PowerVault: ME4 - How to Create a Virtual Disk Group with ME Storage Manager GUI
Summary: This article explains how to create a Virtual Disk Group with MESM GUI for the Dell Storage ME4 Series.
This article applies to
This article does not apply to
This article is not tied to any specific product.
Not all product versions are identified in this article.
Instructions
Table of Contents
Description
The Dell EMC ME4 Series Storage System Administrator’s Guide for the ME4 product gives only certain details on the exact process for creation of a Disk Group (or Virtual Disk Group) when configuring an ME4 storage array. This article provides specific details and screenshots showing the step by step process for creating Virtual Disk Groups, using ME Storage Manager (MESM). This article is not intended to give full information on differences between virtual and linear pools and disk groups. For more details on this please consult the Administrator's Guide. A storage pool type must be chosen before creating pools or disk groups. It is important to know that the only way to change pool types after initial configuration is to factory reset the array.
 This article covers the Disk Group Creation Process for Virtual Pools only and is written from the basis of no experience setting up an ME4 system.
Virtual Pools: One pool per installed RAID controller (Pool A and Pool B) and up to 16 disk groups per pool
Linear Pools: Up to 32 pools per installed RAID controller and one disk group per pool
A disk group is an aggregation of disks of the same type, using a specific RAID level that is incorporated as a component of a pool, for the purpose of storing volume data. Disk groups are used in both virtual and linear storage environments. You can add virtual, linear, and read-cache disk groups to a pool.
All disks in a disk group must be the same type (SSD, enterprise SAS, or midline SAS). A disk group can contain different models of disks, and disks with different capacities and sector formats. If you mix disks with different capacities, the smallest disk determines the logical capacity of all other disks in the disk group, for all RAID levels except ADAPT. For example, the capacity of a disk group composed of one 500 GB disk and one 750 GB disk is equivalent to a disk group composed of two 500 GB disks. To maximize capacity, use disks of similar size. Multiple disk groups can be added to a pool. Volumes are then created after in a pool and spread across all the disk groups. Generally, it is best to create 2 pools (A and B) so that disk groups will be utilized in different pools. The pools are assigned to a controller
 After you create a disk group using one storage type, the system will use that storage type for additional disk groups. To switch to the other storage type, you must first remove all disk groups.
Creating Disk Groups: (Virtual)
 The panel that displays when creating disk groups and pools is dependent upon whether you are operating in a virtual storage environment or a linear storage environment.
New Array Setup Method:
Open the ME Storage Manager (MESM) GUI using one of the controller IP addresses and login. Configure the ME4 array using the basic setup wizard. Once the ME4 has been configured with basic settings from the Welcome Panel, one or more Disk Groups should be configured next.
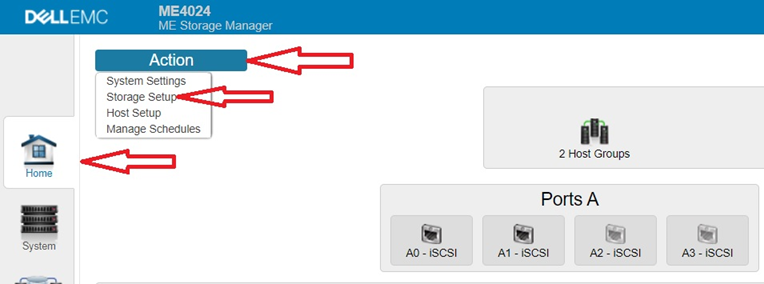
- From the Welcome Screen wizard either click Storage Setup to create a Disk Group or if Welcome Screen is closed click Home and then Action button upper left then Storage Setup.
Selecting the storage type
When you first access the wizard you are prompted to select the type of storage to enable for your environment. Choose either virtual or linear. If you choose virtual, the system enables virtual provisioning options and features. If you choose linear, the system enables linear provisioning options and features. For the purpose of this article we will be selecting Virtual storage.
- Next screen will show The Storage Setup Screen which gives suggestions on what type of Disk group or Pool to use. It is also possible to Expand current Pools by adding one or more disks to a pool for future use utilizing the "Unused Disks" to pick from. The Expand option is only available for ADAPT based Raid Types or Linear Pools and will not work with non-ADAPT Virtual pools. If not enough disks of the same type are available to auto-create disk groups, no further options will appear.
 For a system with no pools provisioned, if you are satisfied with the recommended configuration, click Create Pools to auto-provision the system as displayed in the panel.
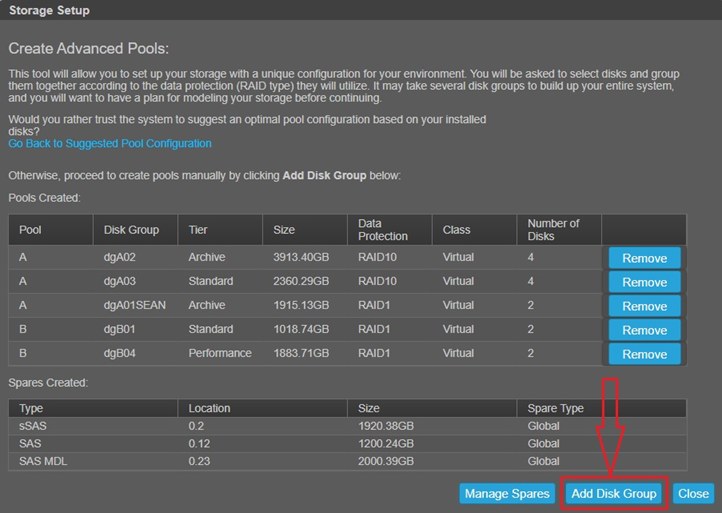
The best choice for the purposes of this article is to choose "Go to Advanced Configuration" at the top of the panel.

- After selecting "Go to Advanced Configuration" the Advanced Configuration screen displays as seen below. Note that Disk Groups that exist can be removed from here, but the primary purpose is to create new disk groups. Click the "Add Disk Group" option listed:
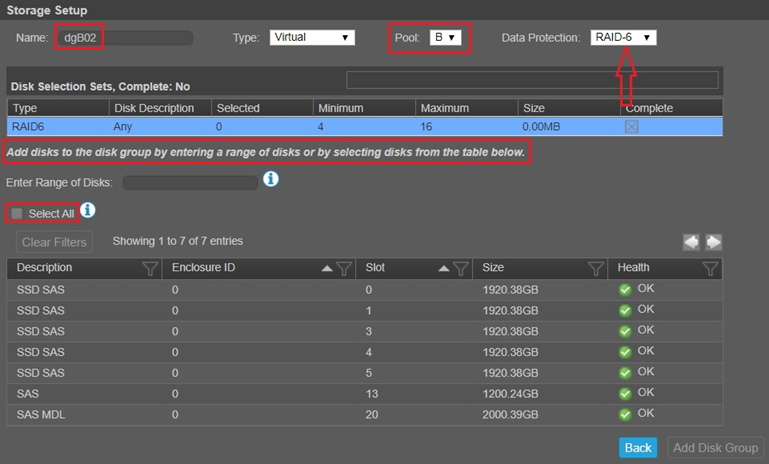
- The next screen shows the screen needed to create a Disk Group. The following items need to be done:
- Type in a disk group name. A disk group name is case sensitive and can have a maximum of 32 bytes. It cannot already exist in the system or include the following: " , < \
- Disk group Type is selected for you and grayed out if a Pool exists otherwise select a type
- Select a Pool if more than one pool exists
- Select a Data Protection type (i.e. Raid 1, 5, 6, 10 and ADAPT) The type of raid that defaults depends on the number of disks available.
- RAID 1 —Requires 2 disks.
- RAID 5 —Requires 3-16 disks.
- RAID 6 —Requires 4-16 disks.
- RAID 10 —Requires 4-16 disks, with a minimum of two RAID-1 subgroups, each having two disks.
- ADAPT —Requires 12-128 disks.
- To select disks there are 3 options:
a. "Enter a Range of Disks" a comma-separated list of disks or range with no spaces added. Example: 1.4-11,2.6-9
b. Select All checkbox. Note: If the available disks are different types, the "select all" checkbox is disabled.
c. Select disks by holding down the Ctrl or Shift keyboard buttons. Ctrl button is used to select individual disks and Shift is used to select a group of consecutive disks. You will be warned if disks selected are not the same type (i.e. SAS vs SSD vs SAS MDL)
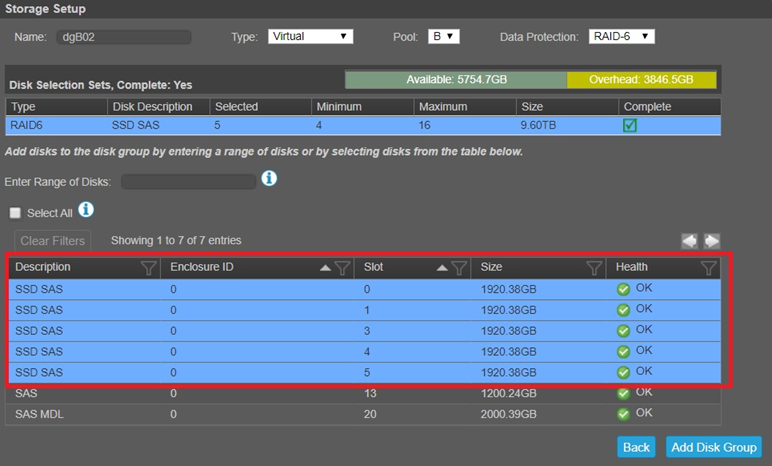
The next screen shows some disks selected. Once the disks are selected the Available space is shown in Green and Overhead for parity and metadata is shown in Yellow along with total number of selected drives and total size. If your disk group contains a mix of 512n and 512e disks, a dialog box displays. Disk groups support a mix of 512n, and 512e disks. However, for consistent and predictable performance, do not mix disks of different rotational speed or sector size types (512n, 512e).

If using the "Enter a Range of Disks" the following screenshot gives an example. Note that the range has a comma-separated list of disks or range with no spaces added. Example: 1.4-11,2.6-9 In the example shown below 0.1 refers to Enclosure 0 column and slot 1 column. If using 0.3 instead it would refer to Enclosure 0, slot 3. A second example: to select disks 3–12 in enclosure 1 and 5–23 in enclosure 2, enter 1.3-12,2.5-23.
It is important to hit the TAB key after entering the range for the disks selected to show up highlighted blue below. To remove disks from the selection, hold down CTRL and click on them individually to deselect.
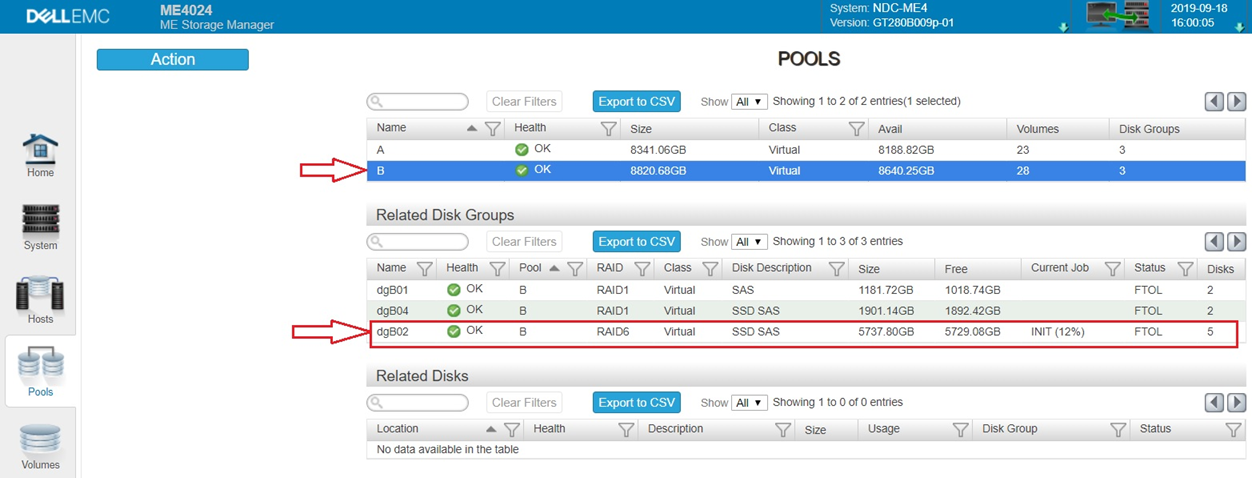
- Select Add Disk Group when done. Next screenshot shows if the task succeeds, the new disk group appears in the Related Disk Groups table in the Pools topic icon when you select its pool.

Select Pools to see the new Disk Group as shown below. Note that it is "INIT" status which is initializing and will take a few minutes depending on the size. FTOL means its Fault Tolerant.
- An alternate method is to use the "Pool" icon. This can be selected and then the "Action button" and Create Disk Group option. This option is only if a pool has been created and one disk group already exists. The Add Disk Group screen will show up immediately.
Creating Disk Groups: (Linear)
The options for Linear disk groups are similar as above but note only Linear or Virtual Disk Groups can exist on an ME4 system at one time. This article is focusing on the Virtual Disk Group creation.
After Disk groups are created within Pools, the following additional steps are needed to get the storage available to Hosts:
- Create one or more Volumes in a pool. The volumes spread across ALL Disk Groups in a pool so the data i/o is spread across various raid levels.
- Add Spare disks Globally to be used by the Disk Groups.
- Create an Initiator and a Host to allow access to one or more volumes
- Create a Mapping between an Initiator and a Host to allow access to a volume
Affected Products
Dell EMC PowerVault ME4012, Dell EMC PowerVault ME4024, Dell EMC PowerVault ME4084Article Properties
Article Number: 000179811
Article Type: How To
Last Modified: 19 Dec 2022
Version: 7
Find answers to your questions from other Dell users
Support Services
Check if your device is covered by Support Services.