NetWorker Virtual Edition: How To Upgrade NetWorker Software and NVE System
Summary: This article goes over the procedure for upgrading the NetWorker Virtual Edition (NVE) appliance.
This article applies to
This article does not apply to
This article is not tied to any specific product.
Not all product versions are identified in this article.
Instructions
Caution: All NetWorker installations and upgrades are not to be performed by NetWorker support. For help with the upgrade or NVE deployment, contact your Dell Site Account Manager or Sales Representative to engage the Dell Professional Services team. If issues are encountered during deployment or upgrade, contact the Dell NetWorker Support Team for assistance.
Note: Whenever a new NVE upgrade package is released, engineering performs upgrades to the current version from the five previous major release branches. When performing NVE upgrades, it is not recommended to upgrade more than five major releases at any given time. Doing so can result in dependency issues observed during the upgrade. If there is a plan to upgrade an NVE across multiple NetWorker releases, it is recommended to stage the upgrade. For example, if a current NVE is 19.5, upgrade to 19.8, then from 19.8 to 19.11, and so forth.
Pre-Upgrade Steps
- Ensure NetWorker compatibility requirements are met in the environment using Dell E-Lab Navigator.
- Download the NetWorker Virtual Edition Upgrade package from the Dell NetWorker Product page- Drivers.
- Ensure that you can log in to the NVE using both the admin and root credentials. Passwords can be changed by running:
sudo /usr/local/avamar/bin/change-passwords
See article NVE: How to change OS passwords
Rootidpassphrase verification:
- If you are upgrading to NetWorker 19.10.x (or later) from a previous release, you are prompted to create a
Rootidpassphrase while performing the upgrade. - For NVEs 19.10.x (and later), you must specify the
Rootidpassphrase during the upgrade. If you do not know theRootidpassphrase, you must reset it before initiating the upgrade. See article NVE: How To Reset SSHRootidPassphrase
Note: The NetWorker 19.12.x (and later) upgrade workflow includes functions to reenable
Rootid passphrase protection.
- Perform a Server Protection backup in NetWorker and collect bootstrap details with:
mminfo -B
- Make note of the upgrade history on the NVE:
avi-cli --verbose localhost --password 'ROOT-PASSWORD' --listhistory

Or:

ls -ltr /data01/avamar/var/avi/server_data/package_data/
- Create a snapshot of the NVE Virtual Machine (VM).
Note: Once an NVE upgrade has been started, it is not possible to rollback. If a failure is preventing the upgrade from completing, the NVE VM can be reverted to the VM snapshot. Logs must be collected before reverting to the snapshot to diagnose the cause of the failure. See the Additional Info section for log collection processes.
- Before copying any files to the NVE, ensure that the NVE has enough space on the / (root) and /data01 partitions by running the following command:
df -Th
- Large .log files can be moved or purged to identify large files:
find / -size +500M -type f
Note: The example shown looks for files larger than 500 MB. The size value can be adjusted, for example +100M, +1G, and so forth.
- Use a Secure Copy Protocol (SCP) agent (for example, WinSCP or FileZilla) to copy logs, or the Linux mv command to move them to a location with more space; optionally, delete logs.
rm -rf /path/to/large/file
- The
/data01partition can be expanded, following article NetWorker Virtual Edition: How to Increasedata01Partition Size
Process
- From a web browser, access the NVE's installation manager:
https://NVE_hostname/avi - Log in with the root credentials.
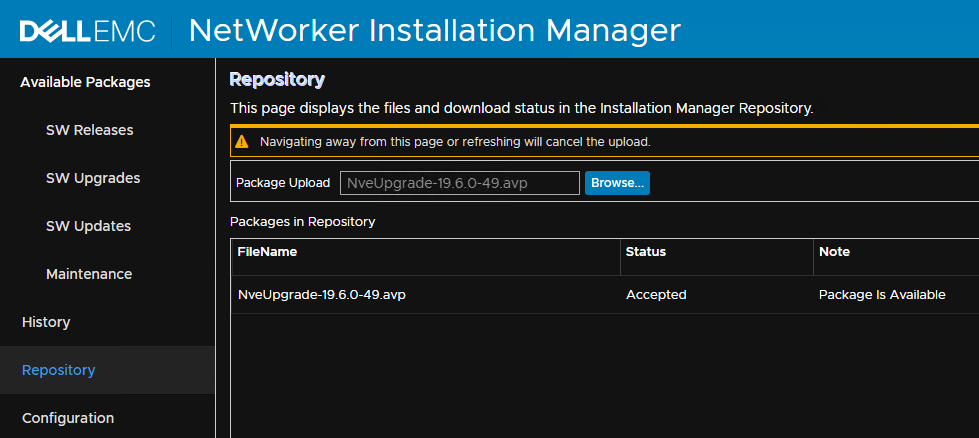
- Go to the Repository tab. Use the Browse button to browse and upload the extracted
.avp package.
Optionally: You can use an SCP agent to copy the downloaded installation package to the NVE's /data01/avamar/repo/packages/ directory.
- On the Software Upgrades tab, you should see the
avpavailable for installation.

Note: If the package is not shown, go to the Repository tab and confirm if the package is shown. The package must report a status of Accepted, and show Package is Available.
- Click Install which initiates the installation process.
- For NetWorker upgrades to 19.10.x or later, enter the
RootidPassphrase. - Enter the admin and root account password in Password Validation tab.
- Click Continue.
The upgrade may take several minutes to run. The time may vary depending on the size or amount of data on the node.
Monitor the installation and respond to any input. The Server is rebooted as part of the workflow. You may be logged out of the Installation Manager. If so log back into the installation manager to continue to monitor progress. Click the Monitor button to get back to the Installation Progress display.
Once the Installation is 100% completed, you may log out (Click the folder upper right next to the refresh icon) and disconnect.
Additional Information
The process for applying the NVE operating system Platform Security Rollups is covered separately. See article How to Install Platform Security Rollup for NetWorker Virtual Edition
See the latest Dell Security Advisories (DSA) under the advisories section of the NetWorker Product pages
For logs and troubleshooting, see article NetWorker Virtual Edition: Upgrade or Install Failure Log Locations and Collection
Affected Products
NetWorkerProducts
NetWorkerArticle Properties
Article Number: 000014823
Article Type: How To
Last Modified: 26 Sept 2025
Version: 14
Find answers to your questions from other Dell users
Support Services
Check if your device is covered by Support Services.