NetWorker (Linux): How to Copy Files to or from a Linux NetWorker Server
Summary: This article is a general article to assist with options for getting files on or off Linux NetWorker servers including the NetWorker Virtual Edition (NVE) appliance. This article contains basic instructions for using Secure Copy Protocol (SCP), NetWorker FLR, NFS, SMB, Mountable ISO files, and VMware PowerCLI. ...
This article applies to
This article does not apply to
This article is not tied to any specific product.
Not all product versions are identified in this article.
Instructions
Sometimes engineering or support may provide or request files that must be transferred to or from NetWorker system. Some options to copy files to or from the NetWorker system may not be possible under certain issues or configurations. This article is to assist with various options for getting files on or off Linux NetWorker servers including the NetWorker Virtual Edition (NVE) appliance.
Secure Copy Protocol (SCP):
Windows 11 and Windows Server 2019 (or later) have command-line SCP functionality. You can SCP a file from a Windows system to a Linux server using:
scp FILE USER@HOSTNAME:/PATH/TO/PUT/FILE


There are also graphical user-interface tools which can be used to SCP files from a Windows system to a Linux system (For example: WinSCP, FileZilla ). These Windows utilities can be installed and use SSH or SCP to connect to the Linux NetWorker server to copy files to/from. This method uses the Linux user permissions of the user account specified when connecting to the Linux system from the SCP agent. This method requires the SSHD service to be running on the NetWorker server.
NOTE: Some Linux systems have "
PermitRootLogin no" set in the /etc/ssh/sshd_config file which fails SSH or SCP connections using the root account with "Access Denied."
NetWorker File Level Recovery (FLR):
If the NetWorker server is not accessible over SSH, you can create a NetWorker client for the NetWorker server, for the save sets specify the files that you need copied off. Perform a backup of the newly created client; then perform an FLR of the files to a different target Linux system where SSH is working. The files can be SCP from the target system or copied from CIFS share to the windows system if configured. This method can also be used to FLR files needed on the NetWorker server by backing them up on a remote Linux client then performing an FLR to the NetWorker server.
NOTE: This method also works using the NetWorker VMware Protection (NVP) vProxy. Instead of creating a client, backup the NetWorker server as a VM and then perform an FLR of the VM save set to the alternate target.
Information about configuring clients and performing FLR can be found in the NetWorker Administration Guide and NetWorker VMware Integration Guides available through Dell Support.
Network File Share (NFS)
Depending on the specific Linux distribution installing NFS may differ. This should only be performed by the end user; this article only provides basic NFS instructions, for additional information see NFS instructions for your Linux OS. NFS allows you to copy files between two Linux systems.
To confirm if NFS is running on the system the files are copied from, run the following command:
rpcinfo -p | grep nfs
The output should show:
100003    3   tcp   2049  nfs
100003    4   tcp   2049  nfs
100227    3   tcp   2049  nfs_acl
If NFS is running, perform the following:
- Create a mountpoint:
sudo mkdir /mnt/nfsshare
- Place the files needed in the
/mnt/nfssharedirectory using the Linuxcpcommand. - Change the owner of the mountpoint:
sudo chown -R nobody: /mnt/nfsshare
- Set permissions on the mountpoint:
sudo chmod -R 777 /mnt/nfsshare
- Modify the
/etc/exportsfile to contain the mountpoints and access information:
Syntax: /mnt/nfsshare NETWORK-IP-ADDRESS/NETMASK(rw,sync,no_all_squash,root_squash)
Example:
[root@linuxserver ~]# cat /etc/exports
/mnt/nfsshare 192.168.0.0/24(rw,sync,no_all_squash,root_squash)
- Export the share:
sudo exportfs -arv
You can display the share with:
sudo exportfs -s
From the NFS client system, confirm that you can reach the NFS server over port 2049:
curl -v NFS-SERVER-NAME:2049
[root@linuxserver ~]# curl -v nsr:2049
* Rebuilt URL to: nsr:2049/
*   Trying 192.168.0.5...
* TCP_NODELAY set
* Connected to centos8 (192.168.0.5) port 2049 (#0)
...
Removed for brevity
Resolve any firewall connection issues on or between the source/target NFS systems if the connection times out or is refused.
- Create a mountpoint on the NFS client system:
sudo mkdir /tmp/mnt
- Mount the NFS mountpoint on the client system:
sudo mount -t nfs NFS-SERVER-IP:/mnt/nfsshare/ /tmp/mnt
- The files from the NFS server should now be seen on the NFS client under the mountpoint:
ls -l /tmp/mnt
[root@linuxserver ~]# ls -l /tmp/mnt
total 0
-rwxrwxrwx 1 nobody nobody 0 May 20 10:13 somefile1
-rwxrwxrwx 1 nobody nobody 0 May 20 10:13 somefile2
- Copy the files to the local system:
cp /tmp/mnt/* .
Common Internet File System (CIFS)/SMB
You can copy the needed files between a Windows system and the Linux NetWorker system if CIFS / SMB is installed on the Linux system. This configuration should only be performed by the end user. This article only provides basic CIFS/SMB instructions; for more detailed instructions see CIFS/SMB instructions for your specific Linux OS. To check if the SMB service is running, you can run:
sudo systemctl status smb
The sudo testparm command shows you how SMB is configured, for example:
[root@linuxserver ~]# testparm
Load smb config files from /etc/samba/smb.conf
Loaded services file OK.
Server role: ROLE_STANDALONE

Press enter to see a dump of your service definitions

# Global parameters
[global]
        dns proxy = No
        map to guest = Bad User
        security = USER
        server string = Samba Server %v
        workgroup = EMCLAB
        idmap config * : backend = tdb


[Share]
        guest ok = Yes
        path = /mnt/samba
        read only = No
The configuration file shown can be modified with sudo vi (this requires restarting the SMB service). The file should contain the domain name as the workgroup, NETBIOS name of the Linux NetWorker server, and configuration parameters for the shared directory:
[root@linuxserver ~]# cat /etc/samba/smb.conf
[global]
workgroup = amer
server string = Samba Server %v
netbios name = linuxserver
security = user
map to guest = bad user
dns proxy = no

[Share]
path = /mnt/samba
browseable = yes
writeable = yes
guest ok = yes
read only = no
If an SMB is running on the NetWorker system, perform the following:
- Create an SMB share:
sudo mkdir /mnt/samba
- Copy the needed files to the
/mnt/samba dirusing the Linuxcpcommand. - Change ownership of the samba directory:
sudo chown -R nobody: /mnt/samba
- Change permissions of the samba dir:
sudo chmod -R 777 /mnt/samba
- Restart the SMB service:
sudo systemctl restart smb
- From a Windows system, add a network location and specify the Linux NetWorker server and shared folder, for example:
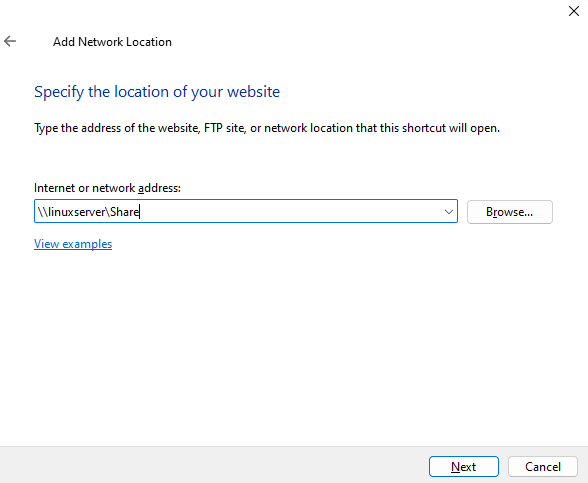
This uses the NETBIOS name and the [Share] name from the Linux server's /etc/samba/smb.conf file.
- Once connected the files from the Linux server can be copied to a Windows system:
Mountable ISO (read-only)
To copy files to the NetWorker server without SSH access, you can create a mountable ISO containing the files needed on the NetWorker server. How the ISO is mounted can vary depending on the server's backend, the following example goes over a VMware VM NetWorker server. This method is "read-only" so it can only be used to copy files to the NetWorker server.
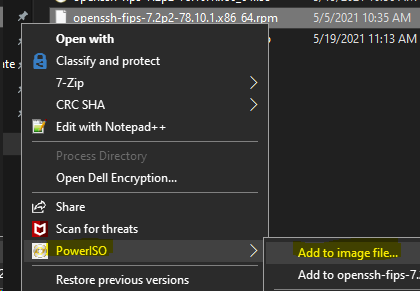
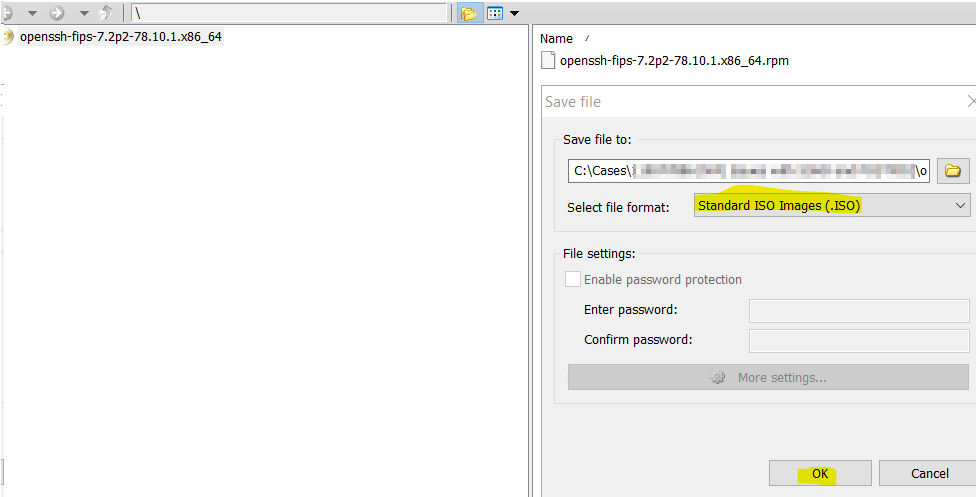
- Collect the files needed for the Linux NetWorker system.
- Software such as PowerISO
can be used to create an ISO file from the file, for example:
- The ISO can be uploaded to a VMware datastore then mounted to the NetWorker server VM's CD drive:
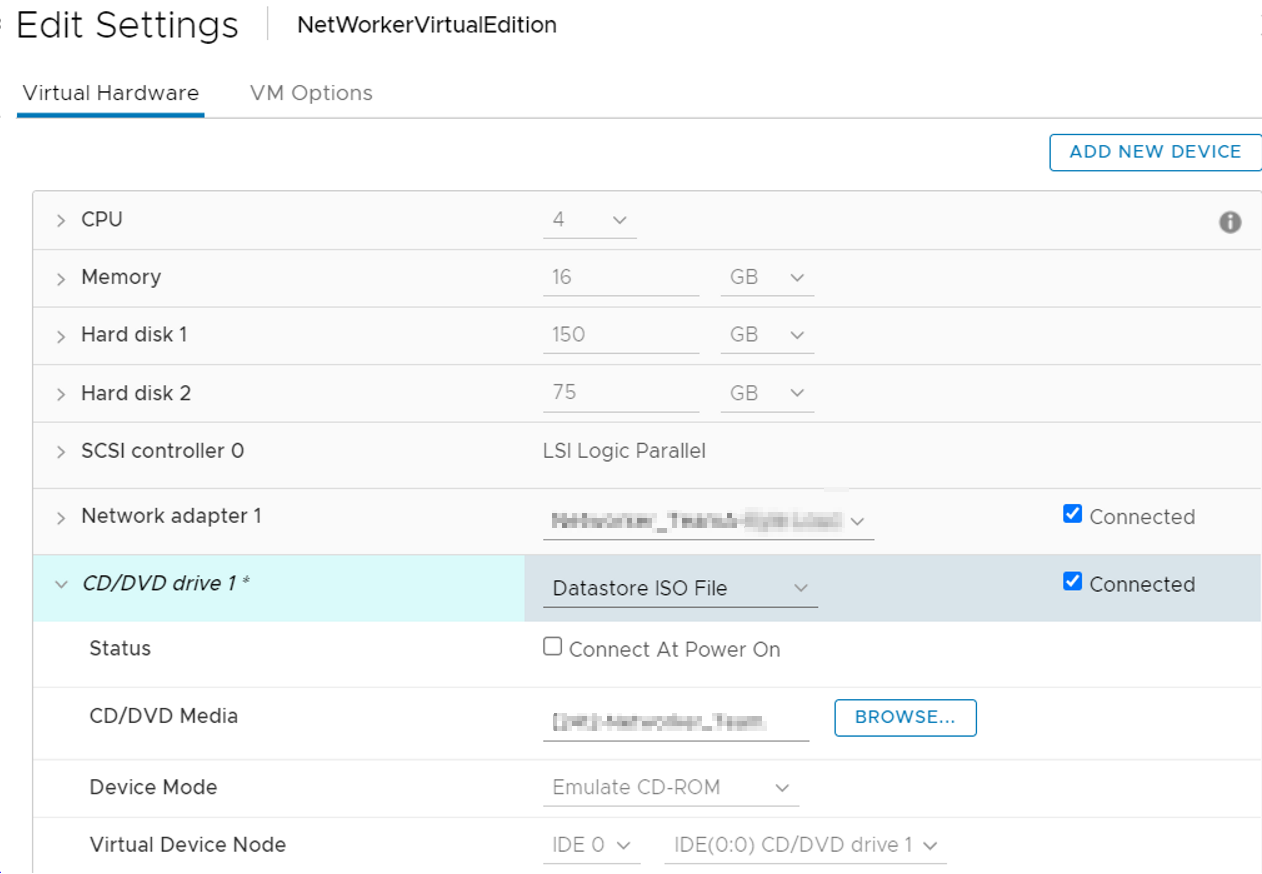
NOTE: Select Datastore ISO File from the drop-down, check the connected box, and Browse to the location the ISO was uploaded.
- Connect to the NVE using a VMware console/web client connection and log in as root.
- Create a temporary mountpoint:
mkdir /tmp/mnt
- Mount the CD drive to the mount point:
mount /dev/cdrom /tmp/mnt
- Copy the files out of the mount point:
cp /mnt/cdrom/* .
VMware PowerCLI
You can also use the PowerCLI cmdlet Copy-VMGuestFile to copy files from a Windows system to a Linux NetWorker system deployed in VMware. This article provides basic instructions for using PowerCLI. See Microsoft documentation on PowerCLI and Copy-VMGuestFile for additional details.
For instructions on installing PowerCLI, see VMware documentation: https://developer.broadcom.com/powercli/installation-guide
If PowerCLI is installed, perform the following.
- Connect to the vCenter server from the Windows server's PowerShell admin prompt:
Connect-VIserver
Example:
PS C:\Users\Administrator> Connect-VIServer

cmdlet Connect-VIServer at command pipeline position 1
Supply values for the following parameters:
Server[0]: vcenter.amer.lan
Server[1]:

Name                           Port  User
----                           ----  ----
vcenter.amer.lan               443   VSPHERE.LOCAL\bkupadmin
After entering the vCenter servers, press enter. You are prompted to specify a vCenter username. In some environments, the
Connect-VIServer command fails with an SSL error; optionally, this can be ignored:
Set-PowerCLIConfiguration -InvalidCertificateAction Ignore -Confirm:$false
- Use the
Copy-VMGuestFilecmdlet to copy the needed file to the Linux NetWorker system:
Syntax:
Copy-VMGuestFile -Source PATH-TO-NEEDED-FILE -Destination PATH-ON-TARGET -VM VM_NAME -LocalToGuest -GuestUser TARGET-USER -GuestPassword TARGET-USER-PASSWORD
Example:
PS C:\Users\Administrator> Copy-VMGuestFile -Source "C:\Share\somefile1" -Destination "/tmp/somefile1" -VM LINUXVM -LocalToGuest -GuestUser root -GuestPassword 'Pa$$w0rd01'
PS C:\Users\Administrator>
NOTE: If you receive an error stating
[Copy-VMGuestFile], NoPermission, the VMware user account used in step 1 does not have permissions to do perform this action. Ensure that the user account is assigned to a role that includes the VirtualMachine.GuestOperations.Query privilege. This can be done through the vSphere Client.
- Confirm that the file was copied to the target VM, for the above example we now see:
[root@linuxserver ~]# ls -l /tmp
total 0
-rw-r--r--. 1 root root 0 May 20 12:32 somefile1
Additional Information
The intention of this article is to assist support and administrators with collecting files from or moving files to a Linux NetWorker system. NetWorker support should not be configuring NFS, SMB, PowerCLI. If assistance is required with these processes, engage your system or VM administrators accordingly.
Affected Products
NetWorkerProducts
NetWorker SeriesArticle Properties
Article Number: 000187100
Article Type: How To
Last Modified: 20 Apr 2026
Version: 10
Find answers to your questions from other Dell users
Support Services
Check if your device is covered by Support Services.