PowerEdge: How to export a Tech Support Report (TSR) from Command Line
Summary: This article provides information about exporting the Tech Support Report (TSR) / SupportAssist Collection, including the Operating System, Application Data, and the RAID controller log. This is done using the integrated Dell Remote Access Controller (iDRAC) command-line interface (CLI) of Dell PowerEdge servers generations 12, 13, and 14. ...
This article applies to
This article does not apply to
This article is not tied to any specific product.
Not all product versions are identified in this article.
Instructions
Table of Contents:
- Advantages
- Exporting a SupportAssist Collection from CLI on iDRAC9
- Exporting a SupportAssist Collection from CLI on iDRAC7 and iDRAC8
- Easier and faster than the graphical interface (iDRAC9)
- iDRAC Credentials are not required.
- Cabling or configuring the iDRAC's Network settings is not required.
- A web browser is not required.
- The collection can be generated even if the iDRAC user interface is not working
Some examples where the TSR using the command-line can be useful:
- The user interface is not accessible or not working properly.
- The iDRAC is cabled and configured, but the customer does not know the credentials.
- The iDRAC is not configured, not cabled and the customer is accessing the server remotely.
Scenarios like this can be circumvented by performing a TSR/SupportAssist Collection by Command-Line.
Exporting a SupportAssist Collection from CLI on iDRAC9
Pre-requisites:
iDRAC Service Modules (iSM) must be installed and running. Below are the links to the manuals with instructions on how to install the iSM:
- Initial installation of iDRAC Service Module through iDRAC Enterprise or Datacenter or iDRAC Express on Microsoft Windows and Linux
- Install iDRAC Service Module on Microsoft Windows operating systems
- Install iDRAC Service Module on VMware ESXi
- Install iDRAC Service Module on Linux operating systems
- Install iDRAC Service Module when System Configuration Lockdown mode is enabled in iDRAC
- Install iDRAC Service Module in container environment
Procedure:
Windows:
- Open a PowerShell console and run the "Invoke-SupportAssistCollection" Cmdlet:

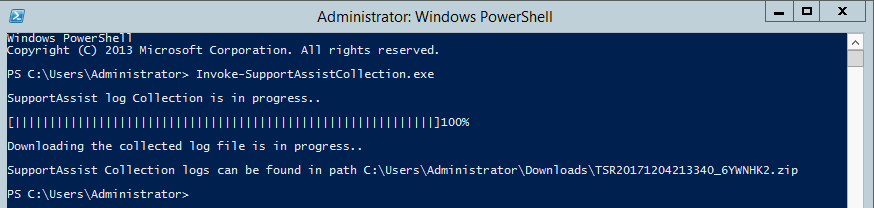
- After completion find the file in the informed directory.
Linux and VMware:
- Go to the directory:
/opt/dell/srvadmin/iSM/bin - Run the command: .
/Invoke-SupportAssistCollection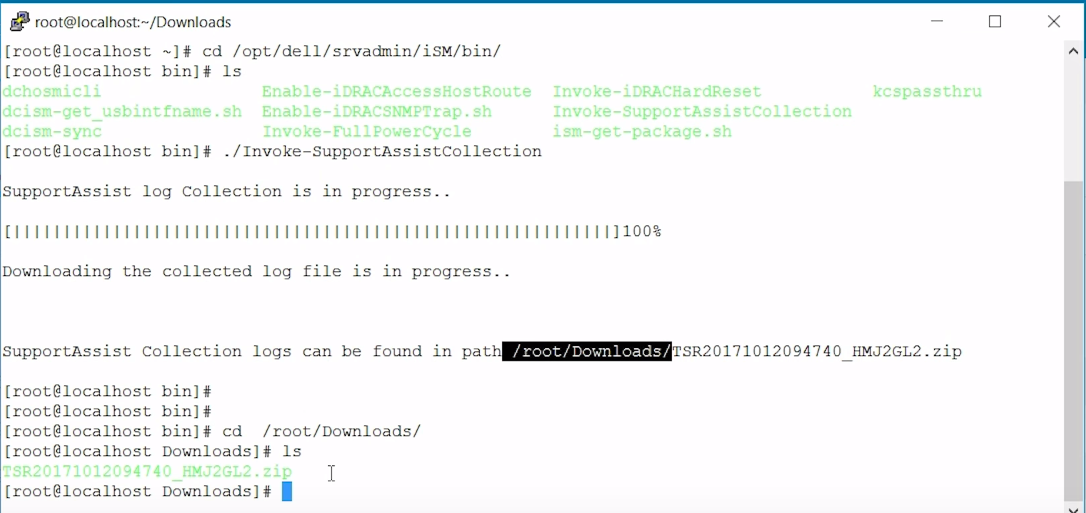
- After completion find the file in the informed directory.
Exporting a SupportAssist Collection from CLI on iDRAC7/8
Pre-requisites:
- Install the latest DRAC Tools available from Drivers & Downloads
Procedure:
Windows and Linux:
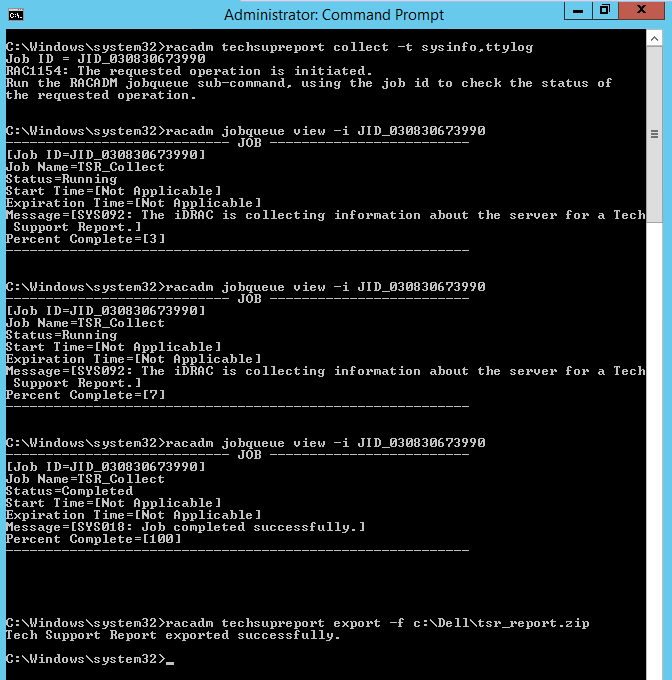
- From Command Prompt(Windows) or Console(Linux) run the following command:
racadm techsupreport collect -t sysinfo,ttylog
- The operation is started, and the Job ID is listed.
Note: More collection options can be found here
- To check the task status use the racadm jobqueue view command:
racadm jobqueue view -i <JID> - Use the following command to export the file to the wanted directory:
racadm techsupreport export -f
Additional Information
PowerEdge: Export a SupportAssist Collection Using iDRAC7 and iDRAC8
How to export Tech Support Report with access to VMware ESXi 8 only
How to Export Tech Support Report via Rocky Linux 9
PowerEdge: How to install ISM on ESXI server to enable TSR collection
PowerEdge: How To Gather TSR with Debug logs using Rocky Linux Based SLI Image
Affected Products
iDRAC7, iDRAC8, iDRAC9, PowerEdge XR2, PowerEdge c6320, PowerEdge c6320p, PowerEdge C6420, PowerEdge C6520, PowerEdge C6525, PowerEdge C6615, PowerEdge C6620, Poweredge FC430, Poweredge FC630, PowerEdge FC640, Poweredge FC830, PowerEdge M630
, PowerEdge M630 (for PE VRTX), PowerEdge M640, PowerEdge M640 (for PE VRTX), PowerEdge M830, PowerEdge M830 (for PE VRTX), PowerEdge MX5016s, PowerEdge MX740C, PowerEdge MX750c, PowerEdge MX760c, PowerEdge MX840C, PowerEdge R230, PowerEdge R240, PowerEdge R250, PowerEdge R260, PowerEdge R330, PowerEdge R340, PowerEdge R350, PowerEdge R360, PowerEdge R430, PowerEdge R440, PowerEdge R450, PowerEdge R530, PowerEdge R530xd, PowerEdge R540, PowerEdge R550, PowerEdge R630, PowerEdge R640, PowerEdge R6415, PowerEdge R650, PowerEdge R650xs, PowerEdge R6515, PowerEdge R6525, PowerEdge R660, PowerEdge R660xs, PowerEdge R6615, PowerEdge R6625, PowerEdge R730, PowerEdge R730xd, PowerEdge R740, PowerEdge R740XD, PowerEdge R740XD2, PowerEdge R7415, PowerEdge R7425, PowerEdge R750, PowerEdge R750XA, PowerEdge R750xs, PowerEdge R7515, PowerEdge R7525, PowerEdge R760, PowerEdge R760XA, PowerEdge R760xd2, PowerEdge R760xs, PowerEdge R7615, PowerEdge R7625, PowerEdge R830, PowerEdge R840, PowerEdge R860, PowerEdge R930, PowerEdge R940, PowerEdge R940xa, PowerEdge R960, PowerEdge T140, PowerEdge T150, PowerEdge T160, PowerEdge T330, PowerEdge T340, PowerEdge T350, PowerEdge T360, PowerEdge T430, PowerEdge T440, PowerEdge T550, PowerEdge T560, PowerEdge T630, PowerEdge T640, PowerEdge XE2420, PowerEdge XE7420, PowerEdge XE7440, PowerEdge XE8545, PowerEdge XE8640, PowerEdge XE9640, PowerEdge XE9680, PowerEdge XR11, PowerEdge XR12, PowerEdge XR4510c, PowerEdge XR4520c, PowerEdge XR5610, PowerEdge XR7620, PowerEdge XR8610t, PowerEdge XR8620t
...
Article Properties
Article Number: 000120100
Article Type: How To
Last Modified: 21 Nov 2025
Version: 9
Find answers to your questions from other Dell users
Support Services
Check if your device is covered by Support Services.