PowerEdge: How to Install the Operating System
Summary: The PowerEdge embedded LifeCycle Controller provides a simplified method for installation of supported Windows Server and Linux server operating systems with the OS Deployment feature. This article explains how to use the iDRAC LifeCycle Controller to install a supported operating system on most Dell PowerEdge servers. Step-by-step instructions and OS installation videos for Windows Server, Ubuntu Server LTS, SUSE Linux Enterprise Server, or Red Hat Enterprise Linux installation with LifeCycle Controller ...
This article applies to
This article does not apply to
This article is not tied to any specific product.
Not all product versions are identified in this article.
Instructions
Table of Contents
NOTE: To download a Microsoft Windows ISO image, details are available in How to Download the Windows Server Media/ISO file?
1. Prerequisites
1.1 PowerEdge supported Operating Systems.
Ensure that the operating system is supported by your PowerEdge server. Compatible and supported operating systems for PowerEdge servers are available in the PowerEdge supported Operating Systems matrix.
1.2 Update the Server.
It is best practice to update the OS Driver Pack for the latest operating system drivers, before installing a new operating system. Download the latest OS Driver Pack from the support site.
- Access the support site, enter the service tag of your system or click Browse all products and select your product.
- Click the DRIVERS and DOWNLOADS tab, type "Dell OS Driver Pack" in the keyword box, and download then upload to the Dell OS Driver Pack to the iDRAC update and rollback section. For more information, see Dell KB article Dell PowerEdge: Update the firmware of Single System Components Remotely Using the iDRAC.
1.3 Installation Source
For installing the operating system, the OS source media has to be available to the server. The installation files can be provided through:
- The optical DVD drive
- USB device
- PXE network boot
- Mounted ISO-file (through iDRAC Virtual Media)
NOTE: An ISO-file can be used as a method for OS deployment. See Using the Virtual Media function on iDRAC6, iDRAC7, iDRAC8, and iDRAC9 for detailed instructions.
1.4 Storage Location
For installing the operating system on a virtual disk, ensure that a Software RAID or PowerEdge RAID controller is installed and at least two (or more, depending on the required RAID level) hard drives are available. In specific scenarios, OS can be installed on SD cards.
1.5 Configuring a virtual array on hard drives
There are two ways to configure an array on the hard drives.
2. Installing the Operating System
The below methods are available for installing an operating system:
- Using LifeCycle Controller for Supported OS
- Windows Server
- Linux-Based Distributions
- Boot directly from the OS Media:
- VMware ESXi distributions
- OS Installation on PowerEdge T20/T30/T40
- Unsupported OS by LifeCycle Controller
- Pxe Boot to PXE server for installation
2.1 Using the LifeCycle Controller
This is the preferred method to install the OS. The LifeCycle Controller simplifies the installation of the Operating System with the "OS Deployment" feature. The drivers are preloaded before the installation process when using this feature. The OS installs seamlessly due to its comprehensive compatibility with all hardware components.
NOTE:
- A wizard is displayed to assist with the initial configuration when accessing the LifeCycle Controller for the first time. If needed, configuration steps are detailed in the manual: Initial Configuration of the Dell Lifecycle Controller (R630 Example)
- If installing Windows Server 2022, additional BIOS configurations must be made. For more information, reference Trusted Platform Module (TPM) Support for Windows Server 2022 Operating System.
Steps to follow:
- Press F10 during boot to enter the Lifecycle Controller (LCC).
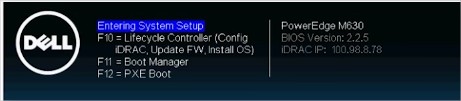
Figure 2: Lifecycle Controller - Select OS Deployment in the left side menu.
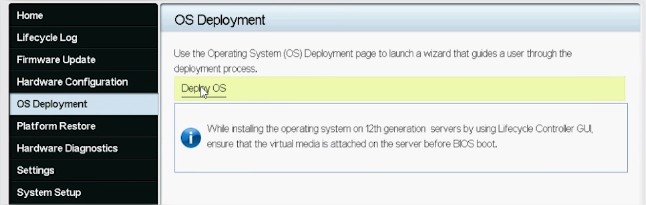
Figure 3: OS Deployment and Deploy OS - Click Deploy OS.
- Select Configure RAID First or Go Directly to OS Deployment depending on if you have a RAID set up already or not.
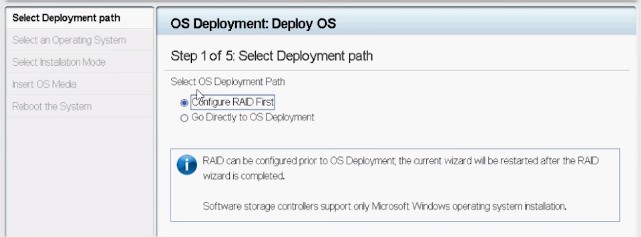
Figure 4: Configuring a deployment path - If applicable, follow the wizard to set up the RAID disk.
- Select the Operating System. The boot mode can be set in BIOS or UEFI. The matching boot mode must be configured properly in the "System Services" settings (F2).
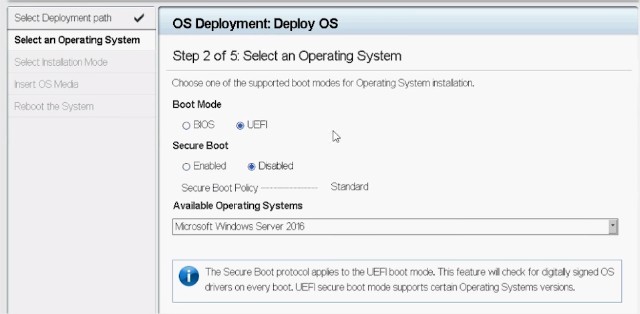
Figure 5: Selecting an operating system - Either select Manual or select Unattended/Automatic install as needed.
- Insert the OS installation media (DVD Drive or Virtual Media of iDRAC).
- Follow the OS installation wizard (If Manual install has been selected).
NOTE: The provided list of Dell-supported operating systems changes based on the driver packs updated on the system. To update drivers, download the latest OS Driver pack that is associated with your server.
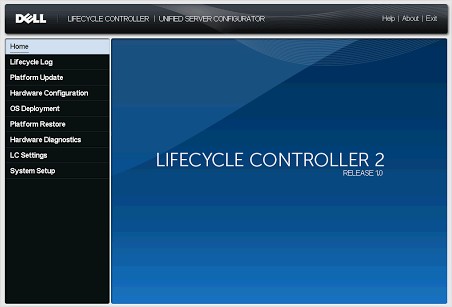
Figure 6: PowerEdge 12G Lifecycle Controller UI
2.2 Booting directly from the Operating System Media
It is possible to boot directly from the OS installation media to install the operating system. Some components of the server may not be recognized as the OS media may not include all the needed drivers. Drivers can be downloaded from the Dell Support site and installed later once the OS is installed.
Note: If installing Windows Server 2022, additional BIOS configurations must be made. For more information, reference Trusted Platform Module (TPM) Support for Windows Server 2022 Operating System.
Steps to follow:
- Insert the OS installation media (DVD Drive, USB, Virtual Media of iDRAC) and boot to it. PowerEdge: How to use the Virtual Media Function on iDRAC6, iDRAC7, iDRAC8, and iDRAC9
- Press F11 during startup to select the boot device.
- Follow the OS installation wizard.
- Once the OS is installed, manually install the missing drivers as needed. (See section 2.3 to mount the OS driver pack)
2.3 How to Mount and Unmount the driver packs using iDRAC9 on a Dell PowerEdge Server
Once the OS is installed, you can mount the OS driver pack to quickly access all the OS drivers if needed:
-
Log in to the server's iDRAC9, go to Configuration > Virtual Media > Mount Drivers
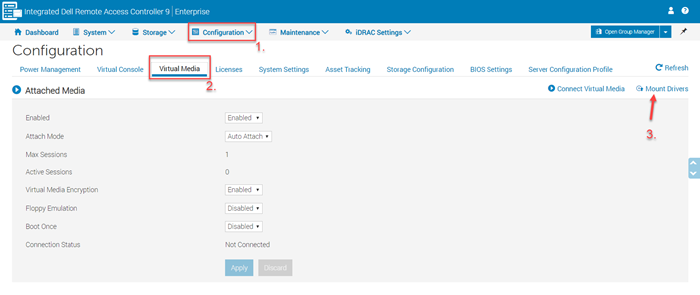
Figure 1: iDRAC9 Virtual Media - Click the Mount Drivers button. For more information about Mounting and Unmounting the driver packs, see How to Mount and Unmount the driver packs using iDRAC9.
Jason to make videos on how to install the OS in UEFI mode for Linux and Windows.
3. Installation Videos
- How to install Window Server OS in UEFI mode (Coming soon)
- How to install and manage Linux OS
- How to install and manage VMware OS
Additional Information
Affected Products
C Series, HS Series, Modular Infrastructure, Rack Servers, Tower Servers, XR Servers, OEM Server Solutions, PowerEdge XR2, PowerEdge C4130, Poweredge C4140, PowerEdge c6320, PowerEdge c6320p, PowerEdge C6420, PowerEdge C6520, PowerEdge C6525
, PowerEdge C6600, PowerEdge C6615, PowerEdge C6620, Poweredge FC430, Poweredge FC630, PowerEdge FC640, Poweredge FC830, PowerEdge FD332, PowerEdge FM120x4 (for PE FX2/FX2s), PowerEdge HS5610, PowerEdge HS5620, PowerEdge M630, PowerEdge M630 (for PE VRTX), PowerEdge M640, PowerEdge M640 (for PE VRTX), PowerEdge M830, PowerEdge M830 (for PE VRTX), PowerEdge MX740C, PowerEdge MX750c, PowerEdge MX760c, PowerEdge MX840C, PowerEdge R230, PowerEdge R240, PowerEdge R250, PowerEdge R260, PowerEdge R330, PowerEdge R340, PowerEdge R350, PowerEdge R360, PowerEdge R430, PowerEdge R440, PowerEdge R450, PowerEdge R530, PowerEdge R530xd, PowerEdge R540, PowerEdge R550, PowerEdge R630, PowerEdge R640, PowerEdge R6415, PowerEdge R650, PowerEdge R650xs, PowerEdge R6515, PowerEdge R6525, PowerEdge R660, PowerEdge R660xs, PowerEdge R6615, PowerEdge R6625, PowerEdge R670, PowerEdge R730, PowerEdge R730xd, PowerEdge R740, PowerEdge R740XD, PowerEdge R740XD2, PowerEdge R7415, PowerEdge R7425, PowerEdge R750, PowerEdge R750XA, PowerEdge R750xs, PowerEdge R7515, PowerEdge R7525, PowerEdge R760, PowerEdge R760XA, PowerEdge R760xd2, PowerEdge R760xs, PowerEdge R7615, PowerEdge R7625, PowerEdge R770, PowerEdge R830, PowerEdge R840, PowerEdge R860, PowerEdge R930, PowerEdge R940, PowerEdge R940xa, PowerEdge R960, PowerEdge T130, PowerEdge T140, PowerEdge T150, PowerEdge T160, PowerEdge T330, PowerEdge T340, PowerEdge T350, PowerEdge T360, PowerEdge T430, PowerEdge T440, PowerEdge T550, PowerEdge T560, PowerEdge T630, PowerEdge T640, PowerEdge XR11, PowerEdge XR12, PowerEdge XR4510c, PowerEdge XR4520c, PowerEdge XR5610, PowerEdge XR7620
...
Article Properties
Article Number: 000130160
Article Type: How To
Last Modified: 02 Dec 2025
Version: 30
Find answers to your questions from other Dell users
Support Services
Check if your device is covered by Support Services.