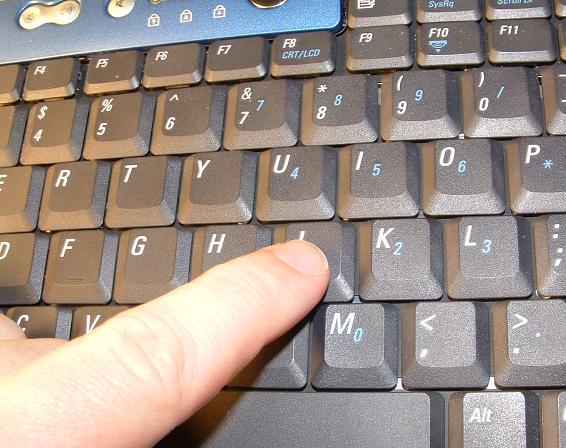
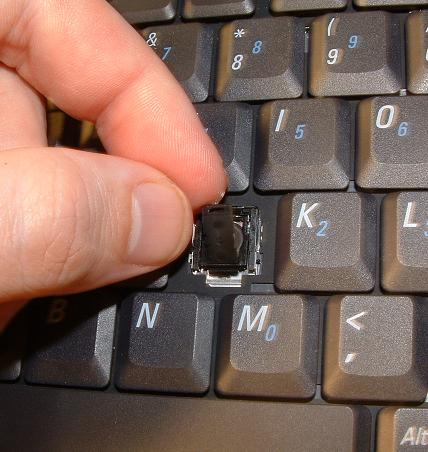
How to Fix a Key That Fell Off Your Dell Laptop Keyboard

Summary: Did a key fall off your Dell laptop keyboard? Follow our simple step-by-step guide to safely snap the keycap back into place.

This article applies to This article does not apply to This article is not tied to any specific product. Not all product versions are identified in this article.

Instructions

Before You Begin

Before you start, take a moment to gather what you need.

What you need:

  • A clean, flat, well-lit surface to work on
  • No tools required in most cases
  • A soft, dry cloth (optional, for cleaning)

Important things to keep in mind:

Caution: Never force a keycap down. Pressing too hard without proper alignment can damage the scissor mechanism underneath and make the issue worse.


Note: This guide covers standard laptop keys. If your spacebar, Enter, or Shift key has fallen off, see the Reattaching Larger Keys section below, as these keys may have an additional stabilizer bar.

Understanding How Your Laptop Keys Work

Knowing what's under your keycap makes the fix much easier.

Most Dell laptop keyboards use a scissor-switch mechanism. This is a small, X-shaped plastic bracket that sits underneath the keycap and on top of a rubber dome. When you press a key, the scissor mechanism compresses the dome to register a keystroke.

Exploded view of key cap, scissor mechanism, and dome of a laptop key

Here's what you'll typically find when a key pops off:

Component What it does
Keycap The top plastic piece you press with your finger
Scissor mechanism (retainer clip) The X-shaped bracket that guides the keycap up and down
Rubber dome The small rubber piece that provides resistance and registers the keystroke


When a key falls off, one of three things has usually happened:

  • The keycap popped off but the scissor mechanism is still intact and attached to the keyboard
  • The scissor mechanism came loose along with the keycap
  • A part of the scissor mechanism is broken or damaged

Identifying which situation you're dealing with will help you choose the right fix.


Step 1: Inspect the Key and Keyboard

Before you reattach anything, take a close look at both the keycap and the area where it fell off.

  1. Place the keycap on a flat surface with the flat side facing up.
  2. Look at the underside of the keycap. You should see small plastic hooks or clips on the inside edges.
  3. Look at the keyboard where the key came from. Check whether the scissor mechanism (the X-shaped bracket) is:
    • Still attached to the keyboard base and intact
    • Loose but not broken
    • Broken or missing pieces
Note: If the keycap is cracked or broken, or if any part of the scissor mechanism or rubber dome is damaged or missing, reseating won't fully resolve the issue.

Step 2: Reattach a Loose Scissor Mechanism (If Needed)

If the scissor mechanism came off along with the keycap or is sitting loose on the keyboard, reattach it first before placing the keycap back on.

  1. Hold the scissor mechanism so that the two arms of the "X" are facing you.
  2. Notice that one side of the bracket has small hooks (these clip onto the keyboard base) and the other side has rounded pegs (these slide into tracks).
  3. Start with the bottom edge of the scissor mechanism. Hook the lower clips under the bottom retainer rail on the keyboard base. You should feel a small click or resistance when it's in place.
  4. Gently press the top edge down and snap it over the top retainer rail.
  5. Gently tug the mechanism to confirm it's secure. It should move slightly up and down but not come off.
Note: The scissor mechanism has a specific orientation, it only fits correctly one way. If it doesn't clip in easily, rotate it and try again.

Clipping the Support Bar Under the Bottom Rail


Step 3: Reseat the Keycap

Once the scissor mechanism is secure on the keyboard, you're ready to put the keycap back on.

  1. Hold the keycap with the printed letter or symbol facing up.
  2. Position the keycap directly over the scissor mechanism. Make sure it's centered and aligned with the other keys around it.
  3. Place one or two fingers flat on top of the keycap.
  4. Press down gently and evenly until you hear or feel the keycap snap into place.
Note: If the keycap doesn't snap in on the first try, try pressing one corner at a time; top first, then bottom. You may need to gently wiggle your finger from side to side as you press down. There are two snap points: one at the top edge and one at the bottom edge of the key.
  1. Once the keycap is snapped in, press it a few times to make sure it feels normal and registers as a keystroke.

Reattaching Larger Keys

Larger keys like the spacebar, Shift, Enter, and Backspace have an extra component called a stabilizer bar (also called a balance bar or wire). This metal or plastic bar keeps the key level when you press it.

Follow these steps to reattach a larger key:

  1. Inspect the key area and locate the stabilizer bar. It should look like a thin metal or plastic wire that runs horizontally across the key slot.
  2. If the stabilizer bar is detached, hook each end of the bar back into the small retaining clips on either side of the key slot. The bar should lie flat and move freely without popping out.
  3. Reattach the scissor mechanism to the keyboard base following the steps in Step 2.
  4. Before placing the keycap, hook the stabilizer bar into the two clips on the underside of the keycap.
  5. Align the keycap over the scissor mechanism and press down evenly until it snaps into place.
  6. Test the key to confirm it feels balanced and level across its full width.
Note: Stabilizer bars can be tricky. If the key feels uneven or wobbles when you press it, the stabilizer bar may not be seated correctly. Remove the keycap gently and check that both ends of the bar are fully clipped in.

Test Your Keyboard

After reseating the key, test it to make sure everything is working correctly.

  1. Open Notepad or any text editor on your Dell laptop.
  2. Press the reattached key several times to confirm it types the correct character.
  3. Press the key at different points (top, bottom, left, right) to confirm it responds evenly.
  4. Check that the key height matches the surrounding keys and doesn't sit higher or lower than the rest.

If the key types correctly and feels normal, you're all set!


Troubleshooting: What If the Key Still Doesn't Work?

If you've reseated the keycap but the key isn't working properly, here are a few things to check:


Issue Possible Cause What to Try
Key doesn't click into place Misaligned scissor mechanism Remove the keycap, check the scissor mechanism orientation, and try again
Key feels mushy or doesn't type Rubber dome is dislodged or missing Check that the rubber dome is centered on the keyboard base
Key sits higher than other keys Scissor mechanism not fully clipped in Press the keycap firmly at each corner
Key wobbles (larger keys only) Stabilizer bar not seated correctly Recheck both ends of the stabilizer bar
Keycap, scissor mechanism, or rubber dome is cracked, broken, or missing Physical damage to one or more components A full keyboard replacement will get you back up and running, see the section below

Can I Buy a Single Replacement Key for My Dell Laptop?

It's a completely understandable question if only one key is damaged, replacing the whole keyboard might seem like more than you need. Here's the good news: Dell offers full keyboard replacements for many laptop models, and in practice, this works out better than replacing a single key.

Here's what's worth knowing:

  • Individual keys and components are not sold separately. Dell replacement keyboards come as a complete unit, which actually works in your favor, you get every key, scissor mechanism, and rubber dome replaced at once, with no mismatched parts.
  • Replacement keyboards are available for many Dell laptop models, though availability can vary depending on your region and the age of your laptop.
  • A full keyboard replacement is a long-term solution. Rather than managing one damaged key today and another down the road, a replacement keyboard restores your entire typing experience in one go.

Tip: Have your Dell laptop's Service Tag or Express Service Code handy when you contact support or browse for parts. Your Service Tag or Express Service Code helps Dell pinpoint the exact keyboard model compatible with your laptop. You can find it on the label on the bottom of your laptop, or by pressing F12 at startup.


Frequently Asked Questions

Q: Can I reattach a laptop key without any tools?
A: Yes, in most cases you can reseat a keycap using just your fingers. No screwdrivers or special tools are needed for standard keys.


Q: What if my keycap is lost or broken?
A: If your keycap is cracked, chipped, or missing entirely, the best solution is a full keyboard replacement. Dell doesn't sell individual keys or components separately, but a complete replacement keyboard means every key is in perfect condition, a great outcome overall. Visit the Dell.com to check availability for your laptop model.


Q: Can I buy just the keycap or scissor mechanism from Dell?
A: Dell replacement parts for laptop keyboards come as a complete keyboard unit rather than individual keys or components. This ensures everything works together perfectly and gives you a fully renewed typing experience. Availability varies by region, so contact Dell Support to find out what's available for your specific model.


Q: Will reseating the key void my warranty?
A: Reseating a keycap is a non-invasive process and does not void your Dell warranty. However, if further disassembly is required, check your warranty terms or contact Dell Support first.


Q: Why do laptop keys fall off?
A: Laptop keys can fall off due to everyday wear and tear, accidentally hitting the key at an angle, or debris getting trapped under the key. This is a common occurrence and doesn't necessarily indicate a defect.


Q: Does this fix work for all Dell laptops?
A: The scissor-switch mechanism is used across most Dell laptop keyboard models, so these steps apply to the most Dell laptops. However, some models may have slightly different clip designs. If you're unsure, contact Dell Support for model-specific guidance.


Q: Can I use this guide for an external Dell keyboard?
A: This guide is specifically for Dell laptop (internal) keyboards. External keyboards may have different mechanisms. Refer to the documentation for your specific external keyboard model.

Affected Products

Chromebook, G Series, Alienware, Dell Laptops, Dell Plus, Dell Pro, Dell Pro Max, Dell Pro Plus, Dell Pro Premium, Inspiron, Latitude, Dell Pro Rugged, Vostro, XPS, Legacy Laptop Models, Mobile Workstations, Dell Pro Max 16 XE MC16250
Article Properties
Article Number: 000133100
Article Type: How To
Last Modified: 08 Jul 2026
Version:  10
Find answers to your questions from other Dell users
Support Services
Check if your device is covered by Support Services.