How to Restore the BIOS or UEFI (System Setup) to Factory Defaults on a Dell Computer
Summary: Learn how to reset the BIOS or UEFI to factory default settings on a Dell laptop. Follow step-by-step instructions for UEFI BIOS utility factory reset, resetting BIOS without display, and restoring BIOS in Windows 10 and Windows 11. ...
This article applies to
This article does not apply to
This article is not tied to any specific product.
Not all product versions are identified in this article.
Instructions
BIOS (Basic Input/Output System) is firmware built into your computer that starts before Windows. It controls how your hardware communicates with your operating system.
When should I reset my BIOS?
Resetting your BIOS can help if:
- Your computer won't start or boot properly
- You're experiencing unusual hardware behavior
- You made changes in BIOS and want to undo them
- A technician suggested resetting BIOS as a troubleshooting step
Important things to know
Before you reset: Resetting your BIOS will undo any custom settings you've made. Some of these include:
- Boot order changes
- Secure Boot settings
- Virtualization settings
- Custom fan or performance settings
- Trusted Platform Module (TPM) settings
Your files are safe: Resetting BIOS doesn't delete your files, photos, or programs. It only changes hardware settings.
Find your BIOS type
Different BIOS types have different methods for loading default settings. Let's identify which one you have so you can follow the right instructions.
To access your BIOS:
- Turn on your computer (or restart it if it's already on).
- When you see the Dell logo, press the F2 key repeatedly.
- Keep pressing F2 until you see "Entering System Setup" or the BIOS screen appears.
Note: If Windows starts instead, restart your computer and try again. Press F2 repeatedly as soon as you turn it on.
Which BIOS interface do you have?
Look at your screen and match it to one of these three types:
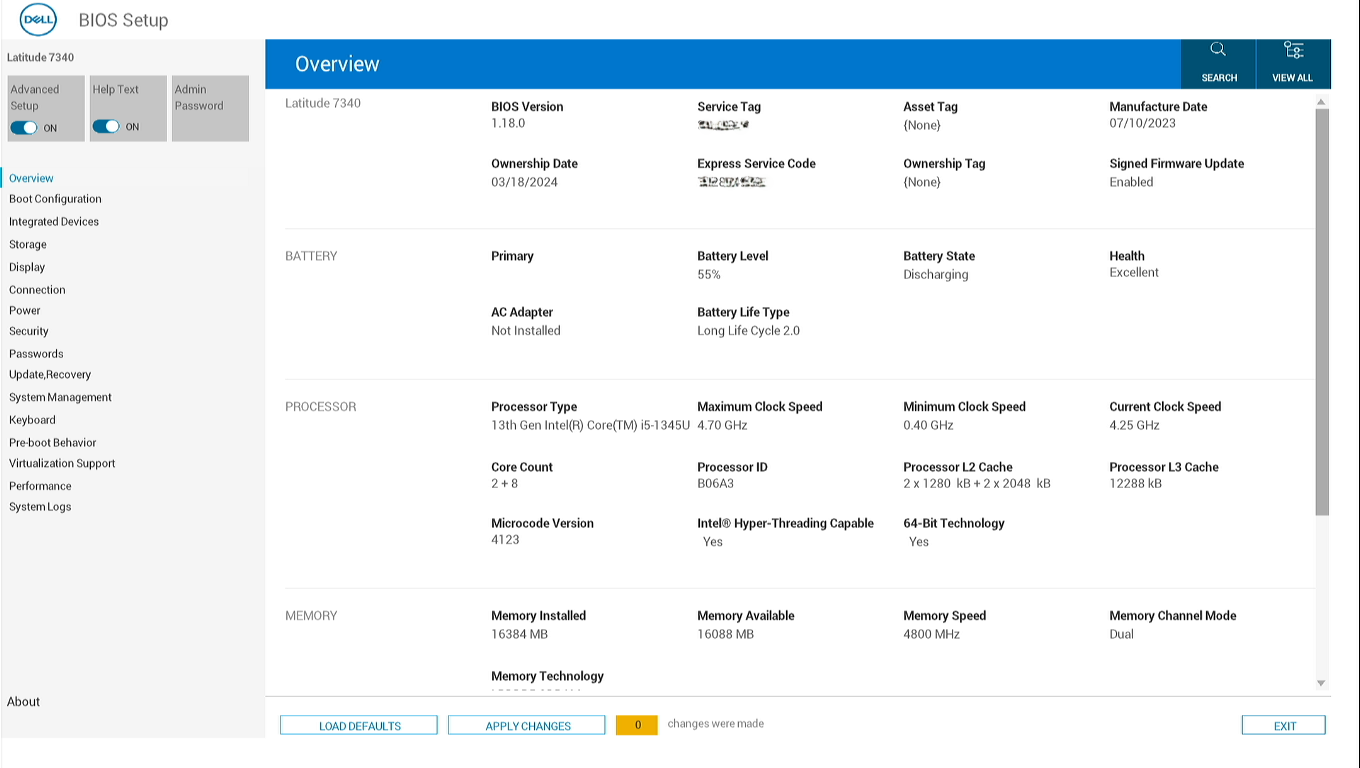
Modern UEFI BIOS
- Uses both mouse and keyboard navigation
- Blue and white interface with clickable menus
- Navigation menu displayed on the left side of the screen
- Large clear toggle switches or checkboxes to turn settings on or off
- Look for "Load Defaults" or "Restore Settings" button at the bottom of the screen
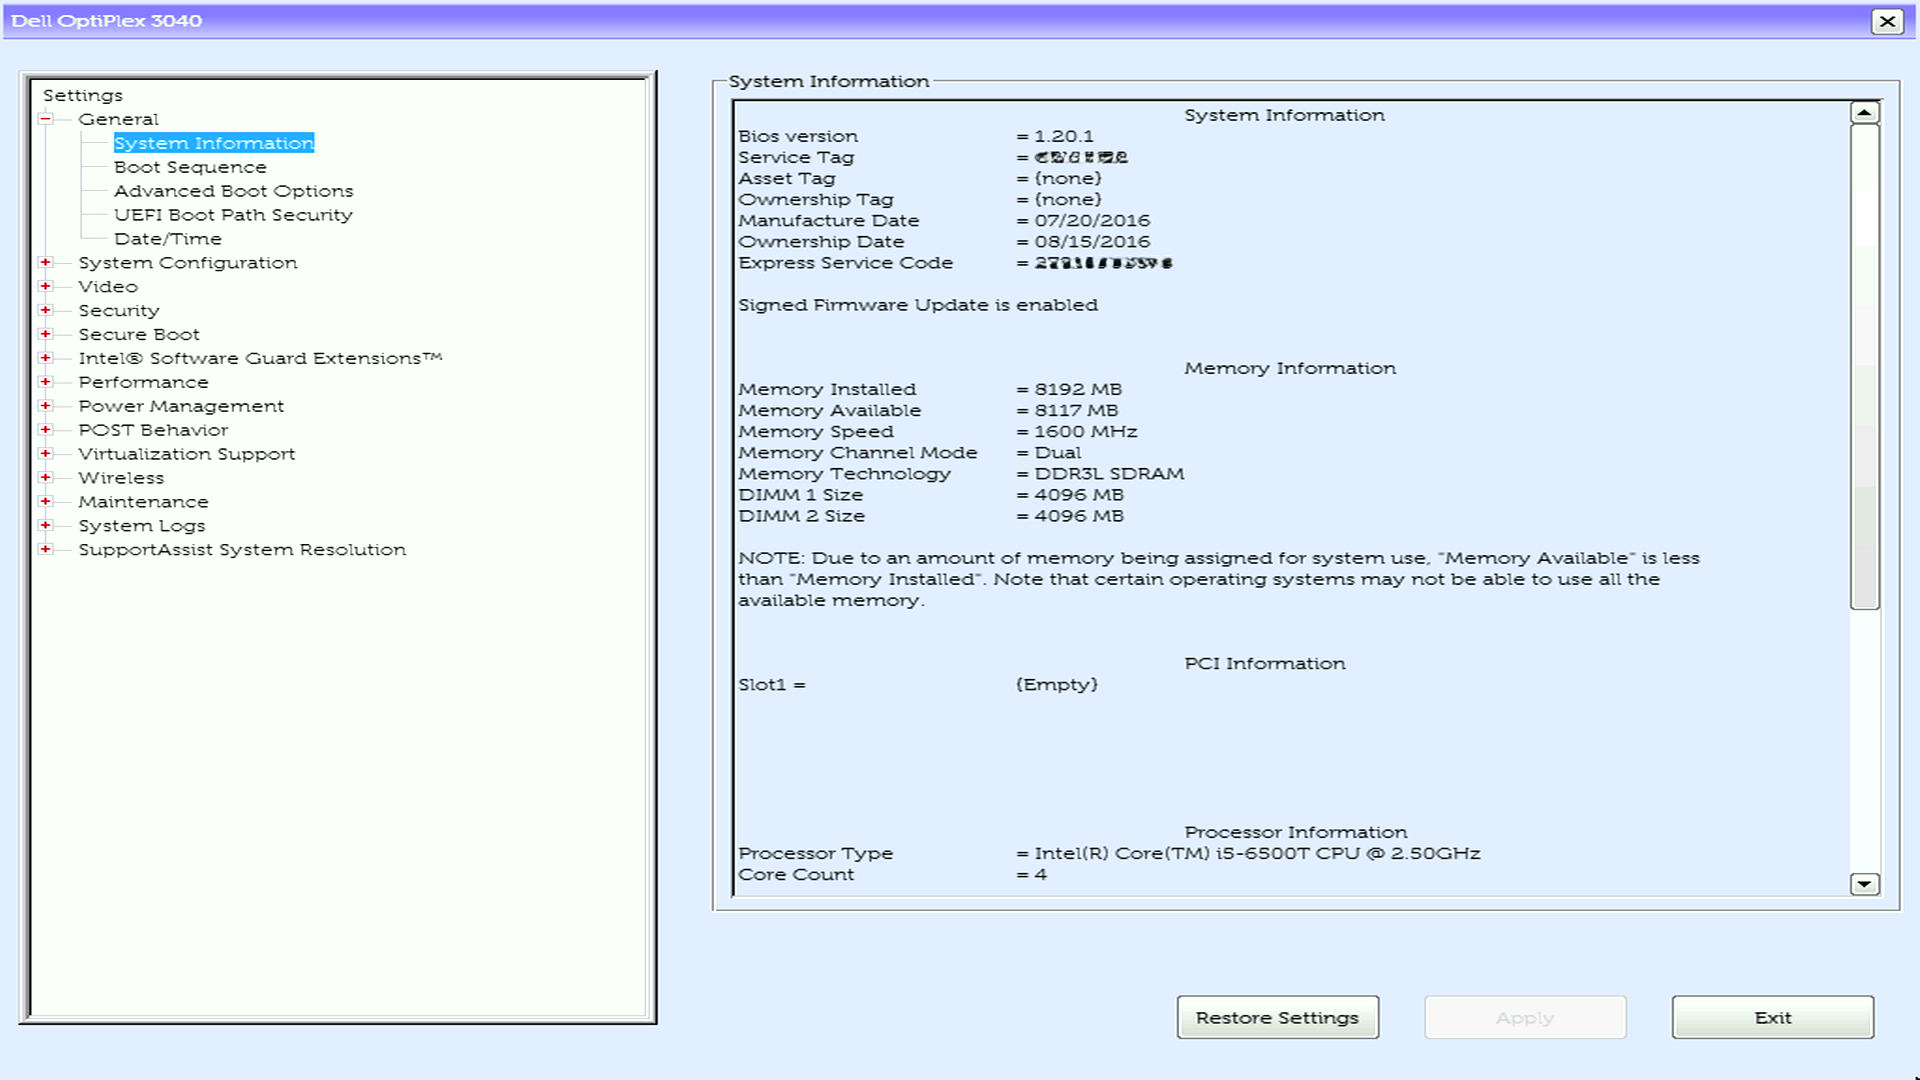
UEFI BIOS with left menu
- Similar to modern UEFI BIOS
- Navigation menu on the left
- Uses both keyboard and mouse navigation
- Uses checkboxes or radio buttons to turn settings on or off
- Look for "Restore Settings" or "Load Defaults" button at the bottom of the screen
Legacy BIOS (Aptio or American Megatrends Inc on older computers)
- No mouse support, only keyboard navigation
- Use arrow keys to move between options
- Press Enter to select or change a setting
- Menu tabs at the top (like "Main," "Advanced," "Security," "Boot," "Exit")
Once you've identified your type, go to the matching section below.
Option 1: Load Defaults on Modern UEFI BIOS
Steps to reset:
- On the BIOS screen, click Load Defaults.
- You can use your mouse to click this button
- A menu will appear. Make sure BIOS Defaults is selected, then click OK.
- You'll see a warning message asking if you're sure. Click OK to confirm.
- Some computers show two warning messages, click OK for both
- Click Exit or look for the option to save and exit.
- Your computer will restart automatically.
What happens next: Your computer will restart with factory default settings. This might take an extra minute, which is normal.
Option 2: Restore Settings in UEFI BIOS
Steps to reset:
- On the BIOS screen, look for a button labeled Restore Settings or Load Defaults.
- Use the arrow keys to navigate if your mouse doesn't work
- Select the option and press Enter.
- Make sure BIOS Defaults is selected (or confirm when asked), then press Enter.
- Navigate to Exit and press Enter.
- Confirm that you want to exit (press Enter on "Yes" if asked).
- Your computer will restart automatically.
What happens next: Your computer will restart with factory default settings.
Option 3: F9 or Restore Defaults in Legacy BIOS
Steps to reset:
- Press F9 to load defaults.
- Alternatively, navigate to the Exit menu on the top.
- Select Restore Defaults or Load Optimal Defaults and press Enter.
- A confirmation message appears. Press Enter on Yes to confirm.
- Press F10 to save and exit (or follow the on-screen instructions to exit).
- Your computer will restart automatically.
What happens next: Your computer will restart with factory default settings.

After resetting: What to do next
Your computer should now start normally
If your computer boots into Windows successfully, you're all set! The BIOS reset has completed.
If you still have problems
Don't worry, there are more steps we can take:
- Check your boot order: Sometimes computers try to boot from the wrong drive.
- Run hardware diagnostics: Dell computers have built-in diagnostic tools. Restart and press F12 at the Dell logo, then select Diagnostics.
- Check for loose connections: If you recently installed new hardware (RAM, hard drive, etc.), make sure everything is properly connected.
- Troubleshoot boot issues: Check out our troubleshooting guide to fix boot issues.
Need to change a specific BIOS setting?
If you need to enable or disable a particular feature (like Secure Boot or Virtualization), you can safely go back into BIOS and make those changes now that you've reset to defaults.
Troubleshooting common issues
Problem: Can't access BIOS (F2 doesn't work)
Try these solutions:
- Restart and try F2 earlier: Start pressing F2 as soon as you press the power button
- Try pressing F12 instead: On some models, F12 opens a one-time boot menu where you can select "BIOS Setup"
- Check for a keyboard connection: If using an external keyboard, try a different USB port
- Try a different keyboard: Some wireless keyboards don't work during startup, use a USB keyboard
Problem: Don't see "Load Defaults" option
Try these solutions:
- Look for similar wording: Different models use different terms. Look for:
- "Restore Settings"
- "Load Setup Defaults"
- Check the Exit menu: On legacy BIOS, this option is usually in the "Exit" tab
- Update your BIOS: Very old BIOS versions might have different options. Check our BIOS update guide.
Problem: Computer won't boot after reset
Try these solutions:
- Enter BIOS again and check boot mode:
- Look for "Boot Mode" or "UEFI/Legacy Boot"
- If it says "UEFI," try changing to "Legacy" (or vice versa)
- Save and exit
- Check Secure Boot:
- Find "Secure Boot" in BIOS
- Try disabling it
- Save and exit
- Restore boot order:
- Find "Boot Sequence" or "Boot Order"
- Make sure your hard drive is listed first
- Save and exit
Still not working? Run the built-in diagnostics by pressing F12 at startup, then try troubleshooting steps to fix boot issues.
Problem: Specific hardware isn't recognized (like new RAM or SSD)
Try these solutions:
- Power cycle your computer:
- Turn off your computer
- Unplug the power cable
- Hold the power button for 15 seconds
- Plug back in and start normally
- Check hardware connections:
- Turn off and unplug your computer
- Open the case and reseat the hardware (remove and reinstall)
- Make sure everything clicks into place
- Check BIOS settings for the hardware:
- Some hardware needs specific BIOS settings enabled
- Look for "SATA Operation" (for drives) or "Advanced" menu
Model-specific information
Alienware and Dell G Series gaming laptops
Special considerations:
- Gaming laptops often have performance profiles in BIOS, resetting will return these to balanced mode
- If using external graphics dock (Alienware Graphics Amplifier), you may need to re-enable this in BIOS after reset
- RGB lighting settings are controlled by Alienware Command Center software, not BIOS
All systems
Special considerations:
- Newer models use modern UEFI
- Thunderbolt settings will reset; you may need to re-enable if using Thunderbolt devices
- After reset, Windows Hello might need to be set up again
- TPM (Trusted Platform Module) settings remain unchanged for security
- BitLocker users: Your encryption keys are safe, but confirm TPM is still enabled
- If managed by IT department: Contact your IT team before resetting BIOS
- Business features on OptiPlex, Dell Pro, or Dell Pro Max like Computrace remain active after reset
Need help with your specific model? Enter your Service Tag on Dell Product Manuals for model-specific documentation.
Frequently asked questions
Q: Will resetting BIOS delete my files?
A: No. Resetting BIOS only changes hardware settings. Your files, programs, and Windows installation remain untouched.
Q: How long does the reset take?
A: The actual reset is instant. Your computer might take an extra 30-60 seconds to restart afterward, which is normal.
Q: Do I need to update Windows after resetting BIOS?
A: No. Windows doesn't need to be updated or reinstalled after a BIOS reset.
Q: Can I undo a BIOS reset?
A: You can't automatically undo it, but you can manually change settings back to what they were. Make sure to note down any custom settings before resetting.
Q: Will this fix a virus or malware problem?
A: No. BIOS reset doesn't remove viruses or malware. For malware issues, run a full antivirus scan or check out our guide to remove malware or viruses.
Q: My computer is asking for a BIOS password. What do I do?
A: If you don't know the BIOS password, try some steps to remove or recover BIOS passwords.
Q: Is it safe to reset BIOS multiple times?
A: Yes, resetting BIOS multiple times won't harm your computer. However, if you need to reset often, there might be an underlying issue worth investigating.
Affected Products
Alienware, Dell All-in-One, Dell Pro Max Micro, Dell Pro Max Slim, Dell Pro Max Tower, Dell Pro Micro, Dell Pro Slim, Dell Pro Tower, Dell Slim, Dell Tower, Inspiron, OptiPlex, Vostro, XPS, G Series, G Series, Alienware, Dell Plus, Dell Pro
, Dell Pro Max, Dell Pro Plus, Dell Pro Premium, Inspiron, Latitude, Dell Pro Rugged, Vostro, XPS, Fixed Workstations, Mobile Workstations, Dell Pro Max Micro XE FCM2250
...
Article Properties
Article Number: 000125291
Article Type: How To
Last Modified: 02 Dec 2025
Version: 20
Find answers to your questions from other Dell users
Support Services
Check if your device is covered by Support Services.