Avamar: Linux VM backups may have LVM metadata inconsistency if they are deployed from a template
Summary: Problem: Avamar - Linux VM backups may have LVM metadata inconsistency if they are deployed from a template.
This article applies to
This article does not apply to
This article is not tied to any specific product.
Not all product versions are identified in this article.
Symptoms
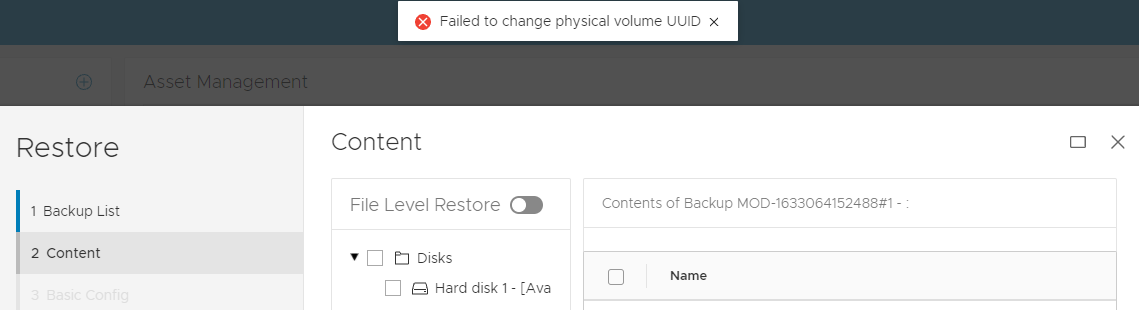
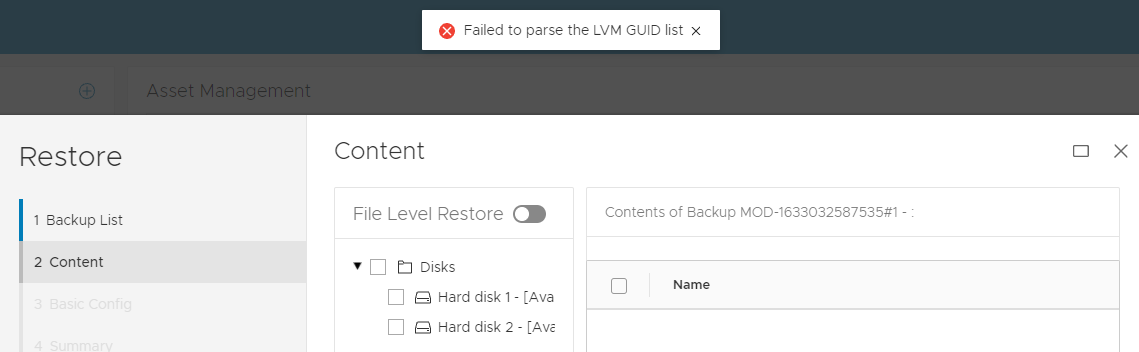
During Restore the following symptoms are seen:
-
FLR operation failure with LVM issue:
OR
2 VM -
Image restored jobs are successful in Avamar UI, the Virtual Machine (VM) may have bootup issuing due to an LVM problem.
Example boot issue 1:
In this Red Hat example below, the operating system boots into an emergency dracut shell:
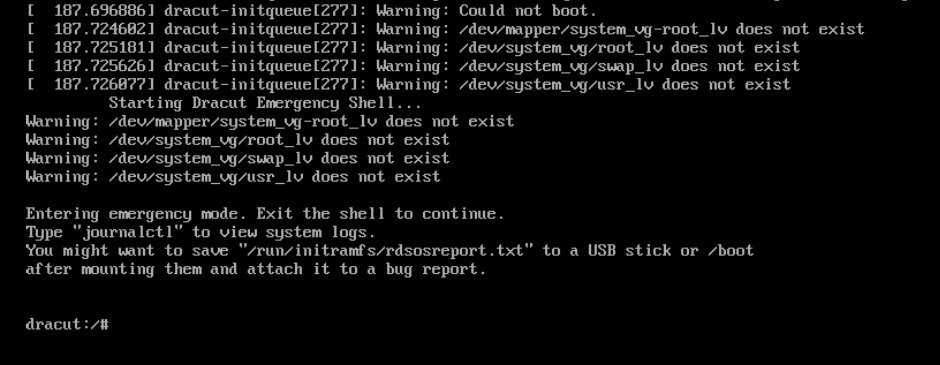
(In this example) from dracut shell the following LVM command repairs LVM state. The output shows that the problem was that one of the lvm disks (sdb) was incorrectly removed from LVM.
dracut:/# lvm pvscan --config 'global{locking_type=1}'
Now the recovered virtual machine can boot.Example boot issue 2:
In Debian example the operating system boots into an emergency busy box shell:
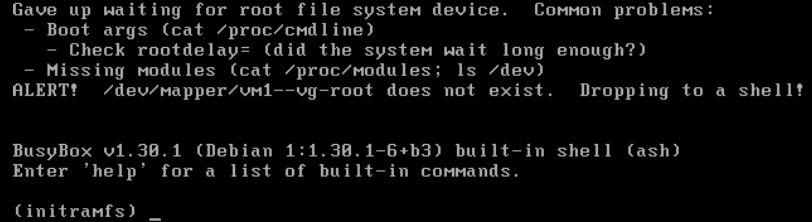
(In this example) from busy box shell the following
lvmcommand restore LVM volume group state from previous configuration:(initramfs) lvm vgcfgrestore vm1-vg --config 'global{locking_type=1}'Note:vm1-vgis the volume group name in this example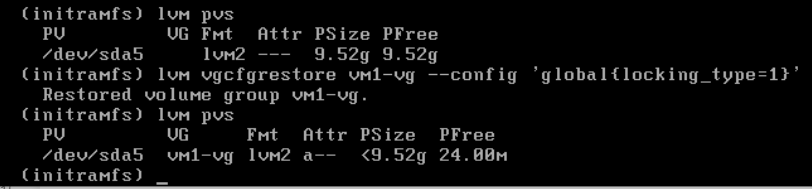
Now the recovered virtual machine can boot.
Other symptoms:
The production Virtual Machines (VMs) can reboot successfully. The problem only affects backup copies of Linux VMs that use LVM and were deployed from the same template.
Windows and Linux virtual machines that do NOT use LVM configurations do NOT exhibit the FLR or boot problems with the backup copies.
Cause
LVM Metadata Background:
- Linux VMs configured with LVM are cloned or deployed from the same template. The resulting new virtual machines have identical LVM Unique Identifiers (UUIDs).
- Any changes made to LVM disks (for example, adding a virtual disk to LVM) necessitate an update to the LVM metadata information. LVM tracks these updates using a field called revision sequence numbers (vg_seqno). This number is incremented whenever a change is made.
Hot add Backup Issue:
During Avamar backup, if the following conditions are met:
- Both the source and the cloned VMs are backed up simultaneously using hot add (the default transport method).
- Both VMs are hot added using the same Avamar proxy.
- The LVM revisions differ between the VMs being hot added.
The Avamar proxy's Linux kernel incorrectly assumes that the two VMs' disks are in the same LVM volume group, updating the LVM metadata automatically. If this LVM update occurs, the LVM metadata is inconsistent in the backup copy.
Note: At the end of backup operations, when the virtual disk is hot-removed from the proxy, LVM updates are discarded. This ensures that the production virtual machine disk maintains consistent LVM metadata.
Restore Issue:
During Image the VM may display "Missing LVM physical extents" or "Transaction ID mismatches" due to incorrect LVM metadata updated during the hot add backup. This discrepancy arises from the aforementioned update.
Recovery LVM tools such as vgcfgrestore, vgextend –restoremissing, and vgchange -ay –activationmodepartial may be required to allow complete bootup or to repair the backup copy to correct the LVM state.
Resolution
This issue is resolved in Avamar proxy hotfixes:
Avamar 19.4 333146.
Avamar 19.3 333148.
Avamar 19.2 333149.
Older Avamar version: See notes below.
These hotfixes reconfigure the LVM setting on Avamar proxy to prevent LVM metadata updates during hot add operations.
BEFORE hotfix
194proxy:~ # lvm config | grep filter
        filter="a/.*/"
AFTER hotfix
194proxy:~ # lvm config | grep filter
        filter=["r|/dev/s.*|","r|/dev/disk.*|","a/.*/"]
For any of the clients that are affected we must force a Change Block Tracking (CBT) L0 backup. This ensures that the correct LVM metadata is captured in new backups.
To aid in client detection, Avamar engineering developed a new script. This script scans Linux backups for LVM inconsistencies and automatically resets cbt for the next job if any are found.
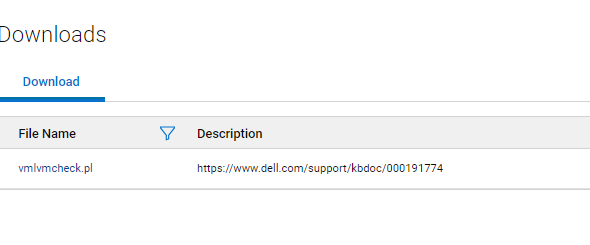
vmlvmcheck.pl
- This script must be installed on the Avamar server.
- The script must be run as the root user.
- This script scans the latest backup of all Linux Virtual machine clients and checks LVM consistency.
- This script may require a long duration (hours) if scanning many virtual machines. By default if the number of scanned VM exceeds 50, then the script runs in background/daemon mode.
Script Logic:
The script locates LVM logical volumes in .vmdk backups and verifies the following conditions:
- Ensures that all physical volumes are present in the backup
- Validates that all physical volumes are associated with an LVM volume group
- All physical volumes for the same volume group have identical sequence numbers.
False positives:
- If some of the virtual disks for a discovered volume group were NOT included it backup this tool flag backup. The root cause is not related to the hot add issue described above. For this case, ensure that Avamar is backing up all virtual disks.
- If any of the virtual disks contain an LVM partition that is NOT fully initialized then the tool identifies backup as bad. However in this scenario the operating system would NOT have any boot issue.
Download instructions:
-
Download vmlvmcheck.pl from the central.dell.com website. For more information about central see KB Avamar: How to find and download Avamar scripts and tools from the Dell Central Avamar page.
-
Transfer vmlvmchck.pl to the `/root` directory on the Avamar server using a tool like WinSCP.
Example 1 (read-only function) Scans the latest backup of all linux vm clients.
root@ave194:~/vmlvmcheck/#: perl vmlvmcheck.pl
11:37:13 2021-10-06 : vmlvmcheck.pl version 19.04 @ave194
11:37:14 14 VMs populated. Processing backups for these...
<list of vms>

“===== 3 Vm(s) with potential LVM inconsistency  in backup ===
vm1,vm2,vm3
11:40:08 COMPLETED. Statistics on  ave194 (vmvlmcheck ver 19.04) ---  (after 2 minutes, 55 seconds)
        11      Activities examined
        11      Backups to DD
        30      Files Examined
        12.500  Run Sec per VM
        2.917   Run Time Minutes
        14      VMs Enabled
        14      VMs Total
        3       VMs With Inconsistent backups
        21.43 %         VMs With Inconsistent backups %
OR When the total scanned vm count exceeds 50, the script runs automatically run in the background instead:
root@ave194:/home/admin/#: perl vmlvmcheck.pl
10:55:34 2021-11-17 : vmlvmcheck.pl version 19.15 @ave194
10:55:35 55 VMs populated. Processing backups for these...
Output is now going to /usr/local/avamar/var/log/vmvlmcheck.log .
PID# 3563 is now running vmlvmcheck as a background process.
To terminate daemon process, enter:
     kill  3563
Please run:  tail -f /usr/local/avamar/var/log/vmvlmcheck.log
Example 2 (read-only function) Scan the latest backup of a single client using
--vm <vm name>flagroot@ave194:/home/admin/#: perl vmlvmcheck.pl --vm cloud2116-clone1 18:13:57 2021-10-05 : vmlvmcheck.pl version 19.04 @ave194 18:13:57 1 VMs populated. Processing backups for these... INFO:============ cloud2116-clone1 /vc6-avamar.gslabs.lab.emc.com/ContainerClients: 1 Backups WARNING: pvs Did not see a LVM on /dev/loop1 ERROR: Expected LVM member appears damaged:VMFiles/2/virtdisk-flat.vmdk. INFO: No partitions found in VMFiles/2/virtdisk-flat.vmdk. VM cskpcloud2116-clone1 has 1 LVMs inside 2 vmdks. ERROR: Bad backup: labelnum=2 2 Snapshots to be deleted ...Option DELETE_SNAPSHOTS=0. 18:14:09 COMPLETED. Statistics on ave194 (vmvlmcheck ver 19.04) --- 1 Activities examined 1 Backups to DD 2 Files Examined 12.000 Run Sec per VM 0.200 Run Time Minutes 1 VMs Enabled 1 VMs TotalExample 3 (writable function) Same as Examples 1 and 2 but this time the
--DELETE_SNAPSHOTSoption is addedroot@ave194:~/vmlvmcheck/#: perl vmlvmcheck.pl --vm cloud2116-clone1 --DELETE_SNAPSHOTS 14:13:35 2021-10-06 : vmlvmcheck.pl version 19.04 @ave194 14:13:36 1 VMs populated. Processing backups for these... INFO:============ cloud2116-clone1 /vc6-avamar.gslabs.lab.emc.com/ContainerClients: 1 Backups WARNING: pvs Did not see a LVM on /dev/loop1 ERROR: Expected LVM member appears damaged:VMFiles/2/virtdisk-flat.vmdk. INFO: No partitions found in VMFiles/2/virtdisk-flat.vmdk. VM cskpcloud2116-clone1 has 1 LVMs inside 2 vmdks. ERROR: Bad backup: labelnum=2 2 Snapshots to be deleted ...Option DELETE_SNAPSHOTS=1. 14:13:49 COMPLETED. Statistics on ave194 (vmvlmcheck ver 19.04) --- 1 Activities examined 1 Backups to DD 2 Files Examined 14.000 Run Sec per VM 0.233 Run Time Minutes 1 VMs Enabled 1 VMs Total
NOTE about the "DELETE_SNAPSHOTS" option:
- This option updates the Avamar database's snapshot table only. This update will cause the next backup to automatically switch to the CBT Level 0.
- The identified backups are NOT removed and this operation does NOT prevent restore.
Additional Information
Manual LVM setting for older or unpatched Avamar proxies
-
As the proxy root backup the lvm.conf file
194proxyga:~ # cp /etc/lvm/lvm.conf /etc/lvm/lvm.conf-`date +%s
-
Edit the /etc/lvm/lvm.conf, look for the existing "filter" line and change to the following.
BEFORE
filter = [ "a/.*/" ]
AFTER
filter = ["r|/dev/s.*|","r|/dev/disk.*|","a/.*/"]
-
Verify that the new filter setting is set by running this command
194proxy:~ # lvm config | grep filter
        filter=["r|/dev/s.*|","r|/dev/disk.*|","a/.*/"]
Affected Products
AvamarProducts
Avamar Client for VMwareArticle Properties
Article Number: 000191774
Article Type: Solution
Last Modified: 11 Jun 2024
Version: 13
Find answers to your questions from other Dell users
Support Services
Check if your device is covered by Support Services.