How To Update Secure Boot Active Database from BIOS
Summary: Learn the steps to use the Secure Boot Default Database (DB) in the BIOS to overwrite the Active DB used to boot the operating system with Secure Boot.
This article applies to
This article does not apply to
This article is not tied to any specific product.
Not all product versions are identified in this article.
Instructions
Affected Platforms:
- Latitude
- OptiPlex
- Inspiron
- Vostro
- XPS
- Precision Workstations
- Dell Pro
- Dell Pro Plus
Note: All Platforms that have shipped since 2012.
Table of Contents:
Warning: This could result in a no-boot situation if you are not familiar with Secure Boot. Secure Boot Active DB should be left to Windows Update to update. This scenario is for those users that are blocking Windows Update and understand Secure Boot requirements.
Note: You should disable BitLocker before performing these steps.
BIOS Type 1
Note: Advanced Setup (upper left) must be turned on, to see some menus. This option may not be available in some lines of computers.
Perform the following steps:
- Press F2 to enter the BIOS
- Select Boot Configuration
- Turn ON Enable Custom Mode (Under Expert Key Management)
- Click Reset All Keys
- Click Apply button
- Click Exit button (click OK to save if prompted)
- On the next boot, press F2 to enter BIOS
- Select Boot Configuration
- Turn OFF Enable Custom Mode (Under Expert Key Management)
- Click Apply button
- Click Exit button (click OK to save if prompted)
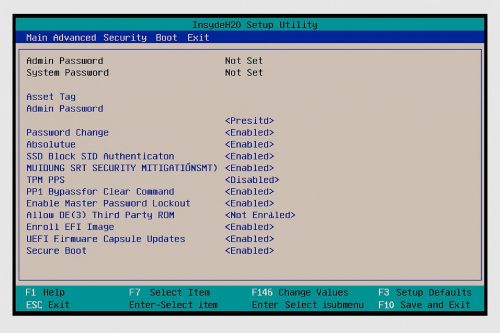
BIOS Type 2

Perform the following steps:
- Press F2 to enter the BIOS
- Select Secure Boot
- Select Expert Key Management
- Check that the checkbox titled Enable Custom Mode
- Click the Reset All Key button
- Click Apply button
- Click Exit button (click OK to save if prompted)
- On the next boot, press F2 to enter BIOS
- Select Secure Boot
- Select Expert Key Management
- Clear the checkbox titled Enable Custom Mode
- Click Apply button
- Click Exit button (click OK to save if prompted)
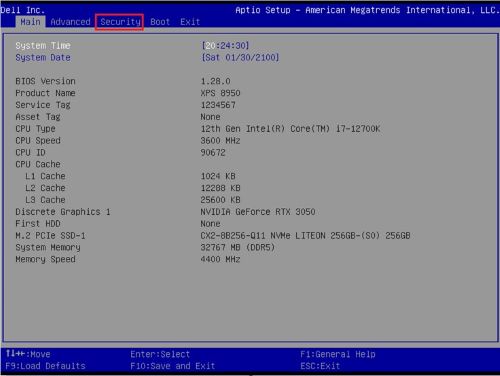
BIOS Type 3
Perform the following steps:
- Press F2 to enter the BIOS
- Select Security tab along top
- Select Secure Boot
- Select Expert Key Management
- Select Customer Mode
- Select Enabled
- Select Reset All Keys
- Select Yes
- Select Exit along top
- Select Exit Saving Changes
- Select Yes
- On the next boot, press F2 to enter BIOS
- Select Security tab along top
- Select Secure Boot
- Select Expert Key Management
- Select Customer Mode
- Select Disabled
- Select Exit along top
- Select Exit Saving Changes
- Select Yes
BIOS Type 4
Perform the following steps:
- Press F2 to enter the BIOS
- Select Security tab along top
- Select Secure Boot
- Under Expert Key Management, select Customer Mode
- Select Enabled
- Select Reset All Keys
- Select Yes
- Select Exit along top
- Select Exit Saving Changes
- Select Yes
- On the next boot, press F2 to enter BIOS
- Select Security tab along top
- Select Secure Boot
- Under Expert Key Management, select Customer Mode
- Select Disabled
- Select Exit along top
- Select Exit Saving Changes
- Select Yes
BIOS Type 5
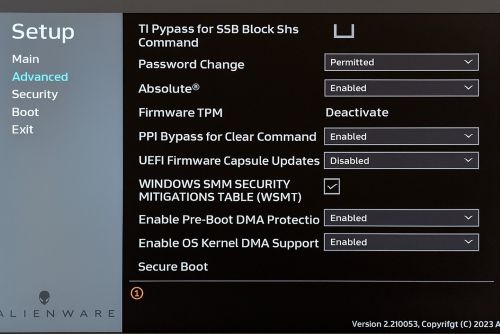
Perform the following steps:
- Press F2 to enter the BIOS
- Select Advanced along left side
- Select Secure Boot
- Under Expert Key Management, select Custom Mode
- Select Enabled in the dropdown
- Click Reset All Keys
- Select Yes
- Select Exit along left side
- Select Exit Saving Changes
- Select Yes
- On the next boot, press F2 to enter BIOS
- Select Advanced along left side
- Select Secure Boot
- Under Expert Key Management, Select Custom Mode
- Select Disabled in the dropdown
- Select Exit along left side
- Select Exit Saving Changes
- Select Yes
Affected Products
Alienware, Dell Pro All-in-One, Dell Pro Max Micro, Dell Pro Max Slim, Dell Pro Max Tower, Dell Pro Micro, Dell Pro Slim, Dell Pro Tower, Dell Slim, Inspiron, OptiPlex, Vostro, XPS, G Series, G Series, Alienware, Dell Laptops, Dell Plus, Dell Pro
, Dell Pro Max, Dell Pro Plus, Dell Pro Premium, Inspiron, Latitude, Dell Pro Rugged, Vostro, XPS, Fixed Workstations, Mobile Workstations, Dell Pro Max Micro XE FCM2250
...
Article Properties
Article Number: 000368610
Article Type: How To
Last Modified: 12 Sept 2025
Version: 1
Find answers to your questions from other Dell users
Support Services
Check if your device is covered by Support Services.