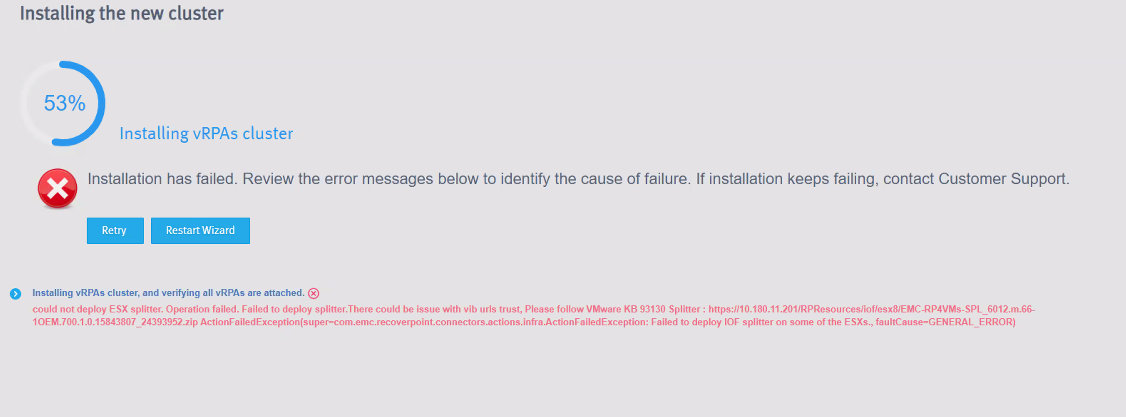
RecoverPoint for VMs 6.0: Installation fails at 53 with error "could not deploy ESXi splitter"
Summary: RecoverPoint for VMs 6.0 installation failure due to error "could not deploy ESXi splitter" and vCenter task errors "The specified key, name, or identifier vibUrl already exists in the task console." ...
This article applies to
This article does not apply to
This article is not tied to any specific product.
Not all product versions are identified in this article.
Symptoms
RecoverPoint for VMs 6.0 installation failure due to error "could not deploy ESXi splitter."
When looking at the vCenter tasks, you may see failures such as "The specified key, name, or identifier vibUrl already exists in the task console."
Cause
The splitter deployment fails due to a previous splitter installation exists/failed.
Resolution
Resolution:
- Identify the error in the Task Console of vSphere Client Menu > Tasks.
- Check the error
"The specified key, name, or identifier vibUrl already exists" - Uninstall the Splitter and JIRAF from using RecoverPoint for VMs uninstaller.bat tool. For more information, see Uninstall the RecoverPoint for VMs Splitter and JIRAF.
- After uninstallation, go to RecoverPoint of VMs Deployer wizard page, and then click Retry to start the vRPA cluster installation again.
Note: Use the latest uninstaller, matching the RecoverPoint for VMs version.
For 6.0 GA release use uninstaller rp4vms_uninstaller_13.0.0-116
The uninstaller can be downloaded here.
For 6.0 GA release use uninstaller rp4vms_uninstaller_13.0.0-116
The uninstaller can be downloaded here.
Additional Information
Uninstall the RecoverPoint for VMs Splitter and JIRAF.
Use the uninstaller.bat tool to uninstall the RecoverPoint for VMs Splitter and JIRAF.
Steps:
- Run
iof_uninstall.
This command removes Splitter, and JIRAF I/O filters completely from your vCenter(s) and ESXi clusters. - A message is displayed: Would you like to proceed? (Y/N):
Type Y if you want to continue to uninstall Splitter and JIRAF or Type N to stop the uninstallation. - Enter the IP address of the vCenter.
- Enter the vCenter's TCP port number or press Enter for the default port (443).
- Enter the vCenter username.
- Enter the vCenter password.
A message is displayed Checking vCenter connectivity vCenter is ready for scanning, do you want to add a new vCenter? (Y/N) or press Q to quit: - Type N if you do not want to add another vCenter to remove I/O Filters or Type Y if you want.
The scanning ESXi Clusters:- <Cluster-Name> v
- All
- Ensure to enter a comma-separated ESXi cluster number (for example, 1,2) / All:
A message is displayed Do you want to continue uninstallation of I/O Filters on selected vCenter(s) and ESXi clusters? (Y/N) - Type Y to complete the uninstallation.
Affected Products
RecoverPoint for Virtual MachinesArticle Properties
Article Number: 000213181
Article Type: Solution
Last Modified: 06 Mar 2025
Version: 7
Find answers to your questions from other Dell users
Support Services
Check if your device is covered by Support Services.