PowerEdge: How to Import a Foreign Configuration in the RAID Controller Using the System Setup Menu
Summary: This article provides information about how to import a foreign configuration RAID array on the system setup (F2) menu.
This article applies to
This article does not apply to
This article is not tied to any specific product.
Not all product versions are identified in this article.
Instructions
A foreign configuration is detected when the RAID controller identifies RAID metadata that is not synchronized with its current configuration. This can occur when disks or a virtual disk are moved between systems, or when a RAID set temporarily goes offline and later returns.
Warning: Importing a foreign configuration at the wrong time may result in data loss. Review the warnings and cautions in this article carefully before proceeding.
Before You Begin
When to Use This Procedure
Use this procedure only when either of the following conditions are true:
- After installing or replacing a new PERC.
- The original RAID configuration is expected to be intact and should be recovered.
- The entire RAID virtual disk (VD) is Offline or Failed with foreign disks detected.
- In this scenario, its advised to review the logs or have support help with reviewing the logs to understand why the array failed as there could be missing of failed disks that make it impossible to import.
When Not to Use This Procedure
Do not import a foreign configuration in the following situations:
- The virtual disk is Online or Degraded but still accessible.
- Only a single physical disk shows a foreign configuration while the RAID remains active.
In these cases, clear the foreign configuration on the affected disk and allow the RAID to rebuild. Importing a single-disk foreign configuration into an active array may cause data corruption.
Additional Notes
- On PowerEdge R/T x30 and x40 series systems running UEFI, the traditional RAID BIOS may not be available. Configuration is performed through System Setup (F2).
- Dell Technologies recommends contacting Dell Technical Support if the RAID state is unclear or if unexpected disk statuses are observed.
- For general guidance on when to import or clear a foreign configuration, see PowerEdge: Importing or Clearing Foreign Configurations on PERC controllers.
An administrator must first Check the Virtual and Physical Disk Status, then Import Foreign Configurations. Click the appropriate process link for details.
Check the Virtual and Physical Disk Status
- Turn on the system.
- Press the F2 key when prompted.
- Select Device Settings on the System Setup Main Menu.
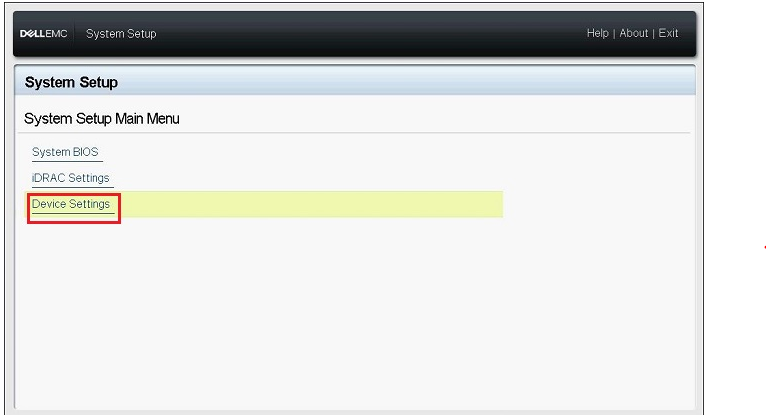
Figure 1: System Setup Device Settings
- Click the appropriate RAID controller on the Device Settings menu.
Note: If the system is a PowerEdge R/T x40 series, select Main Menu on the Dashboard View menu that is displayed after selecting the RAID controller.
- Click Virtual Disk Management on the Main Menu.
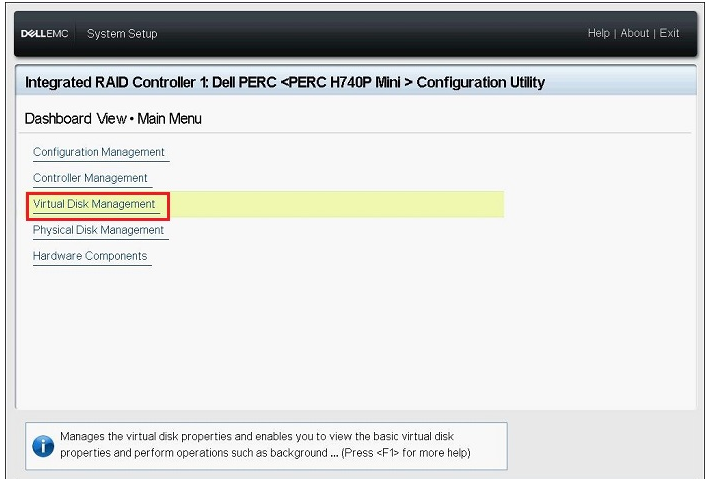
Figure 2: Virtual Disk Management
- Check the status of the appropriate virtual disk that is displayed and then click the virtual disk link.
Note: If the virtual disk information is not displayed, click Back to go back to the previous screen and go to Step 8 to check the physical disk.
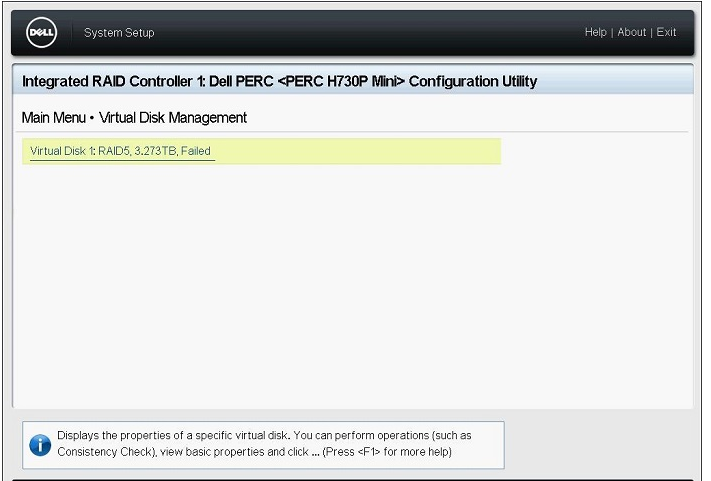
Figure 3: Selecting the virtual disk
- Check the information about the RAID Level, Status and Size, and then click View Associated Physical Disks.
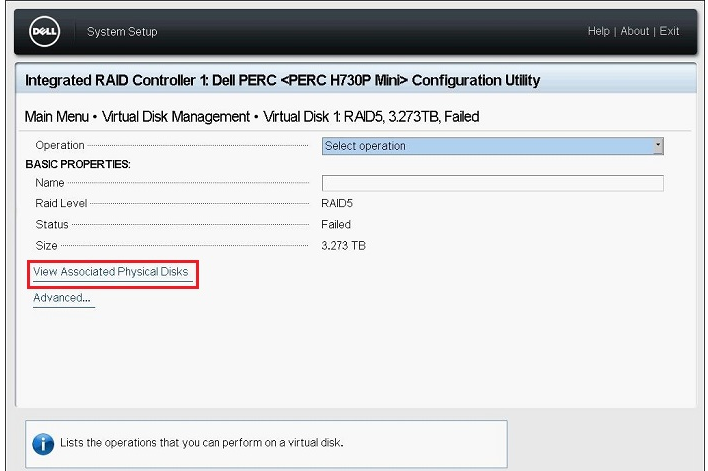
Figure 4: View Associated Physical Disks
- Check physical disks that are part of the virtual disk from the ASSOCIATED PHYSICAL DISKS field and then click Back until the screen returns to the Main Menu.
- Click Physical Disk Management from the Main Menu.
- Check the status of all displayed physical disks and click each disk to check the details.
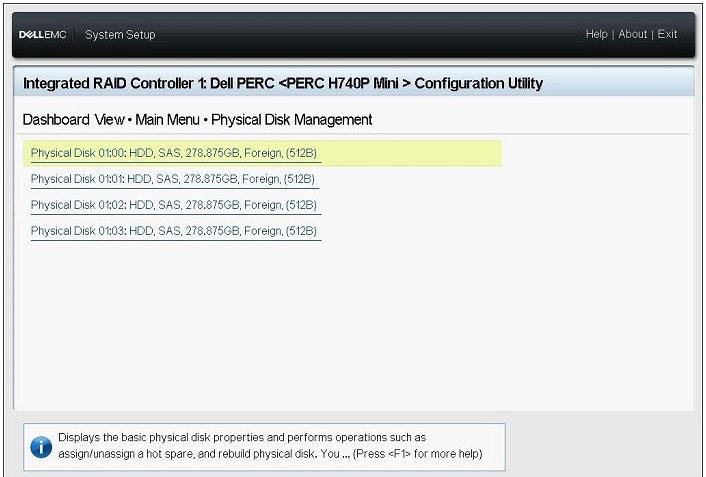
Figure 5: Physical disk details
- Check the following items on the disk details screen:
- PowerEdge R/T x30/x35 series: Physical Disk ID, Status, Size
- PowerEdge R/T x40/x45 series: Device ID, Backplane ID, Slot Number, Status, Size
- Check the status of all remaining physical disks in the same way and then return to the Main Menu.
Import Foreign Configurations
Note: Management of Foreign Configuration is only available if a foreign configuration has been detected by the controller.
- Click Configuration Management on the Main Menu screen.
- Click Manage Foreign Configuration.
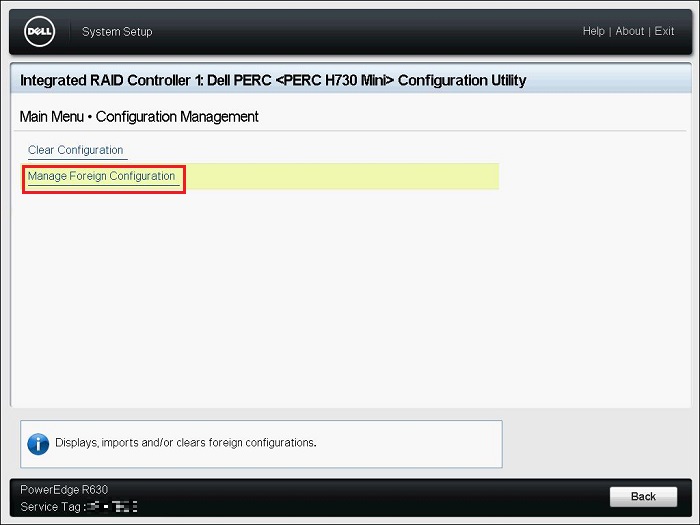
Figure 6: Manage Foreign Configuration.
- Click Preview Foreign Configuration.
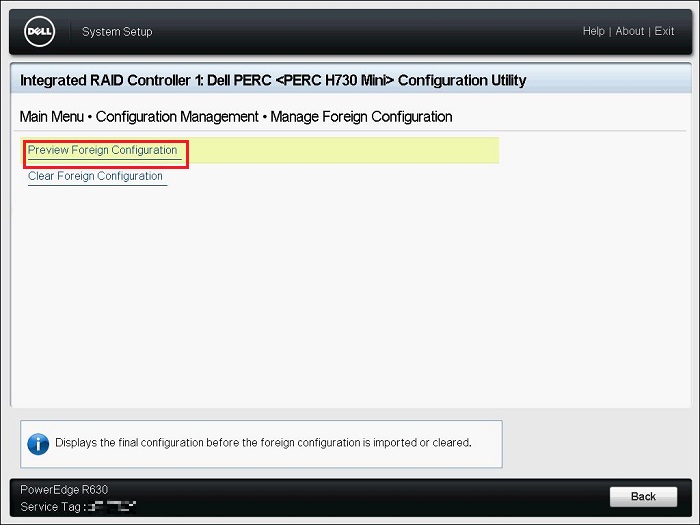
Figure 7: Preview Foreign Configuration
- Check if the status of the virtual disk displayed on the
"VIRTUAL DISKS INCLUDED AFTER FOREIGN CONFIGURATION IMPORT"is Ready or Degraded and then click Import Foreign Configuration.PHYSICAL DISKS INCLUDED AFTER FOREIGN CONFIGURATION IMPORT: Displays only disks in foreign configurationVIRTUAL DISKS INCLUDED AFTER FOREIGN CONFIGURATION IMPORT: Displays virtual disk after the import operation
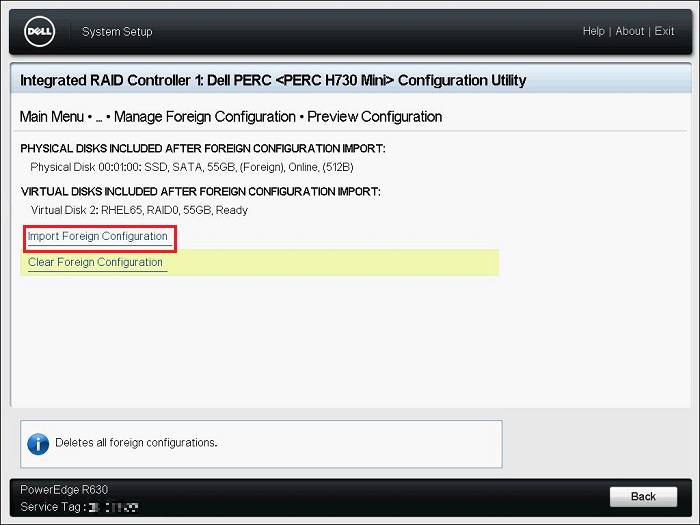
Figure 8: Manage Foreign Configuration.
- Read the displayed warning, select Confirm, and then click Yes.
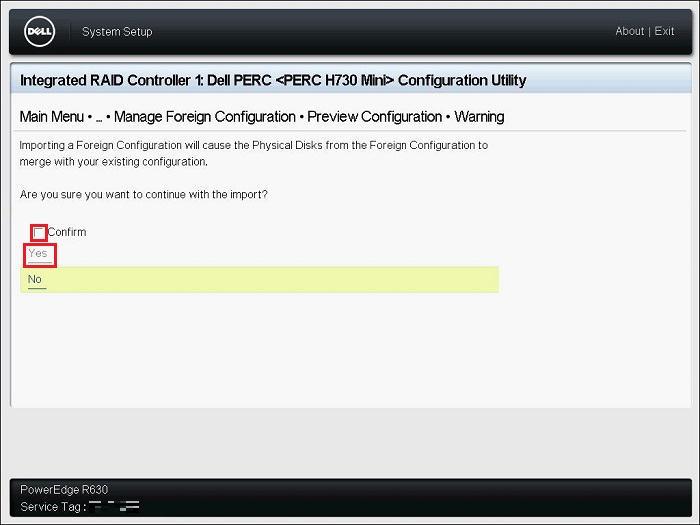
Figure 9: Confirming the warning
- Once the message
"The operation has been performed successfully"is displayed, click OK.
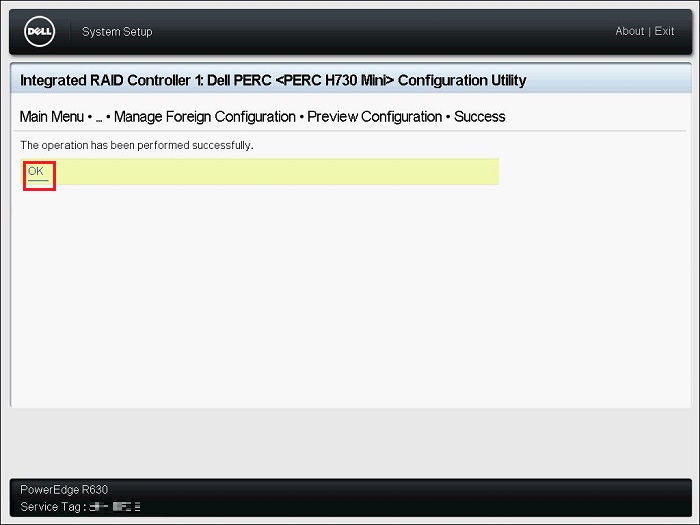
Figure 10: Foreign import success
- Click Back on the Configuration Management screen.
Note: The "Manage Foreign Configuration" menu is still displayed.
- Click Virtual Disk Management on the Main Menu screen, Check that the status of the virtual disk is Ready or Degraded.
If the status is Ready, go to Step 9.
If the status is anything other than Ready, follow the steps below to check the status.- Click the appropriate virtual disk and check the Status.
- Click View Associated Physical Disk and check the physical disks that are part of the virtual disk.
Contact Dell technical support if the disk status is anything other than Online status.
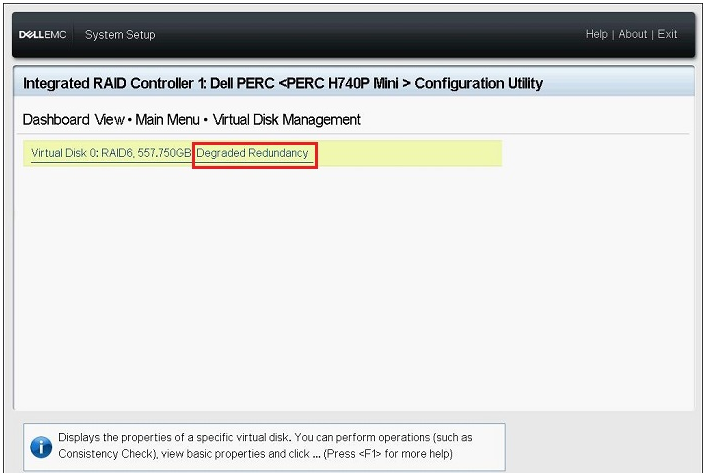
Figure 11: Example Degraded Redundancy Status
- Click Back, Finish, Finish, and then Finish. Once the warning,
"Are you sure you want to exit?"is displayed, click Yes. - The operating system boots.
Note: The operating system should boot normally. If the recovered virtual disk is not immediately recognized, restart the system using CTRL + ALT + DEL.
After Successful Import
- If the import of the array was successful it is recommended to update the firmware of the PERC and the drives to the latest available versions.
- If the foreign configuration was not expected, meaning it was not due to migrating disks to another server or detection from a new PERC, it is advised to monitor the RAID VD health as it completes its rebuild, checking the Lifecycle logs or gathering a SupportAssist report for review.
Additional Information
How To Import A Foreign RAID Config On A Dell PowerEdge Server Using The System Setup
Duration: 00:01:56 (hh:mm:ss)
When available, closed caption (subtitles) language settings can be chosen using the CC icon on this video player.
Affected Products
PowerEdge XR2, PowerEdge RAID Controller H345, PowerEdge RAID Controller H350 Adapter SAS, PowerEdge RAID Controller H355 Front SAS, PowerEdge RAID Controller H355 Adapter SAS, PowerEdge RAID Controller H730P MX, PowerEdge RAID Controller H745
, PowerEdge RAID Controller H745P MX, PowerEdge RAID Controller H750 Adapter SAS, PowerEdge RAID Controller H755 Adapter, PowerEdge RAID Controller H755 MX Adapter, PowerEdge RAID Controller H755N Front NVMe, PowerEdge RAID Controller H755 Front SAS, PowerEdge RAID Controller H965i Adapter, PowerEdge RAID Controller H965i Front, PowerEdge RAID Controller H965i MX, Poweredge C4140, PowerEdge C6420, PowerEdge C6520, PowerEdge C6525, PowerEdge C6615, PowerEdge C6620, PowerEdge FC640, PowerEdge M640, PowerEdge M640 (for PE VRTX), PowerEdge MX740C, PowerEdge MX750c, PowerEdge MX760c, PowerEdge MX840C, PowerEdge R240, PowerEdge R250, PowerEdge R260, PowerEdge R340, PowerEdge R350, PowerEdge R360, PowerEdge R440, PowerEdge R450, PowerEdge R540, PowerEdge R550, PowerEdge R640, PowerEdge R6415, PowerEdge R650, PowerEdge R650xs, PowerEdge R6515, PowerEdge R6525, PowerEdge R660, PowerEdge R660xs, PowerEdge R6615, PowerEdge R6625, PowerEdge R740, PowerEdge R740XD, PowerEdge R740XD2, PowerEdge R7415, PowerEdge R7425, PowerEdge R750, PowerEdge R750XA, PowerEdge R750xs, PowerEdge R7515, PowerEdge R7525, PowerEdge R760, PowerEdge R760XA, PowerEdge R760xd2, PowerEdge R760xs, PowerEdge R7615, PowerEdge R7625, PowerEdge R840, PowerEdge R860, PowerEdge R940, PowerEdge R940xa, PowerEdge R960, PowerEdge RAID Controller H310, PowerEdge RAID Controller H330, PowerEdge RAID Controller H700, PowerEdge RAID Controller H710, PowerEdge RAID Controller H710P, PowerEdge RAID Controller H730, PowerEdge RAID Controller H730P, PowerEdge RAID Controller H740P, PowerEdge RAID Controller H800, PowerEdge RAID Controller H810, PowerEdge RAID Controller H830, PowerEdge RAID Controller H840, PowerEdge RAID Controller H965e Adapter, PowerEdge T140, PowerEdge T150, PowerEdge T160, PowerEdge T340, PowerEdge T350, PowerEdge T360, PowerEdge T440, PowerEdge T550, PowerEdge T560, PowerEdge T640, POWEREDGE VRTX, PowerEdge XR11, PowerEdge XR12
...
Products
PowerFlex rack, ScaleIOArticle Properties
Article Number: 000122457
Article Type: How To
Last Modified: 12 Jun 2026
Version: 13
Find answers to your questions from other Dell users
Support Services
Check if your device is covered by Support Services.