Dell C1422H Monitor Usage and Troubleshooting Guide
Summary: Learn how to use and troubleshoot issues that are related to the Dell 14 Portable Monitor - C1422H.
This article applies to
This article does not apply to
This article is not tied to any specific product.
Not all product versions are identified in this article.
Instructions

For help with video or display issues such as: no video or no display, blank or black screen, flickering, resolution or color issues, horizontal or vertical lines, etc. refer to an expanding section below.
The Dell C1422H monitor has an active matrix, Thin-Film Transistor (TFT), Liquid Crystal Display (LCD), anti-static, and LED backlight.
The key features of the Dell C1422H monitor are:
- 35.56 cm (14.0 in.) diagonal viewable area display (measured diagonally), 1920 x 1080 resolution, with full-screen support for lower resolutions
- Viewing angles of 178 degrees in horizontal and vertical directions
- Dynamic contrast ratio (700:1)
- Digital connectivity with USB Type-C
- Dual USB Type-C port supports DP Alternate Mode, power pass through, and power delivery 65W.
- Tilt adjustment capability.
- On-Screen Display (OSD) adjustments for easy setup and screen optimization.
- ≤ 0.3 W in Standby Mode
- Optimize eye comfort with ComfortView.
- Arsenic-free glass and mercury-free panel
- BFR/PVC-Reduced (the circuit boards inside your monitor are made using BFR/PVCfree laminates).
- RoHS Compliant
- EPEAT registered where applicable. EPEAT registration varies by country or region See https://www.epeat.net for registration status by country or region.
- Energy Star Certified
Warning: The possible long-term effects of blue light emission from the monitor may damage your eyes, including eye fatigue or digital eye strain. ComfortView feature is designed to reduce the amount of blue light that is emitted from the monitor to optimize eye comfort.
This section provides some specifications of the Dell C1422H monitor. To learn more about the specifications of the Dell C1422H monitor, refer to the User's Guide at the Dell Manuals website.
| Panel technology |
|
|---|---|
| Maximum resolution |
|
| Viewing angle |
|
| Contrast ratio |
|
| Response time |
|
| Color gamut |
|
| Color depth |
|
| Ports and connectors |
|
Sleeve
The protective sleeve that is shipped with the monitor can protect your monitor from damage when shipping or storage.
The following illustrations show how to use the protective sleeve:
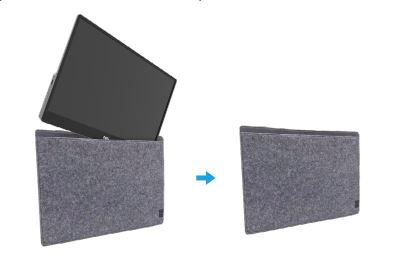
(Figure 1: Dell C1422H Monitor Protective Sleeve)
Ergonomics
Where you put your monitor is almost as important as what model you buy. The monitor should be directly in front of you, at an arm’s length away (between 20 to 40 inches from your eyes). The top edge of the screen is at eye level when you are sitting comfortably. You may need to adjust your chair height or the height of the monitor to achieve this.
Connecting your monitor to the personal computer
To connect your Dell C1422H monitor to your personal computer:
- Turn off your personal computer and disconnect the power cable.
- There are two kinds of usage for the C1422H: Normal usage and charging usage.
Normal Usage
There are two kinds of normal usage for C1422H: Laptop and mobile phone
- Connect the USB Type-C port of the laptop and C1422H with a USB Type-C cable.
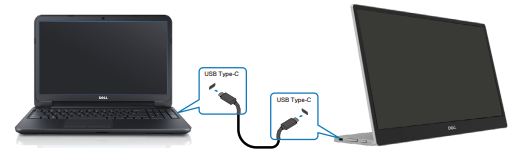
(Figure 2: Dell C1422H Monitor Laptop Connection)
- Connect the USB Type-C port of the mobile phone and C1422H with a USB Type-C cable.

(Figure 3: Dell C1422H Monitor Mobile Phone Connection)
Note: For normal usage, devices of laptop and mobile phone that connect to C1422H need to support video signal and power output of 7.5 W(5V/1.5A). When you encounter abnormal display conditions, please check your devices to see if they support USB Type-C Alt-mode display and PD2.0 or above. After checking, please reconnect and try again.
Note: It is suggested to connect to a power adapter when connecting to a mobile phone.
Plugin Usage
There are two kinds of normal usage for C1422H: Laptop and mobile phone with power adapter.
- Connect Type-C power adapter to C1422H and connect C1422H to the laptop with a USB Type-C cable. (Electronically marked cable, current rating: 5A).
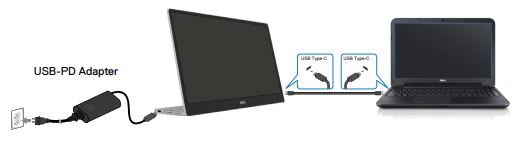
(Figure 4: Dell C1422H Monitor Laptop Connection with Power Adapter)
- Connect Type-C power adapter to C1422H and connect C1422H to the mobile phone with a USB Type-C cable.
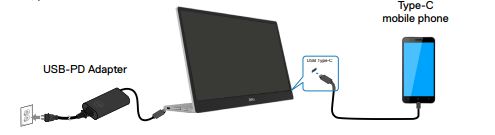
(Figure 5: Dell C1422H Monitor Mobile Phone Connection with Power Adapter)
Note: When you encounter abnormal charging conditions, please check the power capacity of the power adapter that is connected with C1422H and ensure it is enough for C1422H and other devices. To use the monitor smoothly, please refer to the Preset display modes and Power management.
Note: When disconnecting the power adapter from the C1422H, a blank screen appears.
Note: When connecting 90 W or above adapter, the Maximum power delivery output from the monitor is 65 W. When connecting the 65 W adapter, the Maximum power delivery output from the monitor is 45 W. When connecting 45 W adapter, the Maximum power delivery output from the monitor is 30 W. When connecting <30 W adapter, the Maximum power delivery output from the monitor is 7.5 W.
The Dell monitor C1422H can only output a maximum of 65 W to the computer. If the computer requires 90 W or above, it needs 90 W or above adapters that are connected to the computer or the battery will drain during usage.
The Dell monitor C1422H can only output a maximum of 65 W to the computer. If the computer requires 90 W or above, it needs 90 W or above adapters that are connected to the computer or the battery will drain during usage.
Tilt adjustment
Please see the illustration below for an example of the tilt range.
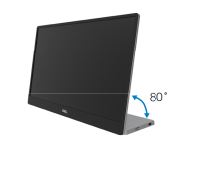
(Figure 1: Dell C1422H monitor Tilt adjustment).
Using the On-Screen Display (OSD) menu
Use the buttons on the edge of the monitor to adjust the image settings.
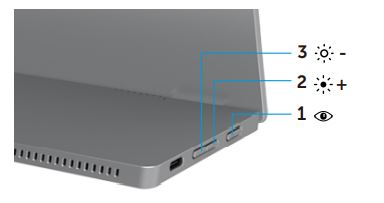
(Figure 1: Dell C1422H Monitor OSD controls)
| Button # | Control Buttons | Description |
|---|---|---|
| 1 | ComfortView | To launch the On-Screen Display (OSD) menu, or to access the list of items/options of a menu item. |
| 2 | Brightness/Up/[+] | Use the Up button to increase values or move up in a menu.
|
| 3 | Brightness/Down/[—] | Use the Down button to decrease values or move down in a menu.
|
Accessing the OSD menu
Note: Any changes that you make are automatically saved when you move to another menu, exit the OSD menu, or wait for the OSD menu to close automatically.
Note: No Contrast adjustment.
- Press the key to call out the ComfortView OSD menu.
- Press button 1 to switch ComfortView ON/OFF.
ComfortView = ON

ComfortView = OFF

- Press the key to call out the Brightness OSD menu.
- Press the Up button to increase the brightness and press the Down button to decrease brightness (min. 0; max. 100).

If your Dell monitor has a blank or black screen, fuzzy or blurry image, flickering, distorted, or any other screen abnormalities, running a diagnostic test helps determine if the Dell monitor is functioning normally. To learn more about diagnostic options on a Dell monitor, refer to the Dell knowledge-base article: How do I run diagnostics on a Dell monitor?
It is always essential to isolate the monitor while troubleshooting your computer for the following scenarios:
- No Power - Your computer is not powering ON or showing any signs of power.
- No POST - Your computer is not showing any indication of activity, the screen might be blank and will not display the Dell logo during start-up.
- No Video - You are unable to see any display on the screen, able to hear the windows chime but no display is seen.
Your monitor provides a self-test feature that allows you to check if your monitor is functioning properly. If your monitor and computer are properly connected but the monitor screen remains dark, run the monitor self-test by performing the following steps:
- Turn off your computer
- Disconnect Type-C power adapter cable, computer USB Type-C cable from the monitor.
- Connect Type-C power adapter cable to the monitor. This way, the computer does not have to be involved.
- If the monitor is working correctly, it scans for signal and detects that there is no signal and the following message appears. While in self-test mode, the power LED remains white.
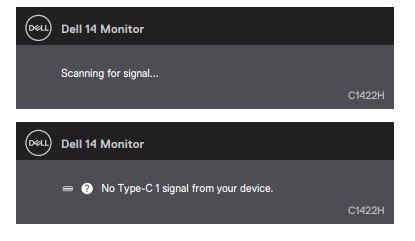
(Figure 1: Self Test)
Note: These messages also appears during normal operation, when the computer USB Type-C cable is disconnected or damaged. - Reconnect the computer USB Type-C cable, then turn on your computer wait for computer boot up is complete.
If your monitor remains dark after step 5, check your video controller and computer
Your Dell C1422H monitor has a built-in diagnostic tool. It helps to determine if the screen abnormality you are experiencing is a problem with the monitor or with the video card on your computer.
When you notice screen abnormalities like distortion, clarity, horizontal or vertical lines, color fade, it is always a good practice to isolate the monitor by running the Built-In Diagnostics.
- Ensure that the screen is clean (no dust particles on the surface of the screen).
- Press and hold button 1 for about 3 seconds and wait for a pop-up diagnostic pattern.
- Use button Up/[+] to switch pattern.
A gray test pattern appears at the beginning of the diagnostic program - Carefully inspect the screen for abnormalities.
- Press button Up/[+] to change the test patterns.
- Repeat steps 4 and 5 to inspect the display in red, green, blue, black, white, and text screens.
- . When in the White color test screen, check for white color uniformity and if their white color appears greenish/reddish, so forth
- Press button Up/[+] to end the diagnostic program.
Note: If you do not detect any screen abnormalities upon using the built-in diagnostic tool, the monitor is functioning properly. Check the video card (GPU) and the computer.
If you notice any abnormalities during Built-In Diagnostics, you may get the monitor repaired or replaced if it is under warranty by contacting Dell Technical Support.
If you notice any abnormalities during Built-In Diagnostics, you may get the monitor repaired or replaced if it is under warranty by contacting Dell Technical Support.
During the LCD Monitor manufacturing process, it is not uncommon for one or more pixels to become fixed in an unchanging state. Which is hard to see and does not affect the display quality or usability. For more information, refer to the Dell knowledge-base article Dell LCD Monitor Pixel Guidelines.
This section provides information about troubleshooting steps that can help resolve the most common issues with the Dell C1422H monitor. Alternatively, to learn more about troubleshooting common issues on Dell monitors, refer to the Dell knowledge-base article Troubleshooting Display or Video Issues on a Dell Monitor or use our Monitor self-help Guide.
| Common Symptoms | Possible Solution |
|---|---|
| No Video - Power LED Off |
|
| No Video - Power LED On |
|
| Poor Focus |
|
| Missing Pixels |
|
| Stuck-On/Off Pixels |
|
| Brightness Problems |
|
| Synchronization Problems |
|
| Safety-Related Issues |
|
| Missing Color |
|
| Intermittent charging when using USB Type-C connection to the computer, laptop, and so on |
|
To learn more about how to view or download the User Guides and Manuals for your Dell product. Refer to the Dell knowledge-base article Manuals and Documentation for your Dell Product.
- Dell C1422H – User’s Guide
- Dell C1422H – Quick Setup Guide
- Dell C1422H – Dell Display Manager User’s Guide
Frequently asked questions
Using Windows Display Settings
In Windows 10, Windows 8 or 8.1, and Windows 7:
- For Windows 8 and Windows 8.1 only, select the Desktop tile to switch to classic desktop view.
- Right-click the desktop and click Screen Resolution.
- Click the dropdown list of the Screen Resolution and select 5120 x 1440.
- Click OK
Using Nvidia Control Panel
To change the resolution using the Nvidia Control Panel:
- Right-click the desktop and click Nvidia Control Panel.
- Click the + symbol next to Display on the left pane.
- Select Change Resolution under Display.
- In the dropdown menu on the right pane, select the resolution 5120 x 1440.
- Click Apply.
Using AMD Catalyst Control Center
To change the resolution using the AMD Catalyst Control Center:
- Right-click the desktop and click AMD Catalyst Control Center.
- Click the + symbol next to Display on the left pane.
- Select Change Resolution under Display.
- In the dropdown menu on the right pane, select the resolution 5120 x 1440.
- Click Apply.
Note: If you do not see the recommended resolution as an option. You may need to update the video card (GPU) driver by visiting the Dell Drivers & Downloads website or the video card (GPU) manufacturer's website. To learn how to download and update a device driver, refer to the Dell knowledge-base article: How do I download and install a device driver?
The Dell C1422H monitor has two built-in diagnostics that are available:
- Self-Test Feature Check - The self-test feature check on the Dell C1422H monitor allows you to check whether the monitor is functioning properly.
- Built-In Self-Test - The Dell C1422H monitor has a built-in self-test that helps you identify if the screen abnormality is with the monitor or the video card (GPU) on your computer. When you notice screen abnormalities like distortion, clarity, horizontal or vertical lines, color fade. It is always a good practice to isolate the monitor by running the Built-In Diagnostics.
To learn how to run a diagnostic test, refer to the Running Diagnostics on Dell C1422H Monitor section of this Dell knowledge-base article.
The Troubleshooting section of this Dell knowledge-base article provides information about troubleshooting common issues with the Dell C1422H monitor. The section has troubleshooting steps on how to resolve power issues, video issues, color or clarity issues, distortion issues, horizontal or vertical lines, brightness issues or pixel issues, and so on.
For more information about using the On-Screen Display (OSD) menu go to the Accessing the OSD menu section.
Affected Products
Dell C1422HArticle Properties
Article Number: 000191371
Article Type: How To
Last Modified: 14 Jul 2025
Version: 3
Find answers to your questions from other Dell users
Support Services
Check if your device is covered by Support Services.