e-Services: Online Support Contact Management
Summary: Online Support Contact Management
This article applies to
This article does not apply to
This article is not tied to any specific product.
Not all product versions are identified in this article.
Instructions
There are several Contact types within Online Support:
- Company Administrator
- Company Non - Administrator
- Third-Party Contact
- Product Level Contact
- Partner Administrator/Support Partner
Company Admin: The Company Admin attribute allows enabled users to manage various site, product, or contact features that reside within their company organization. This includes the ability to promote/demote other contacts in their organization as Company Administrators, set the Site Security Levels of a Site, set a Product Alias, and set or manage Product Level Contact designations (Connect Home relationships).
Company Non - Admin: Users can view the various site, product, or contact features within Company Administration, without the ability to manage.
Third-Party Contact: Contacts from outside the user's organization who has been granted explicit access to the site. This is a third-party Consultant who is supporting products on behalf of the user's organization.
Product Level Contact: Contacts set at the Product Level help drive the Connect Home experience. The following role designations have been streamlined for efficiency and effectiveness:
- Primary - serves as the primary contact for all connect home service requests for the specified product.
- Alternate - if Primary contact is not available, the Alternate contact can be contacted
- 24 Hour - optional contact for weekend or after hours support if different than the Primary
Partner Admin/Support Partner: The Partner Admin attribute allows enabled users to edit the Product Alias and Product Level Contacts for products outside the user's organization as long as they are defined as the Support Partner affiliated to the product. Partner Admins can demote or promote contacts within the same company to and from Partner Admin Status.
Manage Company Information within Online Support gives you a centralized view of company and contact information affiliated with your organization.
If you are designated as a Company Administrator for your organization, in addition to viewing the related content, you can also manage various features related to sites, products, contacts, and contact designations within your organization.
To access Company Administration, log in to the portal at http://support.emc.com or dell.com/support and select "Manage Company Information" from the account menu on the top right-hand corner of the home page.

Company Admins see three tabs on the Company Administration page: Manage Sites, Manage Contacts and Manage Approvals.
Company Non-Admins see three tabs on the Company Administration page: View Sites, View Contacts, and View Pending Requests
Partner Admins see three tabs on the Company Administration page: Manage Sites, Manage Contacts, and View Pending Requests.
- Company Administration Dropdown allows for quick entry into the main administrative areas without having to navigate back to the Company Administration landing page. You must be within the Company Administration pages in order to access the dropdown.
- From the View Sites or Manage Sites selection, External, and Internal Contacts are displayed:

External Contacts - A list of contacts not affiliated to the Site s organization that has been granted a relationship to the Site (that is a contact from a different company, third-party relationship).
Internal Contacts - A list of contacts affiliated to the Site's organization that has either inherited a relationship or been explicitly granted access to the Site which occurs when advanced security settings have been applied to the Site.
View/Manage Contacts within your Company:
The View/Manage Contacts section within Company Administration displays all contacts within your organization that would inherit sites set to the Open security level automatically.
To access the Contacts area, Company Admins should:
- Select the Manage Contacts tile on the Company Administration home page (or if already in Company Admin, use the Company Administration Sectional Drop-down).
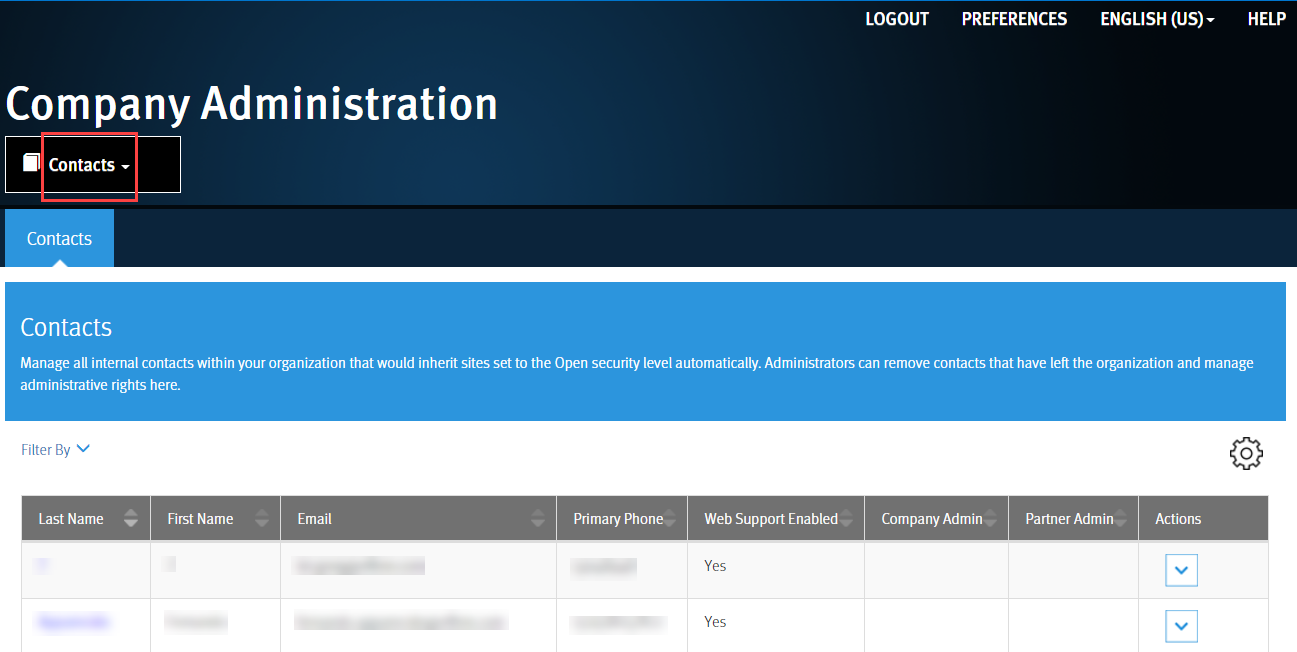
From the Manage Contacts area, Company, and Partner Admins can drill into the details of each internal contact within their organization by clicking the Last Name of the Contact. This presents the Admin with the following details:
- Site Access tab: Displays sites that the contact has access to by inheritance, approved Site Secured access, or Support Partner-defined access Third-party or any manually applied relationships may not be visible to the Admin.
- Product Level Contacts tab: Displays products that the contact has been designated as a Product Level Contact for.
Non-Admins cannot drill into any internal contacts to view the aforementioned details.
Requesting Admin Privileges:
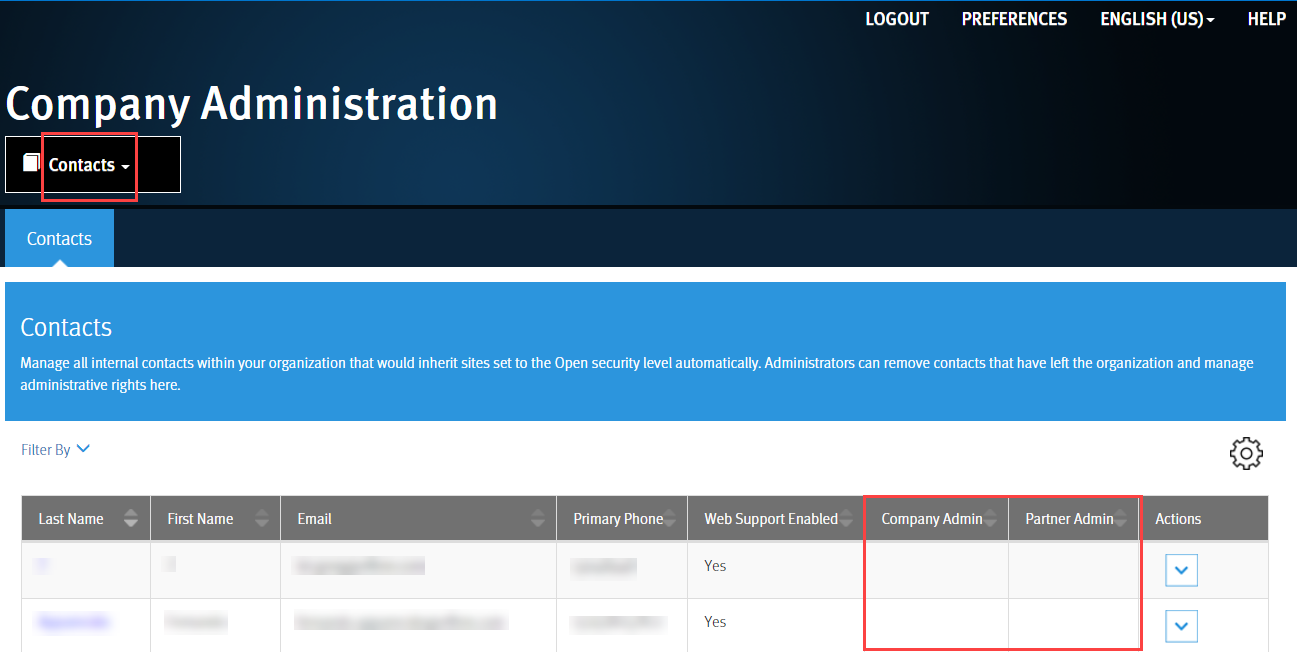
Contact an existing corresponding Administrator within your organization to request a Company or Partner Attribute promotion. They are identified within the applicable column designation when viewing Contacts within the Manage Contacts section, and certain Contact tabs within Site Details.
Internal Site Contacts for a Site with an Open Security Level (Site Details):
When drilled into a specific Site (Site Details), the Internal Contacts tab represents any Contacts belonging to the same organization to which the User belongs (user accounts with valid email domains defined for the same organization to which the User belongs).
When a Site's Security Level is set to Open, an Admin is presented with Internal Contacts information within the Internal Contacts tab. Within this view, Admins can Export the list of Internal Contacts for Open Sites.
- Admins cannot carry out any actions on Contacts listed within the Internal Contacts tab. To do so, users must go to the Manage Contacts tab using the Manage Contacts redirect in the Internal Contacts tab, or from the OLS Company Administration home page.
- The Manage Contacts redirect is only visible to Company Admins or Partner Admins (or those Users with both Admin attributes). Non-Admins will not see the redirect as it offers no value (they cannot make edits, so they would view the same list shown in the Internal Contacts tab, offering no further value in a redirect).
- The Internal Contacts tab displays users from your entire organization. For most situations this properly reflects what users at your enterprise have access to a given site. For situations where a particular user is part of a subsidiary organization and is only provided access to sites within that subsidiary, the current experience still includes the user in the Internal Contacts tab as they are within the Admin's purview of administration.
External Site Contacts (by My Customers Sites):
The External Contacts tab displays any Contacts from outside the organization that have been explicitly granted access to the selected site. These contacts include either:
- Third-party consultants, and
- Authorized Contacts who have been explicitly granted access to a site within their own organization due to potential customer master data conflicts. This should be a temporary relationship while the data conflict is investigated.
- Support Partners have similar site associations as are described here but are defined by contractual relationship. All users associated to the Support Partner would automatically inherit that contractual relationship, so they are not shown in the External Contacts tab.
You cannot start any actions from this view such as the Add or Remove Contact functions regardless of your Admin attribute level as the contacts are outside of your organization.
Add or Remove an External Site Relationship (Site Details):
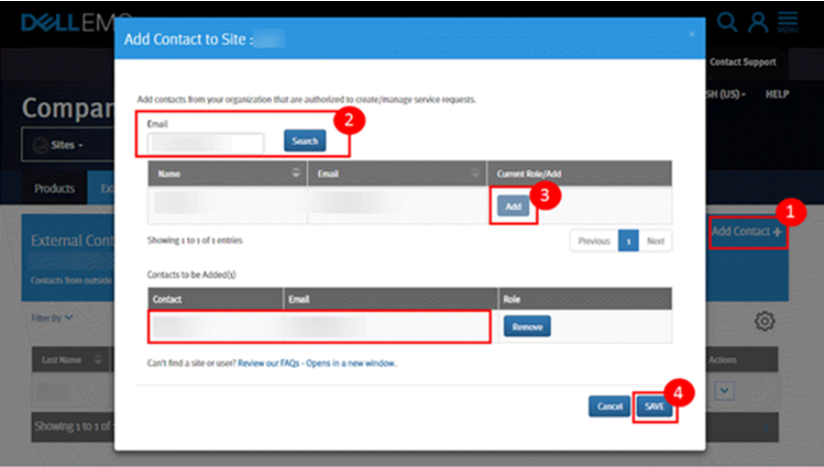
A Company Administrator can add Online Support-registered Users from outside their organization to a site by the External Contacts tab of Site Details. This is typically referred to as a third-party relationship for third-party Consultants.
To add an External Contact to a site, the Company Admin should:
- Go to the External Contacts tab of the Site to which they want to add the third-party account.
- Trigger the Add Contact + feature.
- Enter the exact email of the Online Support User account that they want to add as a third-party to the Site in the Email Search field. The email must match exactly, and the user being added must be a registered Online Support account.
- If the user is found and displayed in results; trigger the Add button next to the record to add the user to the queue.
The Company Admin can search for multiple user accounts and keep adding to the queue to add multiple users in one transaction. - Once the Company Admin is satisfied with the records in the queue, they can trigger Save to run the addition of the users as third-party relationships to the designated Site.
A Company Admin can also remove an external third-party or Authorized Contact relationship from one of their sites through the External Contacts tab in Site Details.
To remove an External Contact from a site, the Company Admin should:
- Go to the External Contacts tab of the Site they want to remove the External Contact relationship from.
- Trigger the Actions Menu next to the External Contact relationship that they want to remove from the Site and select Remove Contact.
- A pop-up appears asking to confirm the choice to remove the relationship. The Company Admin should select OK or cancel out if they change their mind.

To Promote or Demote an Admin attribute for a particular contact, the Administrator should:
- Go to the Manage Contacts area of Company Administration.
- Trigger the Actions Menu next to the internal contact record in the grid that they want to manage and select either Demote/Promote Company Admin or Demote/Promote Partner Admin depending on the Admin attribute of the logged in User and attribute status of the contact record.
- A pop-up appears asking to confirm the choice to promote/demote the contact. The Company Admin should select OK or cancel out if they change their mind.
Deleting Contacts from Online Support (User left the company):
From the Actions Menu on the Contacts page, Company Admins can delete a contact completely (Remove Contact).
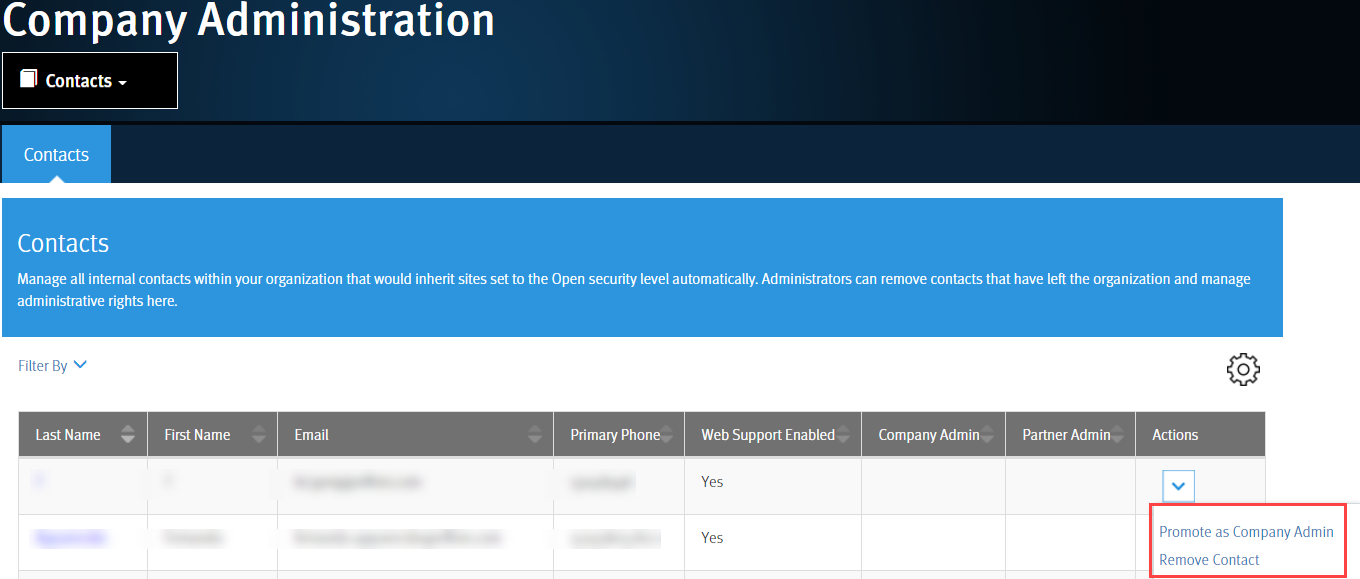
The Remove Contact should only be used when access is no longer needed (typically when they have permanently left the company). This does affect access across ALL Dell Secured Websites and Applications (not just Online Support), so this should be done with extreme care.
To delete a contact that has left your organization (and no longer needs access to any Dell Online applications including Online Support, Partner Portal, Education Services, Licensing, so on), the Company Admin should:
- Go to the Manage Contacts area of Company Administration.
- Trigger the Actions Menu next to the internal contact record in the grid that they want to manage and select Remove Contact
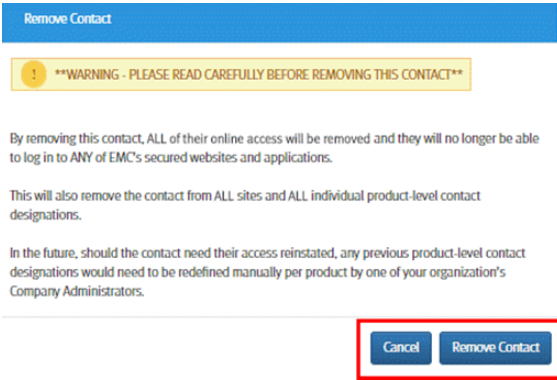
- A pop-up appears with a strong WARNING message explaining the severity of this action. The Company Admin should select Remove Contact or cancel out if they change their mind.
Partner Admins are also able to promote and demote the Partner Admin attribute in a similar fashion. If a user has both Company and Partner Admin attributes, they can promote or demote based on both attributes' purpose.
Non-Admin users cannot perform any actions from this view.
Product Level Contact assignment (Connect Home applicable):
You can click each Product Name to view the list of Product Level Contacts set for that specific product. Contacts are set at the Product Level which helps drive the Connect Home experience.
A contact is required to have a site level association before they can properly be defined as a Product Level Contact. Site association can occur through automatic inheritance or be explicitly granted through third-party or Support Partner relationships. From the Actions menu, specific Administrator privileges are required to run the following tasks:
- Company Admins can add or remove a Product Level Contact for any product within their company hierarchy unless a support partner is defined on the product.
- When a Support Partner is defined on a product, only a Partner Admin affiliated with the Support Partner can add or remove a Product Level Contact through the My Customers Sites tab. Users without the Partner Admin attribute cannot administer Product Level Contacts as the products within this tab are outside of their organization.
A Non-Admin user cannot perform any actions from this view.
Site Security Settings (Restricted, Blocked) - How to add or remove an Internal Contact.
Company Administrators can choose to control access to one, many, or all their organization s sites by applying advanced Security Levels to a site. This is manually done using the Actions Menu of the Company Sites tab on a per site basis.
A site can be defined as one of three Security Levels:
- Open Sites are accessible to all contacts belonging to your organization. Contacts within your organization (Internal Contacts) inherit association to all sites within your organization upon registering for a Dell Online account. No maintenance is required at the site level, as this is the default Security Level.
- Restricted Sites are visible to all contacts in your organization but access to the site is granted only on a per-request basis. Access to the site must be granted by a Company Administrator within your organization using the View/Manage Site Approval Requests area of Company Administration.
- Blocked Sites access is heavily restricted. The site is not visible to contacts in your organization. Access can only be granted when a contact is added directly to the blocked site by an administrative user of your organization.
All third-party site relationships retain access to the Site when changing a Site's Visibility to Restricted or Blocked. For them to be removed, you must manually remove them from the site.
- To update the Security Level, choose "Change Site Security" under the Actions menu for the site:
 To add an Internal Contact to a Secured Site, the Company Admin should:
- Go to the Internal Contacts tab of the Secured Site for which they want to add the Internal Contact.
- Trigger the Add Contact + feature.
- The Company Admin is presented with a list of Contacts from within their organization which can be filtered by Name or Email.
- Trigger the Add button next to any Contact to add the account to the queue.
The Company Admin can search for multiple user accounts and keep adding to the queue to add multiple users in one transaction. - Once the Company Admin is satisfied with the Internal Contacts in the queue, they can trigger Save to run the transaction and grant the Internal Contacts access to the designated Secured Site.

To remove an Internal Contact from a Secured Site, the Company Admin should:
- Go to the Internal Contacts tab of the Secured Site for which they want to remove the Internal Contact relationship.
- Trigger the Actions Menu next to the Internal Contact relationship that they want to remove from the Secured Site and select Remove Contact.
- A pop-up appears asking to confirm the choice to remove the relationship. The Company Admin should select OK or cancel out if they change their mind.
View/Manage Site Approval Requests:
The View/Manage Approvals section in Company Administration presents a list of any pending Site requests related to the User s inherited sites affiliated with their organization.
For a Non-Admin (standard user), the area displays any pending requests or any that were submitted (and are awaiting approval for). They will not see any other pending requests related to their organization.
To see their pending requests, Non-Admins and Partner Admins should:
- Select the View Pending Requests tile on the Company Administration home page (or if already in the Company Administration tool, use the Company Administration Sectional drop-down) which leads to the View Pending Requests area.
- Once in the area, Non-Admin (standard users) and Partner Admin users can view their pending requests.
Company Administrators can see and act on (Approve/Deny) any request made against sites within their organization.
To manage requests, a Company Administrator should:
- Select the Manage Approvals tile on the Company Administration home page (or if already in the Company Administration tool, use the Company Administration Sectional drop-down) which leads to the Manage Approvals area.
- Company Admins can Approve/Deny requests through the Approve or Deny buttons to the right of each Pending request.
Article Properties
Article Number: 000011252
Article Type: How To
Last Modified: 17 Apr 2026
Version: 6
Find answers to your questions from other Dell users
Support Services
Check if your device is covered by Support Services.