NFS 远程 I/O 错误;更改已启用 FS 的存储桶的存储桶所有者可能会导致应用程序和/或用户无法访问 NFS 文件
Summary: 不允许或限制以前的存储区所有者 ObjectControllerException: 以前的存储桶所有者不允许使用 Method updateObjectInternal
This article applies to
This article does not apply to
This article is not tied to any specific product.
Not all product versions are identified in this article.
Symptoms
用户对 用户界面上的存储桶所有者页面所做的更改:
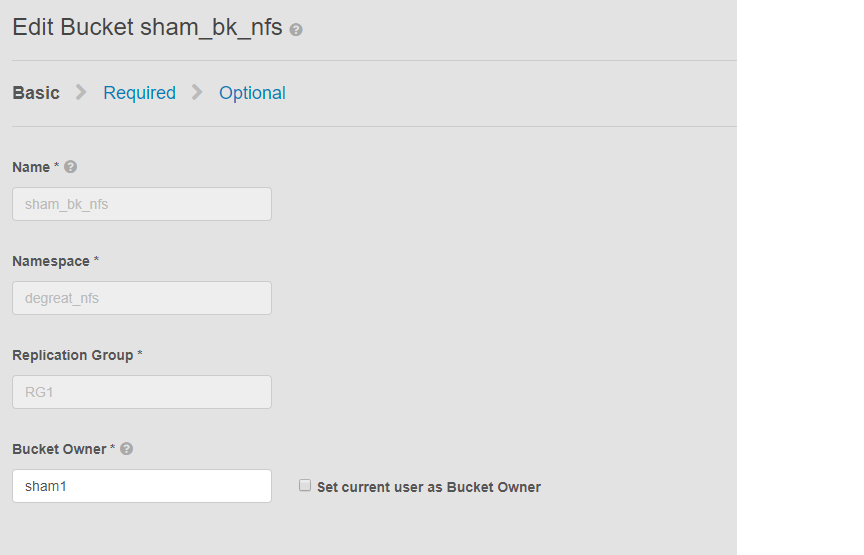
此问题适用于启用了 NFS 的存储区以及通过用户界面更改存储区所有者。这可能会导致连接到的应用程序或用户失去对 Linux 文件系统上的存储区的访问权限。即使我们将更改再次恢复给原始所有者,也无法进行访问,从而导致 DU。
在此示例中:
存储区所有者已使用用户界面更改为“sham2”。由于 ECS 中的限制,即使在将存储区所有者名称更改回“sham1”之后也是如此。ECS 不会使用用户界面将存储区所有者更改回“sham1”。目前只能通过 CLI 使用带有有效负载的 API 来完成此操作,以便将 resetowner 标记设置为 true。
识别问题的方法,在 Linux 计算机上要求用户触摸文件,例如:
此问题适用于启用了 NFS 的存储区以及通过用户界面更改存储区所有者。这可能会导致连接到的应用程序或用户失去对 Linux 文件系统上的存储区的访问权限。即使我们将更改再次恢复给原始所有者,也无法进行访问,从而导致 DU。
在此示例中:
存储区所有者已使用用户界面更改为“sham2”。由于 ECS 中的限制,即使在将存储区所有者名称更改回“sham1”之后也是如此。ECS 不会使用用户界面将存储区所有者更改回“sham1”。目前只能通过 CLI 使用带有有效负载的 API 来完成此操作,以便将 resetowner 标记设置为 true。
识别问题的方法,在 Linux 计算机上要求用户触摸文件,例如:
admin@node1~>touch file
touch: setting times of `file': Remote I/O error

se svc_log with the string  "method updateObjectInternal "

Command:
# svc_log -a -sr dataheadsvc | grep "method updateObjectInternal"
Example:
admin@node1~>svc_log -a -sr dataheadsvc | grep "method updateObjectInternal"
svc_log v1.0.22 (svc_tools v1.5.3)                 Started 2019-06-06 10:45:04

Running on nodes:              <All nodes>
Time range:                    2019-06-05 10:45:04 - 2019-06-06 10:45:04
Filter string(s):              <All messages>
Show nodename(s):              True
Search reclaim logs (if any):  False

com.emc.storageos.data.object.exception.ObjectControllerException: method updateObjectInternal not allowed for previous bucket owner sham1
Caused by: com.emc.storageos.data.object.exception.ObjectControllerException: method updateObjectInternal not allowed for previous bucket owner sham1
Cause
使用特定用户作为所有者创建存储区,然后更改存储区的所有权。最后,使用 ACL 页面向原始所有者授予完全控制权会失败,并出现 ECS 日志异常:
ObjectControllerException: method updateObjectInternal not allowed for previous bucket owner <ownerid>
This is a known issue currently being evaluated by Dell EMC at this time.
Resolution
解决方法是通过 CLI 使用 API 将存储区所有者更改为存储区所有者,并将有效负载更改为 resetowner 标记为 true。
1.确定当前存储区所有者。
2.使用 vi 编辑器创建简单的 xml 文件。在下面的示例中,它被称为 /tmp/bucket-owner.xml。这是一个多步骤过程。我们必须将其临时设置为 sham2 的新所有者。如下面的示例中所示,在设置回原始所有者 sham1 之前,请确认输出:
。7.配置更改完成后,我们应该不会再看到相同的错误
1.确定当前存储区所有者。
需要用户界面 root 密码才能生成令牌。例如:
admin@ecsnode1:~> tok=$(curl -iks https://XX.XX.XX.XX:4443/login -u 'root:ChangeMe' | grep X-SDS-AUTH-TOKEN)
验证当前存储区所有者(在您的情况中替换存储区和命名空间):
admin@node1:~> curl -s -k -X GET -H "$tok" https://XX.XX.XX.XX:4443/object/bucket/sham_bk_nfs/info?namespace=degreat_nfs | xmllint --format - | grep '<owner>'
  <owner>sham2</owner>
这确认参数reset_previous_owners需要设置为 true。恢复的存储区所有者位于用户界面上,但通过 CLI 的 API 确认 ECS 仍将存储区所有者视为“sham2”。
2.使用 vi 编辑器创建简单的 xml 文件。在下面的示例中,它被称为 /tmp/bucket-owner.xml。这是一个多步骤过程。我们必须将其临时设置为 sham2 的新所有者。如下面的示例中所示,在设置回原始所有者 sham1 之前,请确认输出:
admin@node1:~ # vi /tmp/bucket-owner.xml

admin@ecsnode1:~ # cat /tmp/bucket-owner.xml
<object_bucket_update_owner>
   <namespace>degreat_nfs</namespace>
   <new_owner>sham2</new_owner>
   <reset_previous_owners>true</reset_previous_owners>
</object_bucket_update_owner>

3. Change the bucket owner to the temporary owner.
通过 xml 文件将存储桶所有者更改为“sham2”所需的 API 语法如下:
admin@ecsnode1:~> curl -v -k -X "POST" "https://xx.xx.xx.xx:4443/object/bucket/sham_bk_nfs/owner" -H "$tok" -H "Content-Type: application/xml" -H "ACCEPT:application/xml" -d @/tmp/bucket-owner.xml -v
* Hostname was NOT found in DNS cache
*   Trying xx.xx.xx.xx...
* Connected to xx.xx.xx.xx (xx.xx.xx.xx) port 4443 (#0)
* successfully set certificate verify locations:
*   CAfile: none
  CApath: /etc/ssl/certs/
* SSLv3, TLS unknown, Certificate Status (22):
* SSLv3, TLS handshake, Client hello (1):
* SSLv3, TLS handshake, Server hello (2):
* SSLv3, TLS handshake, Certificate (11):
* SSLv3, TLS handshake, Server key exchange (12):
* SSLv3, TLS handshake, Server finished (14):
* SSLv3, TLS handshake, Client key exchange (16):
* SSLv3, TLS change cipher, Client hello (1):
* SSLv3, TLS handshake, Finished (20):
* SSLv3, TLS change cipher, Client hello (1):
* SSLv3, TLS handshake, Finished (20):
* SSL connection using TLSv1.2 / ECDHE-RSA-AES256-GCM-SHA384
* Server certificate:
*        subject: CN=localhost
*        start date: 2019-03-25 09:53:41 GMT
*        expire date: 2029-03-22 09:53:41 GMT
*        issuer: CN=localhost
*        SSL certificate verify result: self signed certificate (18), continuing anyway.
> POST /object/bucket/sham_bk_nfs/owner HTTP/1.1
> User-Agent: curl/7.37.0
> Host: xx.xx.xx.xx:4443
> X-SDS-AUTH-TOKEN: BAAcUy9KYlhxTlVYb2M0bnF3bTNscEsvSEdDeWhJPQMAjAQASHVybjpzdG9yYWdlb3M6VmlydHVhbERhdGFDZW50ZXJEYXRhOmJhOGQ3ZTkzLTMyMGYtNDNmNy05Y2FkLWM4YWQzMWFiMzY1MAIADTE1NTk3Mzk3OTA2MDgDAC51cm46VG9rZW46YjQ4NGNiZjEtNTkwNy00YWI3LTgzYTctM2Y3OGRhM2RiY2NiAgAC0A8=
> Content-Type: application/xml
> ACCEPT:application/xml
> Content-Length: 179
>
* upload completely sent off: 179 out of 179 bytes
< HTTP/1.1 200 OK
< Date: Thu, 06 Jun 2019 10:56:08 GMT
< Content-Length: 0
< Connection: keep-alive
<
* Connection #0 to host xx.xx.xx.xx left intact
4. Edit the simple.xml file previously created in step 2 and this time insert original owner of sham1
admin@node1:~ # vi /tmp/bucket-owner.xml

admin@ecsnode1:~ # cat /tmp/bucket-owner.xml
<object_bucket_update_owner>
   <namespace>degreat_nfs</namespace>
   <new_owner>sham1</new_owner>
   <reset_previous_owners>true</reset_previous_owners>
</object_bucket_update_owner>

5. Change the bucket owner back to the original owner
The API syntax required to change the bucket owner back to "sham1" through the xml file is as follows:
admin@ecsnode1:~> curl -v -k -X "POST" "https://xx.xx.xx.xx:4443/object/bucket/sham_bk_nfs/owner" -H "$tok" -H "Content-Type: application/xml" -H "ACCEPT:application/xml" -d @/tmp/bucket-owner.xml -v
* Hostname was NOT found in DNS cache
*   Trying xx.xx.xx.xx...
* Connected to xx.xx.xx.xx (xx.xx.xx.xx) port 4443 (#0)
* successfully set certificate verify locations:
*   CAfile: none
  CApath: /etc/ssl/certs/
* SSLv3, TLS unknown, Certificate Status (22):
* SSLv3, TLS handshake, Client hello (1):
* SSLv3, TLS handshake, Server hello (2):
* SSLv3, TLS handshake, Certificate (11):
* SSLv3, TLS handshake, Server key exchange (12):
* SSLv3, TLS handshake, Server finished (14):
* SSLv3, TLS handshake, Client key exchange (16):
* SSLv3, TLS change cipher, Client hello (1):
* SSLv3, TLS handshake, Finished (20):
* SSLv3, TLS change cipher, Client hello (1):
* SSLv3, TLS handshake, Finished (20):
* SSL connection using TLSv1.2 / ECDHE-RSA-AES256-GCM-SHA384
* Server certificate:
*        subject: CN=localhost
*        start date: 2019-03-25 09:53:41 GMT
*        expire date: 2029-03-22 09:53:41 GMT
*        issuer: CN=localhost
*        SSL certificate verify result: self signed certificate (18), continuing anyway.
> POST /object/bucket/sham_bk_nfs/owner HTTP/1.1
> User-Agent: curl/7.37.0
> Host: xx.xx.xx.xx:4443
> X-SDS-AUTH-TOKEN: BAAcUy9KYlhxTlVYb2M0bnF3bTNscEsvSEdDeWhJPQMAjAQASHVybjpzdG9yYWdlb3M6VmlydHVhbERhdGFDZW50ZXJEYXRhOmJhOGQ3ZTkzLTMyMGYtNDNmNy05Y2FkLWM4YWQzMWFiMzY1MAIADTE1NTk3Mzk3OTA2MDgDAC51cm46VG9rZW46YjQ4NGNiZjEtNTkwNy00YWI3LTgzYTctM2Y3OGRhM2RiY2NiAgAC0A8=
> Content-Type: application/xml
> ACCEPT:application/xml
> Content-Length: 179
>
* upload completely sent off: 179 out of 179 bytes
< HTTP/1.1 200 OK
< Date: Thu, 06 Jun 2019 10:56:08 GMT
< Content-Length: 0
< Connection: keep-alive
<
* Connection #0 to host xx.xx.xx.xx left intact


6.  Confirm the bucket owner change is reflected.
确认存储桶所有者的更改现在为“sham1”。
admin@ecsnode1:~> curl -s -k -X GET -H "$tok" https://XX.XX.XX.XX:4443/object/bucket/sham_bk_nfs/info?namespace=degreat_nfs | xmllint --format - | grep '<owner>'
<owner>sham1</owner>
在 API 上恢复存储区所有者后,确认主机现在可以访问 Linux 文件系统上的存储区。
。7.配置更改完成后,我们应该不会再看到相同的错误
svc_log -f "method updateObjectInternal not allowed" -start "20 hour ago" -sr all -sh -st hour
svc_log v1.0.22 (svc_tools v1.6.8)                 Started 2020-01-23 09:28:17

Running on nodes:              <All nodes>
Time range:                    2020-01-22 13:28:17 - 2020-01-23 09:28:17
Filter string(s):              'method updateObjectInternal not allowed'
Show nodename(s):              True
Search reclaim logs (if any):  False

Count of message occurrences per hour:

2020-01-22 13:xx - 5066
2020-01-22 14:xx - 9580
2020-01-22 15:xx - 9574
2020-01-22 16:xx - 9580
2020-01-22 17:xx - 9570
2020-01-22 18:xx - 9576
2020-01-22 19:xx - 9564
2020-01-22 20:xx - 9576
2020-01-22 21:xx - 9576
2020-01-22 22:xx - 9572
2020-01-22 23:xx - 9564
2020-01-23 00:xx - 9586
2020-01-23 01:xx - 9574
2020-01-23 02:xx - 9572
2020-01-23 03:xx - 4564
2020-01-23 04:xx - 0
2020-01-23 05:xx - 0
2020-01-23 06:xx - 0
2020-01-23 07:xx - 0
2020-01-23 08:xx - 0
2020-01-23 09:xx - 0


Dell EMC is aware of this issue and are working on a fix in a future release.
Additional Information
相关 NFS 知识库文章:
- 如何创建基本 NFS 导出并在客户端上装载它
- ECS:dataheadsvc 日志流式传输错误:请求 ReadLinkRequest 中不支持 NFSv3 过程 LINK
- NFS 装载失败并出现 No such file or directory(没有此类文件或目录)或 ERROR_OBJECT_NOT_FOUND(错误:未找到对象), ECS, NFS mount failing with No such file or directory or ERROR_OBJECT_NOT_FOUND
- NFS 远程 I/O 错误;更改已启用 FS 的存储桶的存储桶所有者可能会导致应用程序/用户无法访问 NFS 文件
- NFS 写入会在一定数量的数据后引发 I/O 错误。
- 将来自 ECS 的 NFS 文件共享与 VMware NFS 数据存储区配合使用
- 装载 ECS NFS 导出的最佳实践
- ECS,如何在 Windows 客户端上装载 NFS 共享
- 在 UI 中更改文件导出设置后,NFS 无法装载
- Oracle WebCenter Content (WCC) 是否与 ECS 兼容?
订阅产品更新。
您可以按照以下知识库文章中的说明订阅更新:
DELL EMC:如何订阅产品页面 - 戴尔支持?
Affected Products
Elastic Cloud StorageProducts
ECS Appliance, ECS Appliance Software with Encryption, ECS Appliance Software without Encryption, Elastic Cloud StorageArticle Properties
Article Number: 000055535
Article Type: Solution
Last Modified: 29 Jul 2026
Version: 5
Find answers to your questions from other Dell users
Support Services
Check if your device is covered by Support Services.