How To Install the Modular Accessories for Latitude Rugged Tablets
Summary: The following article provides information about the installation and features of the modular accessories for the Dell Latitude 12 Rugged 7202 and Rugged Extreme 7212 Tablets.
This article applies to
This article does not apply to
This article is not tied to any specific product.
Not all product versions are identified in this article.
Instructions
Modular Accessories for Latitude Rugged Tablets
The Dell Latitude 12 Rugged 7202 and Rugged Extreme 7212 Tablets can expand their functionality by connecting accessory modules to them.
Each Module attaches securely to the back of the tablet when fitted and can be removed to reduce weight when not required.

The extended I/O module pictured above consists of:
- USB 3.0 connectors x two
- Network interface controller (NIC) Ethernet port
Modular Accessories install guides for the Rugged Tablets
-
Seat the module at the back of the tablet. It locates above the batteries and on top of the Pogo-pin connector on the rear of the unit.
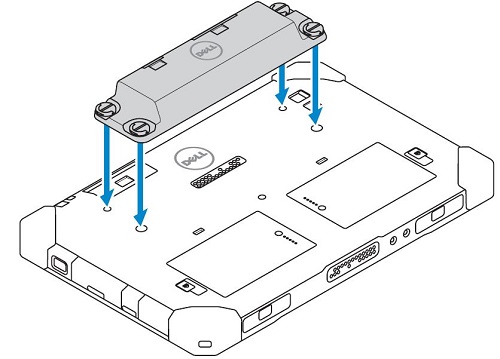
-
There is a screw in each corner of the module and a corresponding hole on the back of the tablet. Locate the screws to the four (4) holes and tighten until secure. (The screws are Thumbscrews. This means that tools are not required to fit or remove the module. There is a D-ring on the head of the thumbscrew that flips up and gives a better grip for tightening or loosening the screws.)
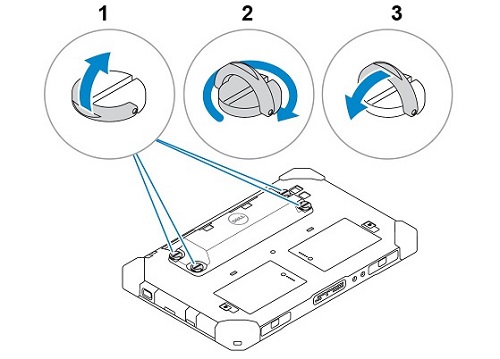
-
Removing the module is loosening the four (4) thumbscrews until the module releases from the back of the tablet.
Affected Products
Electronics & Accessories, Latitude 7212 Rugged Extreme Tablet, Latitude 7202 Rugged TabletArticle Properties
Article Number: 000137097
Article Type: How To
Last Modified: 30 Sep 2025
Version: 6
Find answers to your questions from other Dell users
Support Services
Check if your device is covered by Support Services.