NVP-vProxy:無法鎖定虛擬機器以供備份:另一個 vProxy 作業在 VM 上處於活動狀態
Summary: NetWorker VMware Protection (NVP) 整合是透過 vProxy 裝置進行設定。 部分 VM 的虛擬機器 (VM) 備份失敗,並顯示整合錯誤訊息。
This article applies to
This article does not apply to
This article is not tied to any specific product.
Not all product versions are identified in this article.
Symptoms
vProxy 備份工作階段記錄顯示:
YYYY/MM/DD HH:MM:SS INFO: Found virtual machine "VM-NAME" with MORef "vm-###".
YYYY/MM/DD HH:MM:SS NOTICE: Virtual machine "VM-NAME" requires consolidation of its virtual disks.
YYYY/MM/DD HH:MM:SS ERROR: Failed to complete consolidation of virtual disks for "VM-NAME" (vm-###): Unable to access file since it is locked
YYYY/MM/DD HH:MM:SS WARN: Failed to consolidate virtual disks of virtual machine "VM-NAME" (vm-###): Failed to complete consolidation of virtual disks for "VM-NAME" (vm-###): Unable to access file since it is locked.
YYYY/MM/DD HH:MM:SS WARN: Failed to consolidate virtual disks of virtual machine "VM-NAME" (vm-###): Failed to complete consolidation of virtual disks for "VM-NAME" (vm-###): Unable to access file since it is locked.
YYYY/MM/DD HH:MM:SS NOTICE: Snapshot "snapshot-###" of virtual machine "VM-NAME" (vm-###) was removed.
VM 工作階段記錄位於以下位置下的 vProxy 上: /opt/emc/vproxy/runtime/logs/recycle/vbackupd/DATE
您也可以在 NetWorker 伺服器上找到虛擬機器 (VM) 備份工作階段記錄:
- Linux:
/nsr/logs/policy/POLICY_NAME/WORKFLOW_NAME - Windows (預設):
C:\Program Files\EMC NetWorker\nsr\logs\policy\POLICY_NAME\WORKFLOW_NAME\
注意:NetWorker 原則記錄會遵循 NetWorker 伺服器 jobsdb 的保留時間 (預設為 72 小時)。保留期間過後,記錄會從 NetWorker 伺服器移除,但存在於 vProxy 上。
Cause
先前的備份意外終止,但快照磁碟仍掛接於 vProxy 裝置上。
Resolution
若要解決此問題,請從 vProxy 裝置移除虛擬機器磁碟 (VMDK)。
選項一:
使用 ProxyHC 以移除剩餘磁碟並清理過時的工作階段 (如果找到)。
如需以下方面的指示: ProxyHC,請參閱:NVP-vProxy:如何在 vProxy 裝置
上使用執行狀況檢查工具 ProxyHC所需的 ProxyHC 選項包括: ProxyHC disk tasks cleanup
選項二:
從 vProxy 移除 VM 磁碟。
注意:如果沒有執行 VM 備份或還原作業,vProxy VM 僅應包含兩個磁碟。
警示:只有在 vProxy 上未執行任何備份或還原動作時,才執行下列步驟。您可以從 NetWorker Management Console (NMC)、NetWorker Web 使用者介面 (NWUI),或
nsrwatch NetWorker 伺服器上的命令列。
- 登入 vSphere Web 介面。
- 以滑鼠右鍵按一下備份 vProxy 裝置。
- 按一下編輯設定。
- 展開所有硬碟。
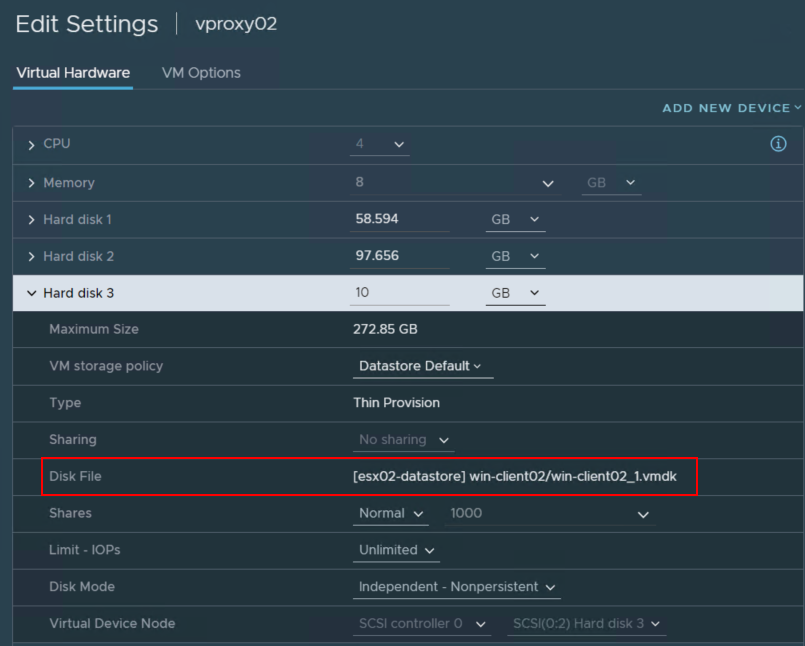
- 選取屬於發生問題的虛擬機器的硬碟。VM 硬碟應在磁碟檔案路徑中顯示 VM 名稱:
- 按一下硬碟旁的 X ,將硬碟從虛擬機器取消掛接。
警示:請勿選取從資料存放區刪除檔案。
- 按一下確定。
- 使用 vSphere Web Client 整合/刪除 VM 上的快照。
Additional Information

Article Properties
Article Number: 000195596
Article Type: Solution
Last Modified: 13 May 2026
Version: 4
Find answers to your questions from other Dell users
Support Services
Check if your device is covered by Support Services.