NVP-vProxy:无法锁定用于备份的虚拟机:另一个 vProxy作在虚拟机上处于活动状态
Summary: NetWorker VMware Protection (NVP) 集成已通过 vProxy 设备进行配置。 某些虚拟机的虚拟机 (VM) 备份失败,并显示整合错误消息。
This article applies to
This article does not apply to
This article is not tied to any specific product.
Not all product versions are identified in this article.
Symptoms
vProxy 备份会话日志显示:
YYYY/MM/DD HH:MM:SS INFO: Found virtual machine "VM-NAME" with MORef "vm-###".
YYYY/MM/DD HH:MM:SS NOTICE: Virtual machine "VM-NAME" requires consolidation of its virtual disks.
YYYY/MM/DD HH:MM:SS ERROR: Failed to complete consolidation of virtual disks for "VM-NAME" (vm-###): Unable to access file since it is locked
YYYY/MM/DD HH:MM:SS WARN: Failed to consolidate virtual disks of virtual machine "VM-NAME" (vm-###): Failed to complete consolidation of virtual disks for "VM-NAME" (vm-###): Unable to access file since it is locked.
YYYY/MM/DD HH:MM:SS WARN: Failed to consolidate virtual disks of virtual machine "VM-NAME" (vm-###): Failed to complete consolidation of virtual disks for "VM-NAME" (vm-###): Unable to access file since it is locked.
YYYY/MM/DD HH:MM:SS NOTICE: Snapshot "snapshot-###" of virtual machine "VM-NAME" (vm-###) was removed.
虚拟机会话日志可在 vProxy 上的以下位置找到: /opt/emc/vproxy/runtime/logs/recycle/vbackupd/DATE
您还可以在 NetWorker 服务器上找到虚拟机 (VM) 备份会话日志:
- Linux:
/nsr/logs/policy/POLICY_NAME/WORKFLOW_NAME - Windows(默认值):
C:\Program Files\EMC NetWorker\nsr\logs\policy\POLICY_NAME\WORKFLOW_NAME\
提醒:NetWorker 策略日志遵循 NetWorker 服务器作业数据库保留期(默认为 72 小时)。保留期过后,日志将从 NetWorker 服务器中删除,但仍存在于 vProxy 上。
Cause
以前的备份意外终止,快照磁盘仍装载在 vProxy 设备上。
Resolution
要解决此问题,请从 vProxy 设备中删除虚拟机磁盘 (VMDK)。
选项一:
使用 ProxyHC 删除剩余磁盘并清理过时的会话(如果找到)。
有关以下方面的说明: ProxyHC看到:NVP-vProxy:如何在 vProxy 一体机上使用运行状况检查工具 ProxyHC
所需的 ProxyHC 选项包括: ProxyHC disk tasks cleanup
选项二:
从 vProxy 中删除虚拟机磁盘。
提醒:如果未运行任何虚拟机备份或还原作,则 vProxy 虚拟机应仅包含两个磁盘。
注意:仅当 vProxy 上没有运行备份或还原作时,才执行以下步骤。您可以从 NetWorker Management Console (NMC)、NetWorker Web 用户界面 (NWUI) 或
nsrwatch NetWorker 服务器上的命令行。
- 登录 vSphere Web 界面。
- 右键单击备份 vProxy 一体机。
- 点击编辑设置。
- 展开所有硬盘。
- 选择属于有问题的虚拟机的硬盘。虚拟机硬盘应在磁盘文件路径中显示虚拟机名称:
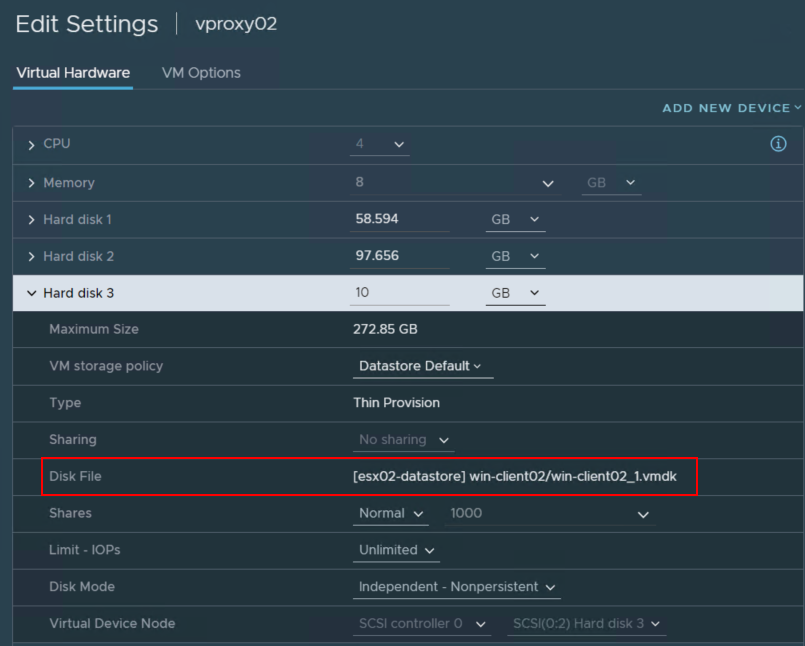
- 单击硬盘旁边的 X 以从虚拟机卸载硬盘。
注意:请勿选择 Delete files from the datastore。
- 单击OK(确定)。
- 使用 vSphere Web 客户端整合/删除虚拟机上的快照。
Additional Information

Article Properties
Article Number: 000195596
Article Type: Solution
Last Modified: 13 May 2026
Version: 4
Find answers to your questions from other Dell users
Support Services
Check if your device is covered by Support Services.