PowerVault ME5/ME52: Creating and Importing Custom Certificates
Summary: This article covers the entire process of creating custom certificates for ME5 storage.
This article applies to
This article does not apply to
This article is not tied to any specific product.
Not all product versions are identified in this article.
Instructions
Setting up AD Certificate Authority certificates on an ME5
Prerequisites
- Install Active Directory Certificate Services for your domain and configure the services
- Record the IPs, Domain Name System (DNS) server IPs, search domain, and system names for each ME5 controller
Gather the Controller Information.
The following information is required for creating Certificates:
- The hostname of each controller
- The IP address of each controller
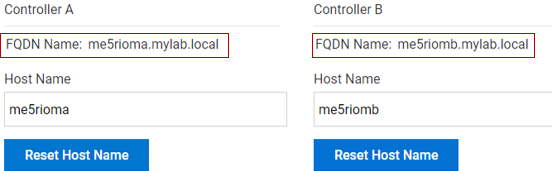
- The DNS Fully Qualified Domain Name (FQDN) for each controller
- The details below are used in this example:
me5rioma.mylab.local AAA.BB.56.10 ME5RIOMAme5riomb.mylab.local AAA.BB.56.11 ME5RIOMB
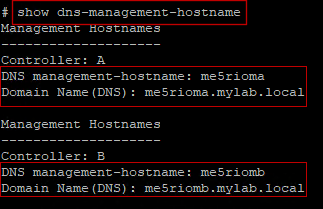
- Use the show
dns-management-hostnameor the UI (Settings > System) to get the common name (CN) hostname of each controller
show dns-management-hostname
- Verify that the FQDN is filled out
- If it is not,
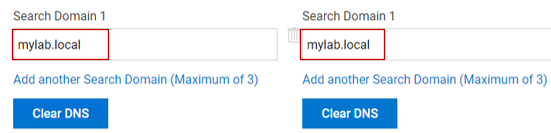
- Configure the DNS search domain as seen below
- CLI
- UI

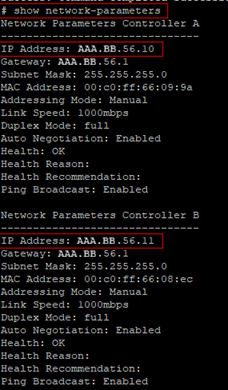
- Use the show network-parameters command or the UI (Settings > Network) to get the IP address of each controller:
show network-parameters
Create DNS entries for Controller A and Controller B.
- Using your normal domain DNS,
- Create an A record for each controller with your required domain name
- In this example, me5-a and me5-b are used in Microsoft DNS
- The IP address should match the IP address in the previous section
- The array should be using the same DNS servers the normal servers are
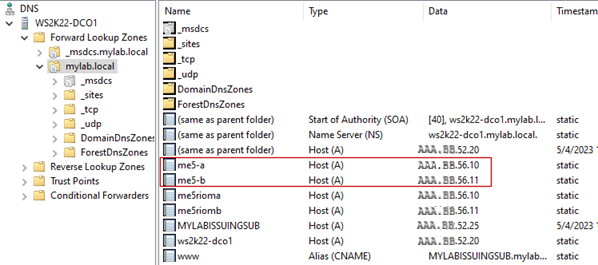
- For our example environment, the DNS records below were created as shown below
- Controller A
me5rioma.mylab.localme5-a
- Controller B
me5riomb.mylab.localme5-b
- As seen in AD
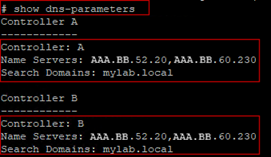
- Use
show dns-parameterscommand to verify:- The DNS server is set
- The search domain is set on the controllers
show dns-parameters
- Alternatively, use the UI in Settings > Network > DNS to apply the DNS servers and Search Domains
Creating and Installing a Certificate on a Controller
This process is the same for both the A and the B controller but there is a different certificate for each controller.
IMPORTANT: All actions for the A controller must be done on controller A. Do not use FTP or SSH to controller B for these actions. Do not restart the management service on the controller until both the CA certificate and the controller certificate have been installed.
Create certificate-signing-request syntax and parameters:
The content string cannot exceed 1024 characters and can include printable UTF-8 characters except space or semicolon. An example is:
/C=US/ST=CO/O=MyOrganization/CN=(The Host Name not the FQDN) See below image.
If FQDN is used, an error shows that with CN name does not match. These parameters must be specified.
Extension and basicConstraints parameters:
If any clarification is needed for extensions and basicConstraints parameters, the external link is included here corn Requests for Comments (RFC) 5280. A lot of how the CA environment is configured affects the creation of this section of the certificates.
- External link =
https://www.rfc-editor.org/rfc/rfc5280#section-4.2 - Location in link = RFC 5280 Page 16
- Heading = Certificate and Certificate Extensions Profile
- Example results

Create Certificate Signing Request for Controller A.
- PuTTY into controller A
- Run the CSR commands:
- Substitute the CSR commands parameter that matches your environment
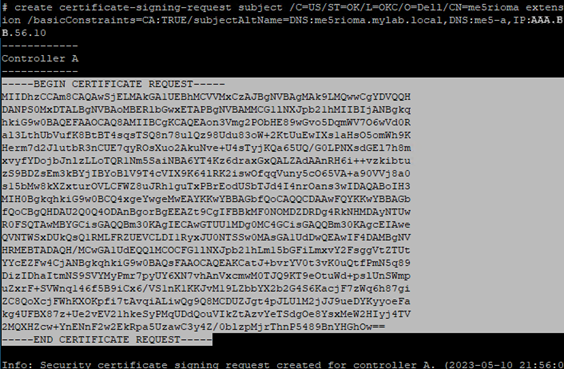
create certificate-signing-request subject <LDAP Parameters> /basicConstraints=CA:TRUE/subjectAltName=DNS:<FQDN>,DNS:<FQDN>,IP:<controllerIP>
Lab example:
create certificate-signing-request subject /C=US/ST=OK/L=OKC/O=Dell/CN=me5rioma extension /basicConstraints=CA:TRUE/subjectAltName=DNS:me5rioma.mylab.local,DNS:me5-a,IP:AAA.BB.56.10
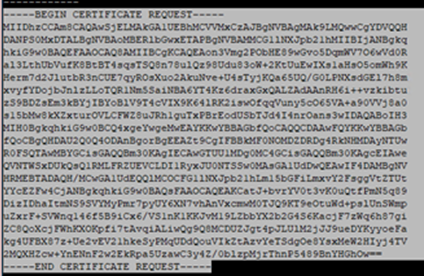
- The CSR command output is what is presented to the CA server
- Copy the file as shown below
- Verify that there is no extra space.
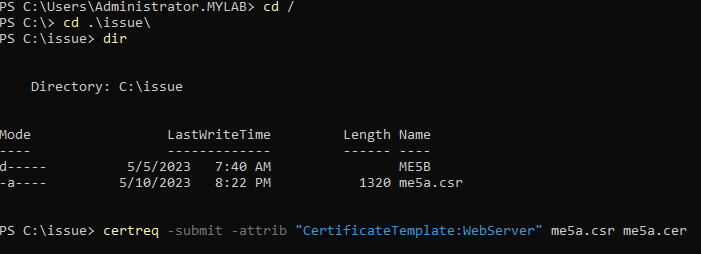
- Copy the highlighted file to notepad or notepad ++ and save it as
me5a.csr - Run the
.CSRfile to the CA to create the.CERfile- The administrator should already know how to do this as this is out of Support's scope.
For this example, in the lab running windows CA certificate
certreq -submit -attrib "CertificateTemplate:WebServer" me5a.csr me5a.cer
- Click "OK" at the next window
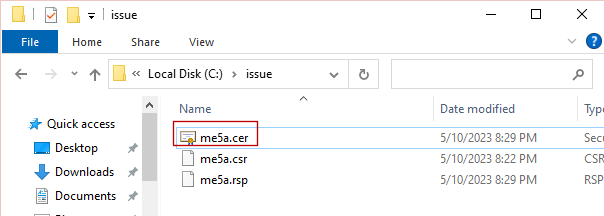
- As seen below, the new certificate for controller A is created.
Create Certificate Signing Request for Controller B.
- PuTTY into controller B
- Run the CSR commands:
- Substitute the CSR commands parameter that matches your environment
create certificate-signing-request subject <LDAP Parameters> /basicConstraints=CA:TRUE/subjectAltName=DNS:<FQDN>,DNS:<FQDN>,IP:<controllerIP>
Lab example:
create certificate-signing-request subject /C=US/ST=OK/L=OKC/O=Dell/CN=me5riomb extension /basicConstraints=CA:TRUE/subjectAltName=DNS:me5riomb.mylab.local,DNS:me5-b,IP:AAA.BB.56.11
- The CSR command output is what is required to present to the CA server
- Copy the file as shown below
- Verify that there is no extra space
- Copy the highlighted file to notepad or notepad ++ and save it as
me5b.csr - Run the
.CSRfile to the CA to create the.CERfile- The administrator should already know how to do this as this is out of Support's scope.
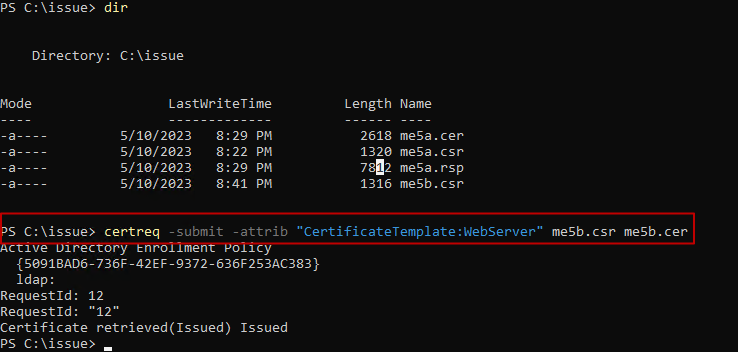
In this example, running windows CA certificate
certreq -submit -attrib "CertificateTemplate:WebServer" me5b.csr me5b.cer
- Click "OK" at the next window

- As seen below, the controller B certificate is now created
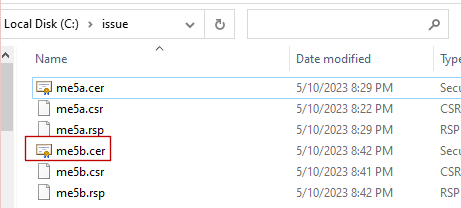
Exporting the AD CA Root Certificate
To export the AD CA root certificate, follow the below steps with the created certificate.
- Double-click the certificate that was created for the controllers
- In this case, use the
me5b.cerfile
- In this case, use the
- Click the Certification Path tab
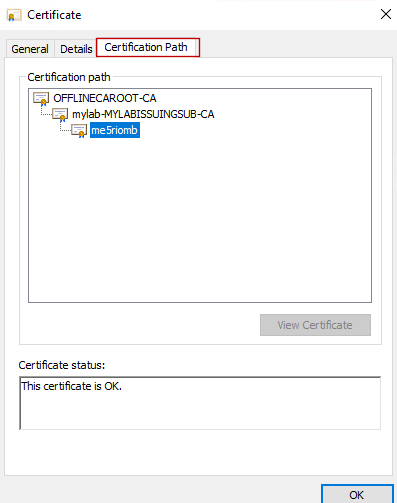
- Double-click the
OFFLINECAROOT-CA
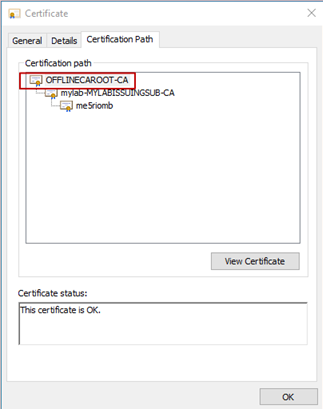
- The offline root certificate window shows.
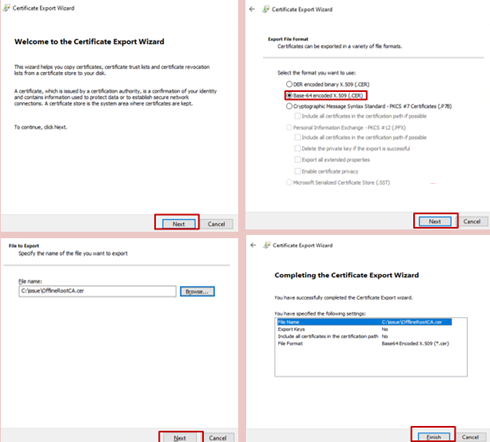
- Click the details tab
- Click the "copy to file"

- Click Next
- Click the
Base-64 encoded x.509 (CER) - Click Next
- Browse where the root certificate should be saved
- Better to have it in the same directory as the controller certificates
- Easier to be in one directory when it is time to upload the certificates using FTP
- Click Finish
- A prompt with "Export Successful" appears
- Click "OK"
- Close the
OFFLINECAROOT-CAcertificate
Example below
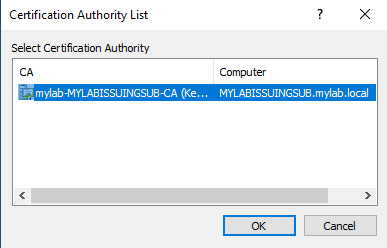
- Go back to step 1 and choose the intermediate root certificate (
Mylab-MYLABISSUINGSUB-CA) to export that certificate - As seen below, both the root and the intermediate root certificate were extracted
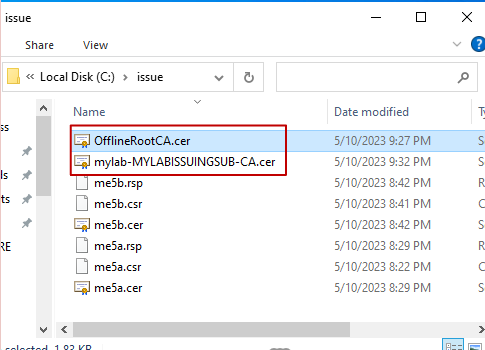
Installing the Certificate on controllers.
Installing the certificates on controller A and controller B
- Ensure the FTP service is running on the storage
- Log in to each controller individually using FTP with a user who has FTP permissions enabled
- On the Windows PowerShell, change the directory to the folder where all the certificates are located.
- The sequence to upload the certificate to controllers are as follows:
- Upload the root certificate first (
OfflineRootCa.cer) - Upload the root intermediate certificate second (
mylab-MYLABISSUINGSUB-CA.cer) - Upload the controller certificate last (
me5a.cer)
- Upload the root certificate first (
- If there is a three-tier Public Key Infrastructure (PKI) root certificate server:
- The topmost root certificate of the tier uploads first
- Then secondary root certificate
- Then the intermediate root certificate
- Then the controller certificate
- For controller A on this instance:
- Go to the directory where the certificates are located.
- FTP to controller A
- Logon with a user that has FTP permissions
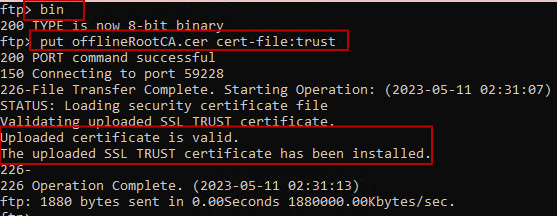
- Type
bin - Type the following:
Put offlineRootCA.cer cert-file:trust
put offlineRootCA.cer cert-file:trust
- Type the following:
put mylab-MYLABISSUINGSUB0CA.cer cert-file:trust

- Type the following:
put me5a.cer cert-file:usr
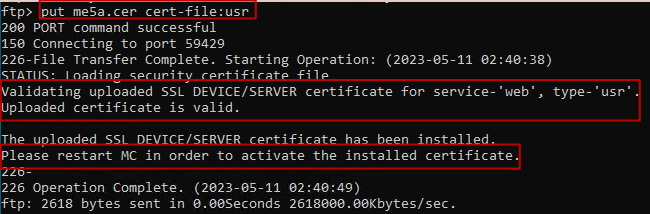
- Notice the output requests to start the MC process to activate the certificate. DO NOT DO THIS YET. Install the certificates on the controller B first.
- Go back to step 1 for controller B certificate installation
- Use FTP to connect to the IP address of the B controller first
- Once both controller’s certificates are uploaded:
- SSH to any controller and type
show certificatesto see the certificates installed:
- SSH to any controller and type
show certificates
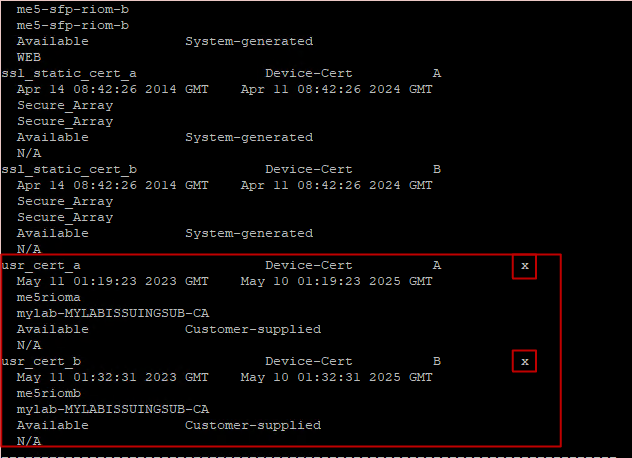
- Notice the asterisks on the certificates means that the certificates are activated
- The last step is to restart the Management Control process of both controllers
- On the SSH console, Type the below command to fully restart the management console:
restart mc both full
- After the management service comes back up, open a web browser to the FQDN of Controllers
- Check access to the controllers using https using the input on
subjecAltnameof the Certificate-Signing-Requestme5rioma.mylab.local
The process is complete.
Troubleshooting
The default certificates can be regenerated using CLI commands if issues arise during this process.
- The following steps are found in the CLI guide for storage
- The CLI Guide shows commands that apply to the latest firmware. The means that some commands used previously may now be missing. The following steps cover references to the latest commands in the latest firmware and older commands that no longer show in the CLI Guide on the Support Site.
Regenerating the Default Factory Certificates:
These steps require the controllers to be running the below firmware:
ME50xx = ME5.1.2.2.1 or laterME52xx = ME5.2.0.1.1 or later
- Log in to one of the controllers with an SSH or serial cable
- Check the current certificates with
show certificates
Example
# show certificates
Certificate Name                 Certificate Type     Controller WEB   Valid From                  Valid Till
  Issued To                                                        Issued By                                                        State
  Certificate Status          Default Services                 Encryption Type
---------------------------------------------------------------------------------------------------------------------------------------------------------
gen_cert_a                       Device-Cert          A          x     Dec 11 16:21:10 2025 GMT    Dec  9 16:21:10 2035 GMT
  me5rioma                                                         me5rioma                                                         Available
  System-generated            WEB                              RSA
gen_cert_b                       Device-Cert          B          x     Apr 22 14:58:17 2023 GMT    Apr 19 14:58:17 2033 GMT
  me5riomb                                                         me5riomb                                                         Available
  System-generated            WEB                              RSA
---------------------------------------------------------------------------------------------------------------------------------------------------------
Success: Command completed successfully. (2026-03-18 15:50:13)
- Run the CLI command to regenerate the needed certificate or both simultaneously
regenerate certificate a|b|both
Example:
# regenerate certificate both
Info: Removed certificate gen_cert_a.
Info: Removed certificate gen_cert_b.
Success: Command completed successfully. - To generate the certificate and have the change take effect, restart both MCs by entering "restart mc both full".  (2026-03-18 15:57:45)
- Restart management as directed with
restart mc both full
Example
# restart mc both full
During the restart process you will briefly lose communication with the specified Management Controller(s).

Do you want to continue? (y/n) y

Info: Restarting the local MC (A)...
Success: Command completed successfully. - Both MCs were restarted. (2026-03-18 15:59:41)
# Killed
- Confirm that changes took effect with
show certificates
Example
# show certificates
Certificate Name                 Certificate Type     Controller WEB   Valid From                  Valid Till
  Issued To                                                        Issued By                                                        State
  Certificate Status          Default Services                 Encryption Type
---------------------------------------------------------------------------------------------------------------------------------------------------------
gen_cert_a                       Device-Cert          A          x     Mar 18 16:01:13 2026 GMT    Mar 15 16:01:13 2036 GMT
  me5rioma                                                         me5rioma                                                         Available
  System-generated            WEB                              RSA
gen_cert_b                       Device-Cert          B          x     Mar 18 16:01:12 2026 GMT    Mar 15 16:01:12 2036 GMT
  me5riomb                                                         me5riomb                                                         Available
  System-generated            WEB                              RSA
---------------------------------------------------------------------------------------------------------------------------------------------------------
Success: Command completed successfully. (2026-03-18 16:11:54)
Older firmware used the command
create certificate unique
Affected Products
PowerVault ME5012, PowerVault ME5024, PowerVault ME5084Products
PowerVault ME5212, PowerVault ME5224, PowerVault ME5284Article Properties
Article Number: 000213369
Article Type: How To
Last Modified: 10 Apr 2026
Version: 5
Find answers to your questions from other Dell users
Support Services
Check if your device is covered by Support Services.