PowerProtect: DM5500: Physical Disk Failure
Summary: This article provides details on identifying and fixing a drive failure on the DM5500 appliance. Fatal ERROR may be seen when a drive fails on the appliance.
This article applies to
This article does not apply to
This article is not tied to any specific product.
Not all product versions are identified in this article.
Symptoms
Note: The DialHome case for Symptom Code OE_PDR5 is most likely the result of an on site maintenance activity to replace a faulted disk. If you receive an alert with Symptom Code OE_PDR5, please check for any ongoing disk replacement or other on-site maintenance activities.
If such an activity is currently in progress, you can disregard this alert. It's likely a normal byproduct of the maintenance work.
|
Message ID |
Severity |
Issue and Recommended Action |
|
OE_PDR5 |
Warning |
Issue<arg1> is removed. |
The following error appears on the 'Alerts' tab of the PowerProtect Data Manager DM5500 Appliance UI: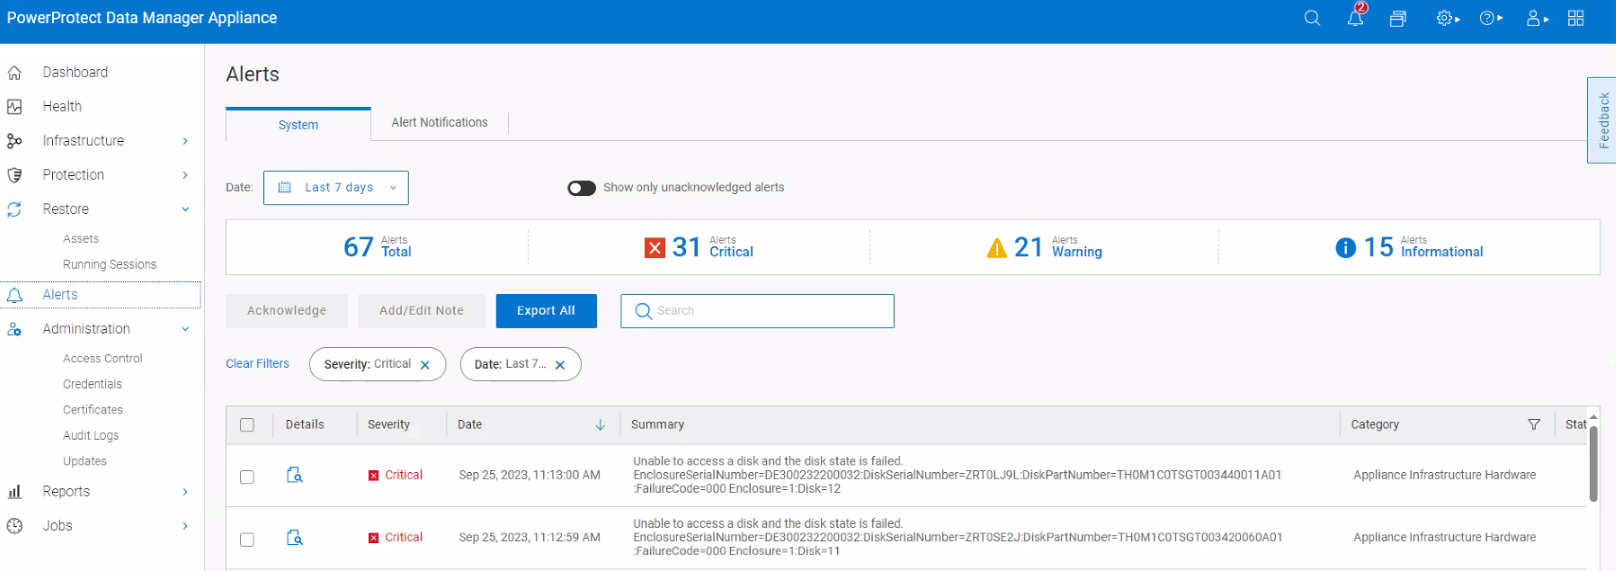
A message like below may be seen in the PowerProtect Data Manager DM5500 Appliance UI. Message ID is highlighted below.
Fault detected on drive arg1 in disk drive bay arg2. Remove and reseat the failed drive If the problem persists contact Dell Customer Support Refer to the product documentation to choose a convenient contact method
Alternately, the failure can also be confirmed from the appliance CLI:
- Open PuTTY to the DM5500 Appliance CLI or PPOE and log in as 'root' user.
- Issue the following command to query the disk status: system showfru Disk
Sample Output:
admin@appliance>system showfru Disk
Collecting Data............
Host xxx.xxx.xxx.xxx:
__________________________________________________________________________________________________
| ID| State   | Status| Model#         | Serial#       | FW Version| Capacity| Operation| OpStatus|
|=================================================================================================|
| 0 | Online  | OK    | MZILT960HBHQ0D3| S5YLNA0T400755| DSA3      | 894.25GB| None     | 0%      |
| 1 | Online  | OK    | MZILT960HBHQ0D3| S5YLNA0T400754| DSA3      | 894.25GB| None     | 0%      |
| 2 | Non-RAID| OK    | KPM6XRUG1T92   | 12V0A500T0VJ  | BA0D      | 1.75TB  | None     | 0%      |
| 3 | Non-RAID| OK    | MZILT3T8HBLS0D3| S5YNNA0T112148| DSA3      | 3.49TB  | None     | 0%      |
| 4 | Online  | OK    | MG07SCA12TEY   | 22A0A1EJFRLH  | EI0D      | 10.69TB | None     | 0%      |
| 5 | Online  | OK    | MG07SCA12TEY   | 22A0A1JAFRLH  | EI0D      | 10.69TB | None     | 0%      |
| 6 | Non-RAID| OK    | MG07SCA12TEY   | 22A0A1QFFRLH  | EI0D      | 10.69TB | None     | 0%      |
| 7 | Non-RAID| OK    | MG07SCA12TEY   | 22A0A1JCFRLH  | EI0D      | 10.69TB | None     | 0%      |
| 8 | Non-RAID| OK    | MG07SCA12TEY   | 22A0A1MFFRLH  | EI0D      | 10.69TB | None     | 0%      |
| 9 | Non-RAID| OK    | MG07SCA12TEY   | 22A0A1PPFRLH  | EI0D      | 10.69TB | None     | 0%      |
| 10| Non-RAID| OK    | MG07SCA12TEY   | 22A0A07ZFRLH  | EI0D      | 10.69TB | None     | 0%      |
| 11| Non-RAID| OK    | MG07SCA12TEY   | 22A0A16BFRLH  | EI0D      | 10.69TB | None     | 0%      |
| 12| Non-RAID| OK    | MG07SCA12TEY   | 22A0A1F1FRLH  | EI0D      | 10.69TB | None     | 0%      |
| 13| Non-RAID| OK    | MG07SCA12TEY   | 22A0A1BAFRLH  | EI0D      | 10.69TB | None     | 0%      |
| 14| Non-RAID| OK    | MG07SCA12TEY   | 22A0A158FRLH  | EI0D      | 10.69TB | None     | 0%      |
| 15| Non-RAID| OK    | MG07SCA12TEY   | 22A0A027FRLH  | EI0D      | 10.69TB | None     | 0%      |
| 16| Non-RAID| OK    | MG07SCA12TEY   | 22A0A1BJFRLH  | EI0D      | 10.69TB | None     | 0%      |
| 17| Non-RAID| OK    | MG07SCA12TEY   | 22A0A185FRLH  | EI0D      | 10.69TB | None     | 0%      |
| 18| Non-RAID| OK    | MG07SCA12TEY   | 22A0A1BHFRLH  | EI0D      | 10.69TB | None     | 0%      |
| 19| Non-RAID| OK    | MG07SCA12TEY   | 2290A4EZFRLH  | EI0D      | 10.69TB | None     | 0%      |
| 20| Non-RAID| OK    | MG07SCA12TEY   | 22A0A168FRLH  | EI0D      | 10.69TB | None     | 0%      |
| 21| Non-RAID| OK    | MG07SCA12TEY   | 22A0A15YFRLH  | EI0D      | 10.69TB | None     | 0%      |
| 22| Non-RAID| OK    | MG07SCA12TEY   | 22A0A15SFRLH  | EI0D      | 10.69TB | None     | 0%      |
| 23| Non-RAID| OK    | MG07SCA12TEY   | 22A0A077FRLH  | EI0D      | 10.69TB | None     | 0%      |
Cause
There are several causes listed below.
Use the table below to locate the MessageID, and the recommended action.
| Message ID | Severity | Issue and Recommended Action |
| OE_PDR12 | Critical | Issue<arg1> initialization has failed. Detail The physical disk has failed or is corrupt. Action Replace the failed or corrupt disk. Identify a disk that has failed by locating the disk that has a red "X" for its status. Restart the initialization. |
| OE_PDR13 | Critical | Issue <arg1> rebuild has failed. Detail A physical disk in the virtual disk has failed or is corrupted. In addition, you may have cancelled the rebuild. Action Replace the failed or corrupt disk, and then start the rebuild operation. |
| OE_PDR215 | Critical | IssueCopyback task to <arg1> has failed. Detail The Replace Member Disk operation did not complete successfully because of internal errors. The error may be due to problems with the source or target physical disks, or the controller may be out of resources. Action Retry the Replace Member Disk operation with a different target physical disk. If the problem persists, check the condition of the target physical disk and replace it if necessary, then retry the operation. |
| OE_PDR3 | Critical | Issue<arg1> is not functioning correctly. Detail The RAID Controller may not be able to read/write data to the physical disk drive indicated in the message. This may be due to a failure with the physical disk drive or because the physical disk drive was removed from the system. Action Remove and re-insert the physical disk drive identified in the message and make sure the physical disk drive is inserted properly. If the issue persists, replace the physical disk drive. |
| OE_PDR51 | Critical | Issue Hot spare <arg1> SMART polling has failed. <arg2> Detail The controller firmware attempted to do SMART polling on the hot spare but could not complete the SMART polling. The controller may have lost communication with the hot spare. Action Verify the health of the disk assigned as a hot spare. Replace the disk and reassign the hot spare. Make sure the cables are attached securely. See the storage hardware documentation for more information about checking the cables. |
| OE_PDR57 | Critical | IssueBad block table on <arg1> is full. Unable to log block <arg2>. Detail The bad block table is the table used for remapping bad disk blocks. This table fills as bad disk blocks are remapped. When the table is full, bad disk blocks are no longer remapped, which means that disk errors are no longer corrected. At this point, data loss can occur. Action Replace the disk generating this message and restore from a backup copy. You may have lost data. |
| OE_PDR61 | Critical | IssueThe rebuild of <arg1> failed due to errors on the source physical disk. Detail It is not possible to rebuild data that resides on a defective disk. Action Replace the source disk and restore data from backup. |
| OE_PDR62 | Critical | IssueThe rebuild failed due to errors on the target <arg1>. Detail It is not possible to rebuild data that resides on a defective disk. Action Replace the target disk. If a rebuild does not automatically start after replacing the disk, then initiate the Rebuild task. You may need to assign the new disk as a hot spare to initiate the rebuild. |
| OE_PDR63 | Critical | IssueA bad disk block on <arg1> cannot be reassigned during a write operation. Detail A write operation cannot complete because the disk contains bad disk blocks that could not be reassigned. Data loss may have occurred. Data redundancy may be lost. Action Replace the disk. |
| OE_PDR64 | Critical | IssueAn unrecoverable disk media error occurred on <arg1>. Detail The rebuild or recovery operation encountered an unrecoverable disk media error . Action Replace the disk. |
| OE_PDR73 | Critical | Issue Copyback failed from <arg1> to <arg2>. Detail The physical disk participating in the copyback operation failed. Action Replace the disk and retry the operation. |
| OE_PDR85 | Critical | IssueSecurity subsystem errors detected for <arg1>. Detail Errors were detected with security-related operations on the disk. The data on the disk might not be retrieved or stored successfully. In addition, the security of the stored data might be at risk. Action Verify the disk is a Secure Encrypted Disk and is not locked. If it is not, replace the disk with a Secure Encrypted Disk. See the storage hardware documentation for more information. |
| OE_PDR88 | Critical | IssuePower state change failed on <arg1>. (from <arg2> to <arg3>) Detail When physical drives in spun down power state are configured, the drives should transition to spun up power state. If the drive is not functioning properly, this transition could fail. Action Replace the physical disk and try again. Contact Dell Customer Support if the issue persists. |
| OE_PDR1002 | Warning | IssueA predictive failure detected on drive <arg1> in disk drive bay <arg2>. Detail The controller received a SMART error from the drive. The drive is operational but needs replace. Action The drive will need replacement at the next service window. |
| OE_PDR1102 | Warning | IssueA predictive failure detected on drive <arg1>. Detail The controller received a SMART error from the drive. The drive is operational but needs replacement. Action The drive will need replacement at the next service window. |
| OE_PDR16 | Warning | IssuePredictive failure reported for <arg1>. Detail The physical disk is predicted to fail. Many physical disks contain Self-Monitoring Analysis and Reporting Technology (SMART). When enabled, SMART monitors the disk health based on indications such as the number of write operations that were performed on the disk. Action Replace the physical disk. Even though the disk may not have failed yet, it is recommended that the disk be replaced. Review other messages for additional information. |
| OE_PDR2 | Warning | IssueInsufficient space available on <arg1> to perform a copyback operation. Detail This message is generated if a physical disk does not have enough space to do a copyback operation. Action Replace the physical disk with a larger physical disk, and then restart the copyback operation. |
| OE_PDR214 | Warning | IssueThe <arg1> is not supported because it is not supplied by an authorized hardware provider. Detail The physical disk identified in the message is not compliant with the standards set by the hardware provider and is not supported. Action Replace the physical disk with a supported physical disk that is provided by an authorized hardware provider. |
| OE_PDR37 | Warning | IssueThe <arg1> is not supported. Detail The physical device may not have a supported version of the firmware, or the physical device may not be supported. Action If the physical device is supported, then update the firmware to a supported version. If the physical device is not supported, then replace the physical device with one that is supported. |
| OE_PDR5 | Warning | Issue<arg1> is removed. Detail A physical disk has been removed from the disk group. This alert can also be caused by loose or defective cables or by problems with the enclosure. Action Do one of the following: 1) If a physical disk was removed from the disk group, either replace the disk or restore the original disk. Identify the disk that was removed by locating the disk that has a red "X" for its status. |
| OE_PDR55 | Warning | IssueInsufficient space available on the <arg1> to perform a rebuild. Detail The physical disk inserted is too small for the rebuild to occur. Action Replace the physical disk with one of correct protocol (SAS, SATA) with at least the required size. Force rebuild if it does not start automatically. |
| OE_PDR56 | Warning | IssueBad block table on <arg1> is 80% full. Detail The bad block table is the table used for remapping bad disk blocks. This table fills as bad disk blocks are remapped. When the table is full, bad disk blocks are no longer remapped, which means that disk errors are no longer corrected. At this point, data loss can occur. The bad block table is now 80 percent full. Action Replace the disk generating this message. |
| OE_PDR60 | Warning | IssueError occurred on <arg1>: <arg2>. Detail The reason for the error can vary depending on the situation. The firmware error code is indicated in the message. Action Verify the health of attached devices. Review the Lifecycle log for significant events. Replace faulty hardware, if required. Make sure the cables are attached securely. See the storage hardware documentation for more information about checking the cable connections. |
| OE_PDR86 | Warning | IssueBad block table on <arg1> is full. Detail The number of blocks on the disk that exhibit an error has exceeded the capacity of the drive to remap. Any future writes to bad sectors are unrecoverable. Action Replace the disk. |
| OE_PDR95 | Warning | IssueMicrocode update on <arg1> has failed. Detail The attempt to update the physical disk has failed. This is due to too much activity on the bus, a bad update package, or a bad disk. Action Retry the update. If the update fails a second time, verify that the update package is valid. If the update package is valid, replace the failing disk. Contact Dell Customer Support if the problem persists. |
| OE_PDR98 | Warning | IssueCommand timeout occurred on <arg1>. <arg2>. Detail An error occurred while performing an action on the disk. Action Check the disk is present or replace the disk. |
Resolution
DM5500 Drive Replacement
Procedures: The documentation links are found on PowerProtect Data Manager Appliance Info Hubs.
User must select the Info Hub based on their current appliance version.
Or
Go to the Dell Online Support Product Page to access the "Dell PowerProtect Data Manager Appliance 5.14.0.0 Customer Replaceable Unit (CRU) Procedures Guide for DM5500"
Prerequisites
-
Identify the failed drive in the PowerProtect Data Manager Appliance UI.
NOTE: In the UI, logical drive position numbering in the appliance starts at 1.1. Physical drive positions start numbering at 0.
a. Check the alerts in the Alerts tab and note down the drive number.
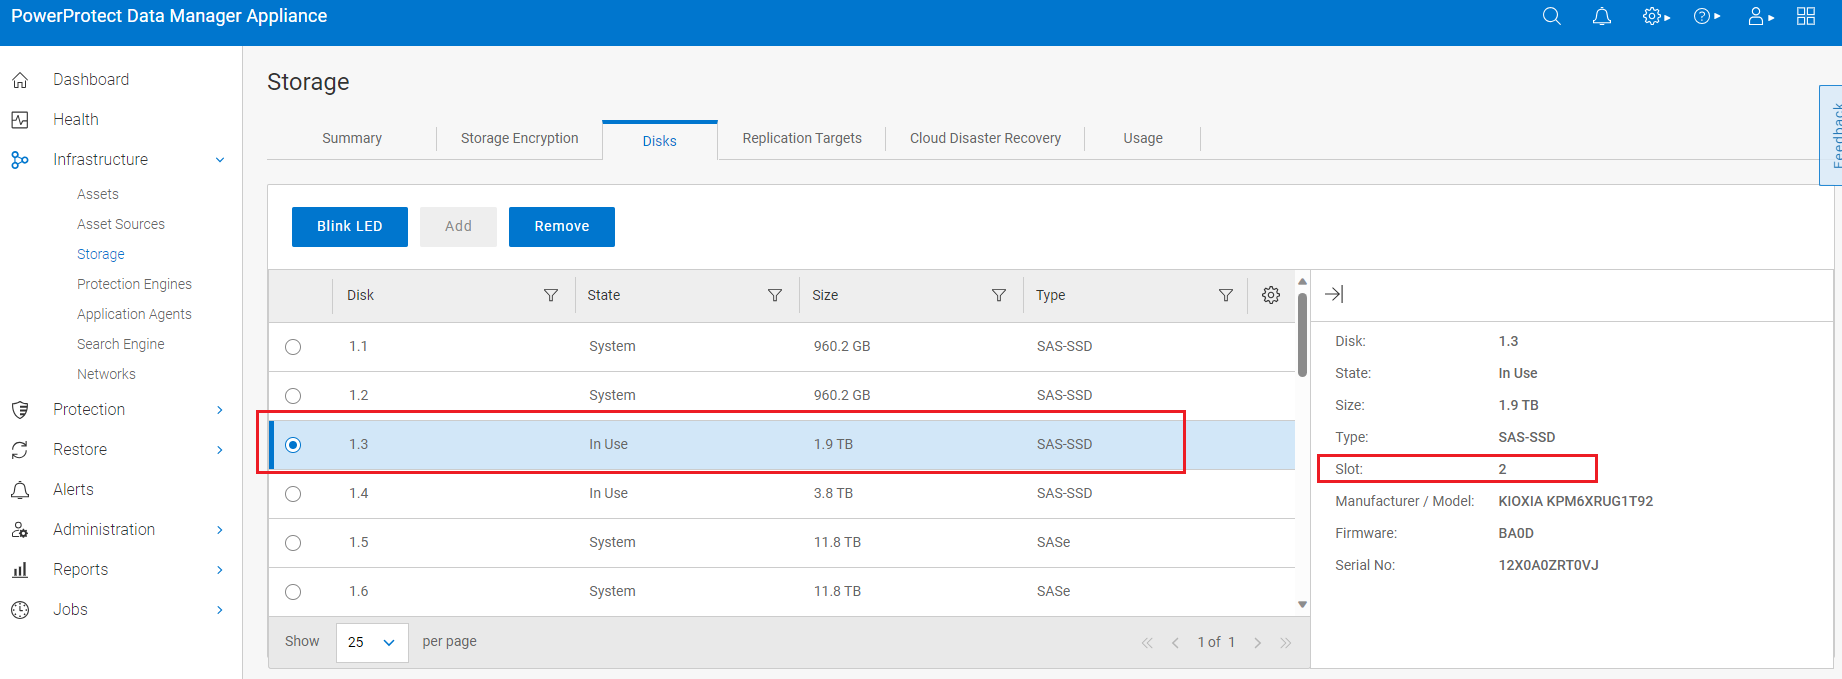
b. Go to the Infrastructure > Storage > Disks tab and select the failed disk from the list of disks.
c. To remove the disk drive, click the blue Remove button.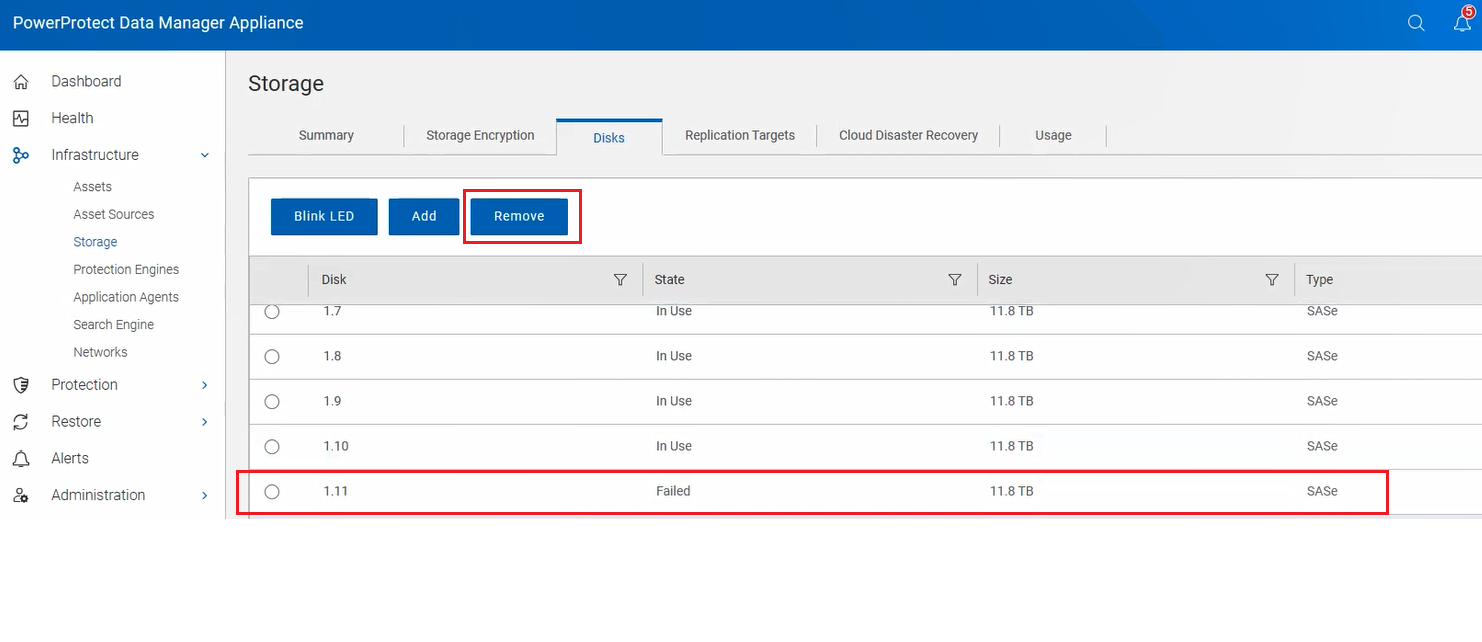
The Remove Disk: . Dialog appears.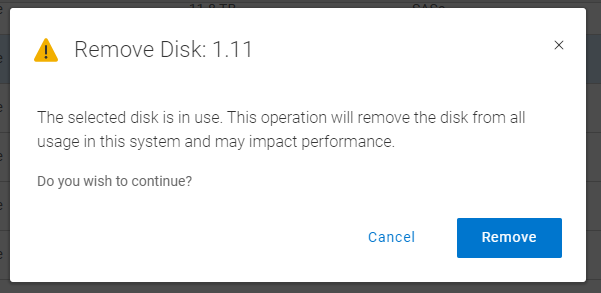
In the dialog, click Remove.
This initiates a data transfer from the failed disk to the remaining disks in the DM5500. The disk status changes to Absent or Not Installed.
d. To make the disk drive easier to locate in the appliance, click the blue Blink LED button.
The Blinking LED light for Disk: . Dialog appears, indicating that the LED light on the front of the drive in the server is blinking.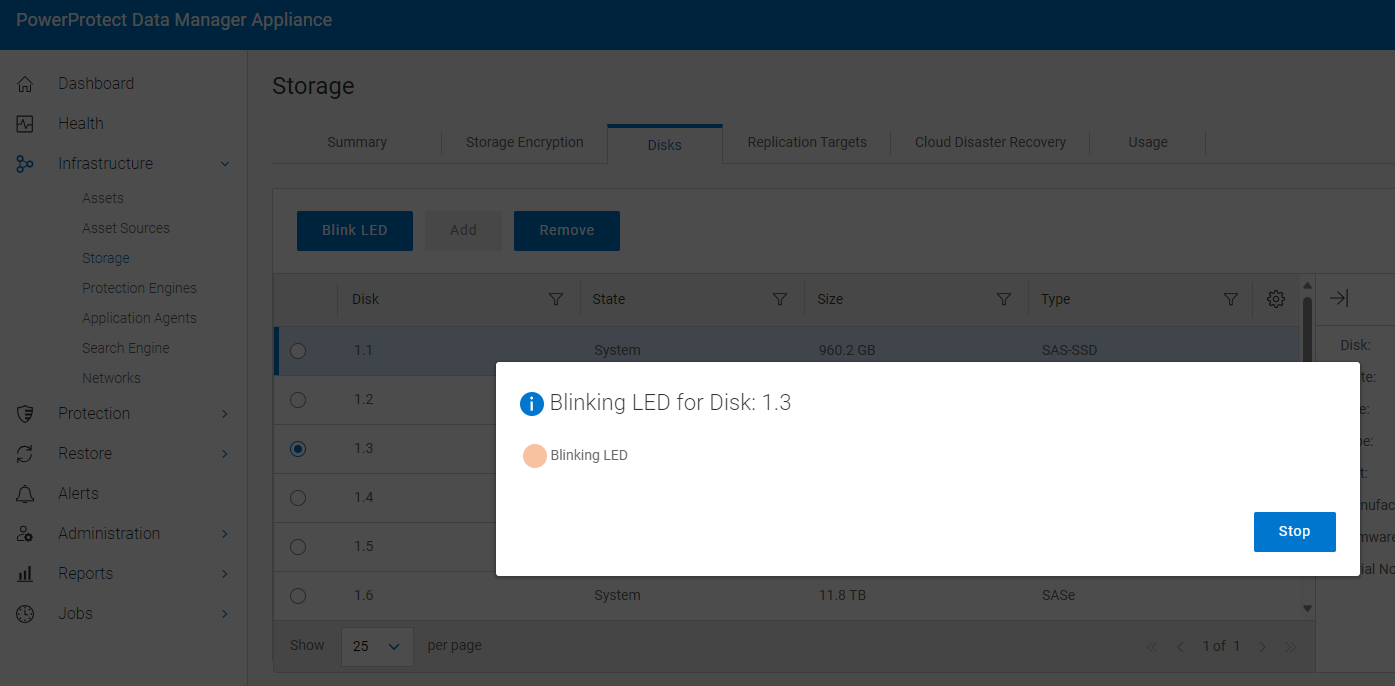
2. If you are removing a drive from drive bay 1, remove the front bezel.
3. If you are removing a drive from drive bay 2, you must open the drive bay.
4. If removing more than one drive, label each one with the corresponding drive number and to remove the drives in a top to bottom order.
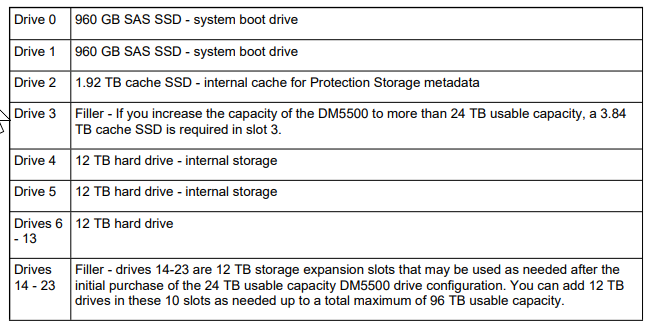
Physical drive slots are numbered 0-23 in the two drive bays, and there is an imprint at the bottom of each bay denoting the slot number, as shown in the following image.
You can also identify the correct drive slot number by highlighting the drive you want to replace. Click on the show details arrow, and then you see which slot the drive belongs to.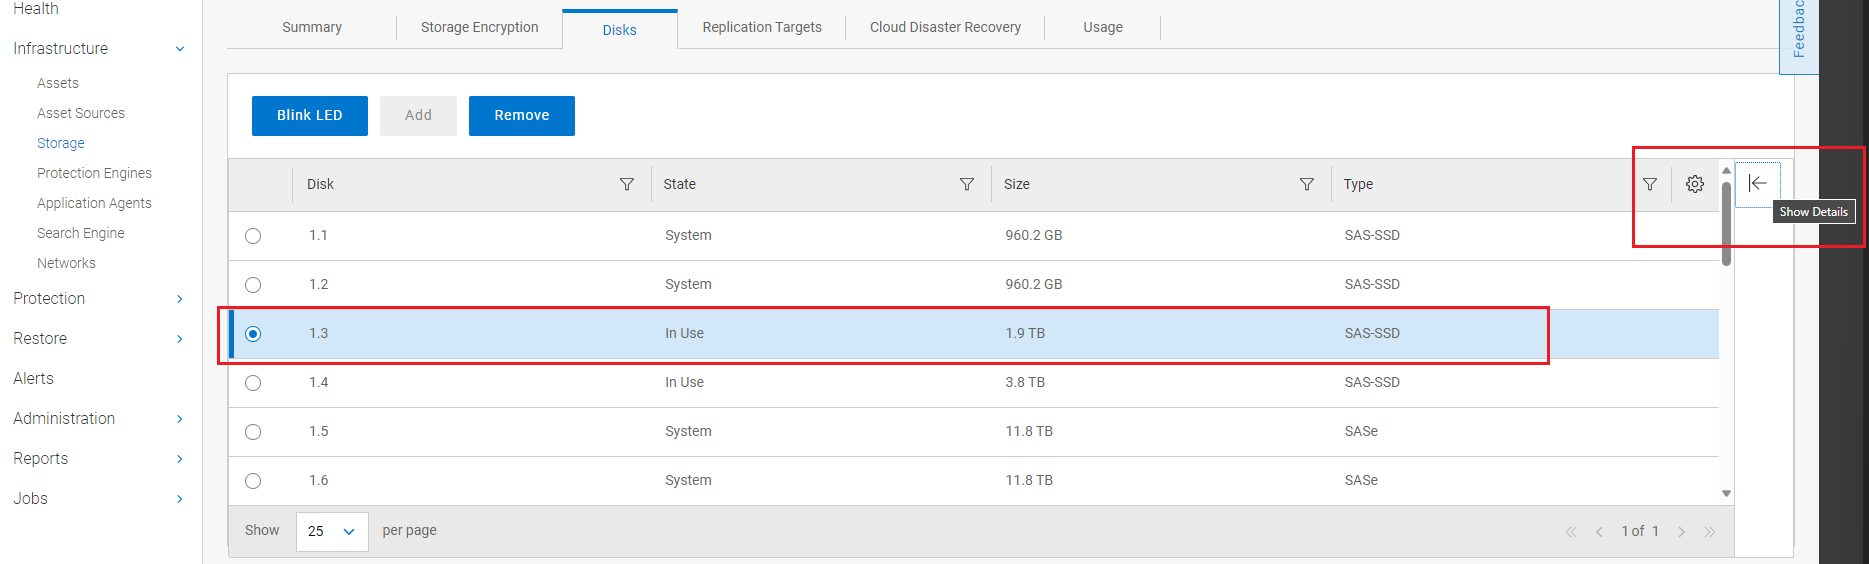
Post-requisites
1. If you replaced a drive in drive bay 1, install the front bezel.
2. If you replaced a drive in drive bay 2, close the drive bay.
3. If you replaced more than one drive, make sure to populate the drives in a bottom to top order to avoid the metal stops from bending in the drive cage in the drive bays.
4. In the Data Manager Appliance UI:
a. Go to the Infrastructure > Storage > Disks tab where you selected the disk drive to be replaced and activated the blinking LED light.
b. In the Blinking LED light for Disk: . Dialog, click Stop to turn off the blinking LED light on the disk drive.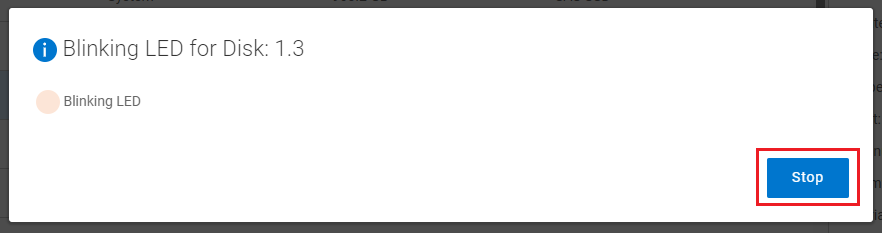
c. Click the blue Add button. The Add Disk: . Dialog appears. In the dialog, click Add.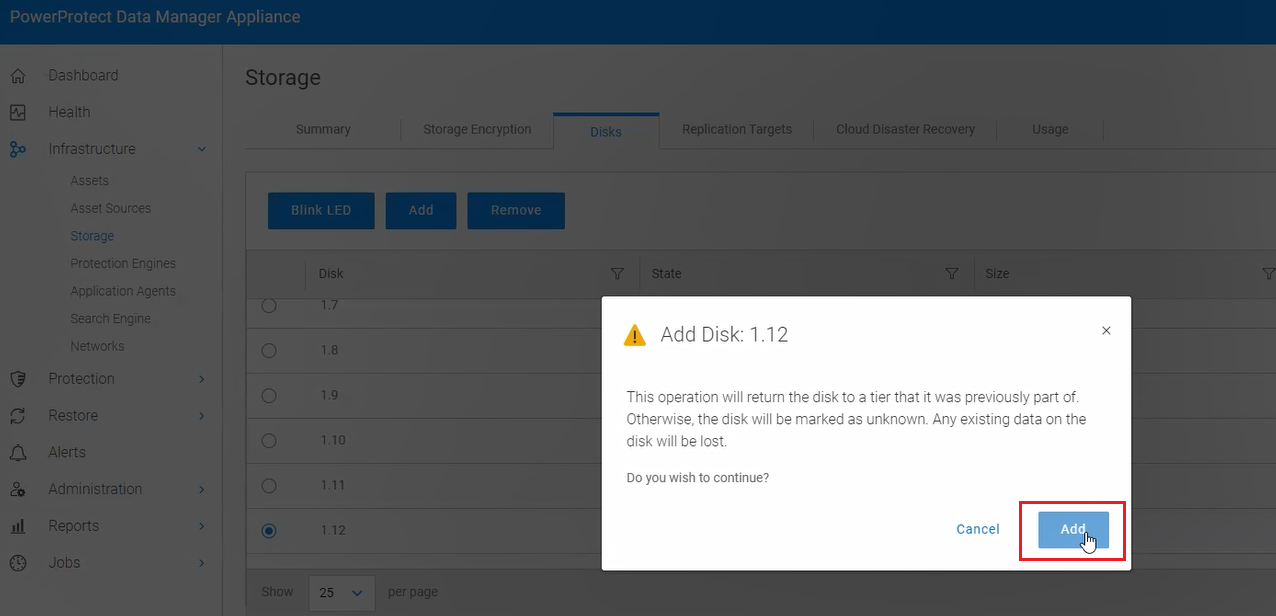
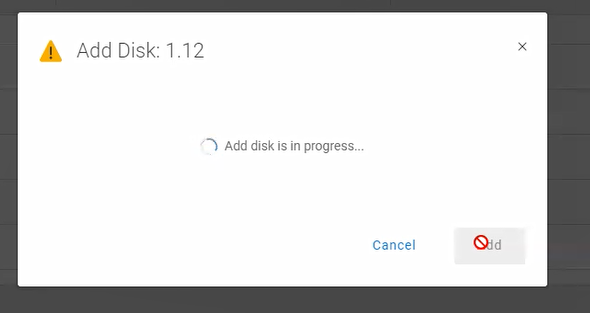
The disk’s state changes from Unknown or Not Installed to In Use.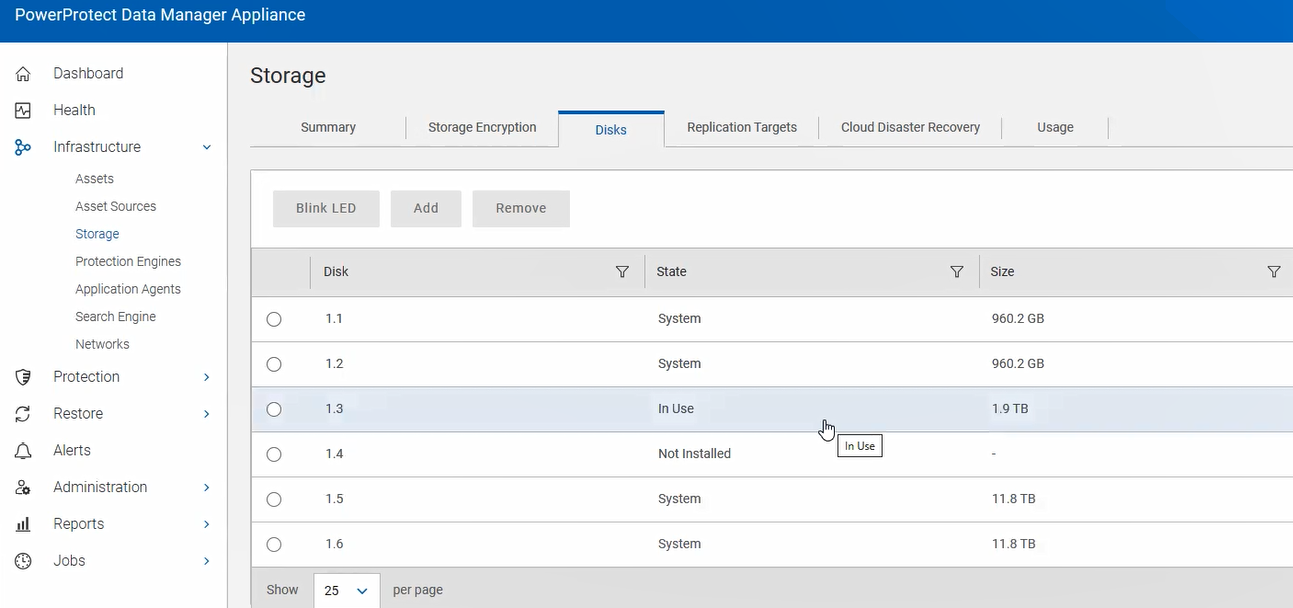
NOTE: It may take up to 5 minutes for a disk to appear in the Data Manager Appliance UI after it is inserted into the appliance.
d. On the Alerts page, verify that there are no alerts related to the replaced drive.
Additional Information
Disk Layout
You can see the reconstruction progress under Infrastructure - Storage - Disks.
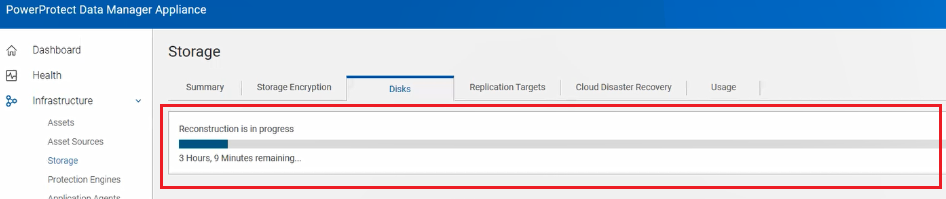
You can see the reconstruction progress under Infrastructure - Storage - Disks.
Affected Products
PowerProtect Data Manager Appliance, PowerProtect DM5500Article Properties
Article Number: 000220241
Article Type: Solution
Last Modified: 30 May 2025
Version: 5
Find answers to your questions from other Dell users
Support Services
Check if your device is covered by Support Services.