Installing a PCIe Card in Windows: A Comprehensive Guide
Summary: Learn to install a PCIe card in a Windows system. Find tips on PCIe slots, adapter options, and step-by-step installation instructions.
This article applies to
This article does not apply to
This article is not tied to any specific product.
Not all product versions are identified in this article.
Instructions
If you want to add a PCIe card in your Dell system, follow the below steps to complete the installation.
- Remove your side cover. If you do not know how to remove it, see the Dell Support page to get your system document.
- A PCIe card is added to the PCIe Slot. (See Figure 1)
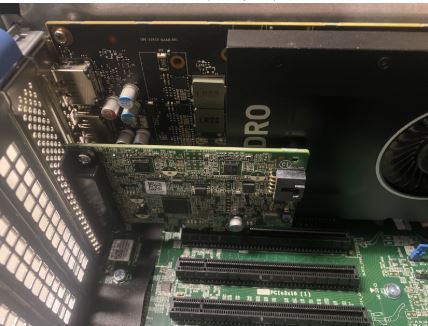
(Figure 1 - PCIe Slot)
- Once the PCIe card ID is added. You need a Display Port to Display Port cable to plug in from the PCIe Card Display Port to the Graphics Card Display Port. (See Figure.2)
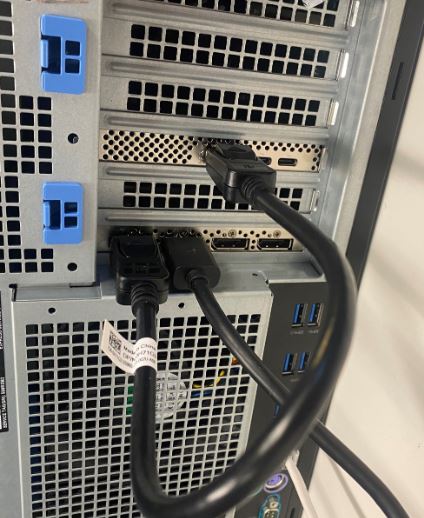
(Figure 2 - DP to DP Cable)
- Once the card has been installed, if it is a Thunderbolt PCIe card you must update the latest Thunderbolt Controller Driver. Go to our Drivers Site to search for the matching driver for your system. Thunderbolt Controller Driver can be found under "Chipset." (See Figure 3)
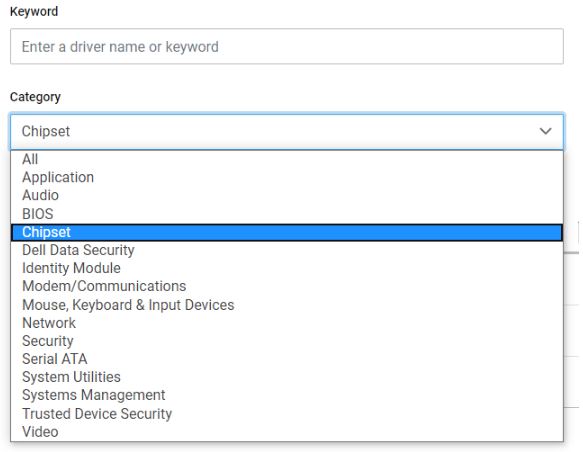
(Figure 3 - Dell Driver Category)
After completion of this driver installation and a reboot of the system, PCIe card functionality should now be capable of using the PCIe slot.
Affected Products
Alienware, Dell All-in-One, Dell Pro All-in-One, Dell Pro Max Micro, Dell Pro Max Slim, Dell Pro Max Tower, Dell Pro Micro, Dell Pro Slim, Dell Pro Tower, Dell Slim, Dell Tower, Inspiron, Legacy Desktop Models, OptiPlex, Vostro, XPS, G Series
, Fixed Workstations, Dell Pro Max Micro XE FCM2250, Dell Pro Max Slim XE FCS1250, Dell Pro Max Tower T2 XE FCT2250, Dell Pro Micro Plus XE QBM1250, Dell Pro Slim Plus XE5 QBS1250, Dell Pro Tower Plus XE5 QBT1250
...
Article Properties
Article Number: 000126038
Article Type: How To
Last Modified: 12 May 2025
Version: 10
Find answers to your questions from other Dell users
Support Services
Check if your device is covered by Support Services.