Connectrix B-Series: How to use PuTTY for SSH key-based authentication
Riepilogo: Learn how to use PuTTY for SSH key-based authentication. Step-by-step instructions to create SSH keys, add SSH key to PuTTY, and connect with SSH key securely on Connectrix B-Series.
Questo articolo si applica a
Questo articolo non si applica a
Questo articolo non è legato a un prodotto specifico.
Non tutte le versioni del prodotto sono identificate in questo articolo.
Istruzioni
Generate SSH keys Using Putty Gen Key:
1. Run the PuTTY key generation tool from C:\Program Files\PuTTY\puttygen or using the puttygen command from the command line.
2. Select Generate in the PuTTY Key Generator window. Move the mouse to create the random values used to develop the key.
3. Select specific key types and bit lengths. Options include RSA, Digital Signature Algorithm, Elliptic Curve Digital Signature Algorithm and more.
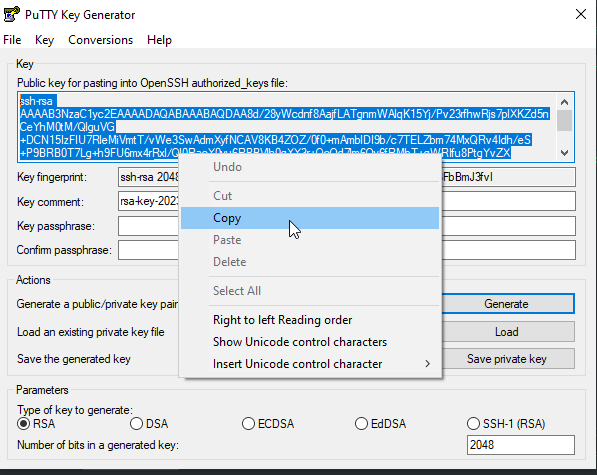
4. Select the entire contents of the "Public key for pasting into OpenSSH authorized_keys file" from the Key window. This is the public key. Copy it to the clipboard to paste into a notepad file "authorized_keys'.
5. Rename the authorized_keys file to authorized_keys.pub
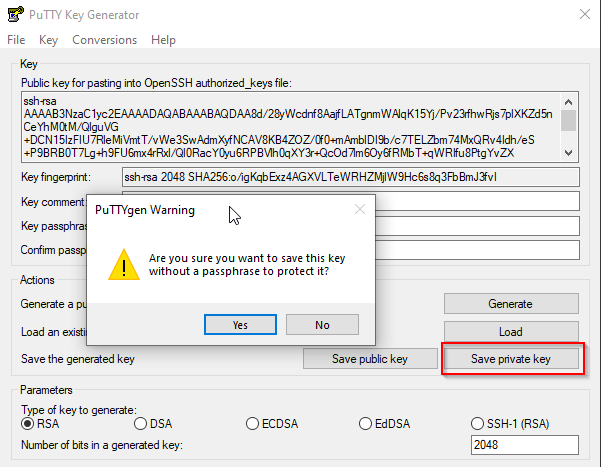
6. Select Save private key. Select Yes in the PuTTYgen Warning window regarding passphrases.
7. Login to the switch and import the authorized_keys.pub key using "sshutil importpubkey" command.

Next steps are to configure Putty for SSH Authentication. The example used is for putty version 0.79.
1. Launch PuTTY but do not connect to a remote system.
2. In the Category window, browse to Connection>Data.
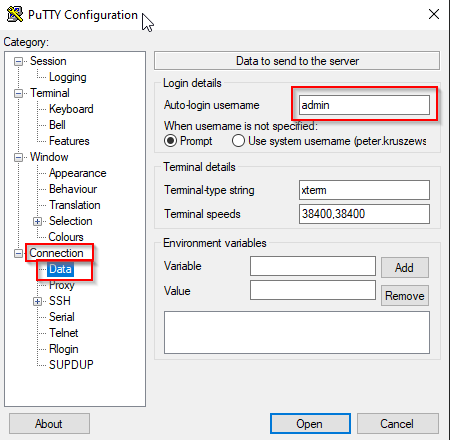
3. Set the Auto-login username to the remote SSH username. This is the user for whom you created the authorized_keys file in putty gen key.
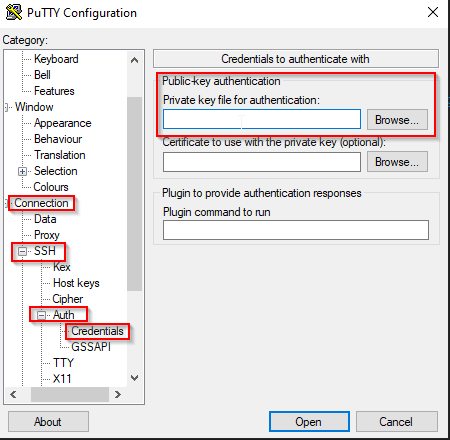
4. Browse to Connection>SSH>Auth>Credentials. Select Browse. Find the saved private key (.ppk) created with the PuTTYgen application.
5. Test key-based authentication
You are now ready to test the connection. Expect the connection to be established without a password challenge.
At the top of the Category window, select Session to return to the main connection window. In the Host Name (or IP address) box, enter the destination hostname or IP address.
6. Select Open to test the session. A message indicating "Authenticating with public key" will appear in the SSH connection window if key-based authentication was configured correctly.
7. You have successfully configured PuTTY to use key-based authentication.
1. Run the PuTTY key generation tool from C:\Program Files\PuTTY\puttygen or using the puttygen command from the command line.
2. Select Generate in the PuTTY Key Generator window. Move the mouse to create the random values used to develop the key.
3. Select specific key types and bit lengths. Options include RSA, Digital Signature Algorithm, Elliptic Curve Digital Signature Algorithm and more.
4. Select the entire contents of the "Public key for pasting into OpenSSH authorized_keys file" from the Key window. This is the public key. Copy it to the clipboard to paste into a notepad file "authorized_keys'.
NOTE: Do not Create or use Public Key created by clicking on the radial button "Save public key".
5. Rename the authorized_keys file to authorized_keys.pub
6. Select Save private key. Select Yes in the PuTTYgen Warning window regarding passphrases.
7. Login to the switch and import the authorized_keys.pub key using "sshutil importpubkey" command.
Next steps are to configure Putty for SSH Authentication. The example used is for putty version 0.79.
1. Launch PuTTY but do not connect to a remote system.
2. In the Category window, browse to Connection>Data.
3. Set the Auto-login username to the remote SSH username. This is the user for whom you created the authorized_keys file in putty gen key.
NOTE: Skip this part if you want to enter user name manually everytime you login to the switch.
4. Browse to Connection>SSH>Auth>Credentials. Select Browse. Find the saved private key (.ppk) created with the PuTTYgen application.
5. Test key-based authentication
You are now ready to test the connection. Expect the connection to be established without a password challenge.
At the top of the Category window, select Session to return to the main connection window. In the Host Name (or IP address) box, enter the destination hostname or IP address.
6. Select Open to test the session. A message indicating "Authenticating with public key" will appear in the SSH connection window if key-based authentication was configured correctly.
7. You have successfully configured PuTTY to use key-based authentication.
Prodotti interessati
Connectrix B-SeriesProdotti
ConnectrixProprietà dell'articolo
Numero articolo: 000217157
Tipo di articolo: How To
Ultima modifica: 18 mag 2026
Versione: 5
Trova risposta alle tue domande dagli altri utenti Dell
Support Services
Verifica che il dispositivo sia coperto dai Servizi di supporto.