Zapraszamy
Witryny firmy Dell
Witryny firmy Dell
Witamy w firmie Dell
Moje konto
- Szybkie i łatwe składanie zamówień
- Wyświetlanie zamówień i śledzenie stanu wysyłki
- Tworzenie i dostęp do listy produktów
- Na firmowej stronie administracji możesz zarządzać witrynami, produktami i danymi kontaktowymi firmy Dell EMC.
Numer artykułu: 000134918
How to add Intel Rapid Storage Driver to the Dell Windows 7 OEM recovery Image
Podsumowanie: Steps to install Windows 7 using the Dell OEM Recovery Image and added the Intel Rapid Storage Driver.
Treść artykułu
Objawy
Refer to Resolution section.
Przyczyna
NA
Rozwiązanie
Follow the steps provided below to install Windows 7 using the Dell OEM image by adding the Intel Rapid Storage Driver to the image.
All drivers not included in image
The Dell OEM Windows 7 ISO is missing a key driver for many Dell systems like the Precision 5510. Injecting the Intel Rapid Storage Driver 14.8 or higher is required for a successful installation of Windows 7 on these systems.
How to add the Intel Rapid Storage Driver to the ISO
How to add the IRST driver to the Dell ISO:
- Go to the Dell OS Download site: https://www.dell.com/support/home/drivers/osiso/recoverytool
- Enter the service tag and the Captcha information.
- Systems that shipped with Windows 7 from Dell should be presented with a Dell Windows 7 SP1 Professional recovery image.
- After downloading the ISO file you will also need to download the Rufus tool
 .
.
 NOTE: Rufus is not a Dell certified software. Installation and use on own risk. We share our best practices with Rufus but do not support issues regarding this program.
- Run the downloaded Rufus executable
- Select the proper USB Device you want to use for this process
- Click the CDROM Icon to select the ISO: (See Figure 1).
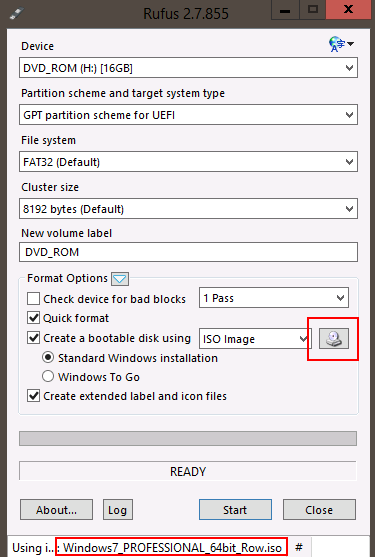
Figure 1. - Rufus USB image information - Make sure that GPT partition scheme for UEFI and FAT32 is selected then Click Start.
- Download the Intel Rapid Storage 14.8 driver from the support site for the Precision 3510: https://downloads.dell.com/FOLDER03457092M/1/Serial-ATA_Driver_28J5R_WN64_14.8.1.1043_A03.EXE
- Use 7-zip to extract the files to a new folder on the USB key that was just created for Windows 7.
- How to download and use 7 zip information
- Boot to the key with UEFI: PMAP
- (See Figure 2.)
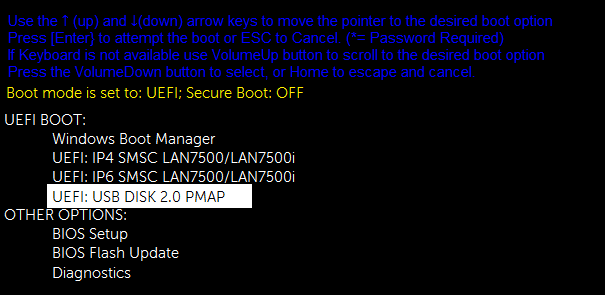
Figure 2. - UEFI USB Boot PMAP option- If USB key is not listed in the boot menu then you will need to add it to the UEFI boot options in the BIOS (F2 at boot). Click add a boot option, select the USB device then browse to the file name: EFI\Boot\Bootx64.efi and name the boot option USBKey (See Figure 3)

Figure 3. - Browse to Bootx64.efi
- Click Load Drivers when prompted for drivers, then browse to the Intel Rapid Storage 14.8.1 folder (See Figure 4)
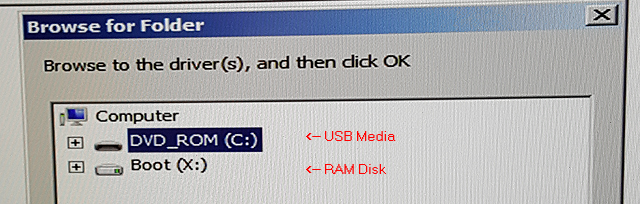
Figure 4. - Browse for a folder - Browse to the USB Media, IRST Driver (See Figure 5.)

Figure 5. - Selecting the IRST driver to load. - You will see the Intel SATA RAID: (See Figure 6.)
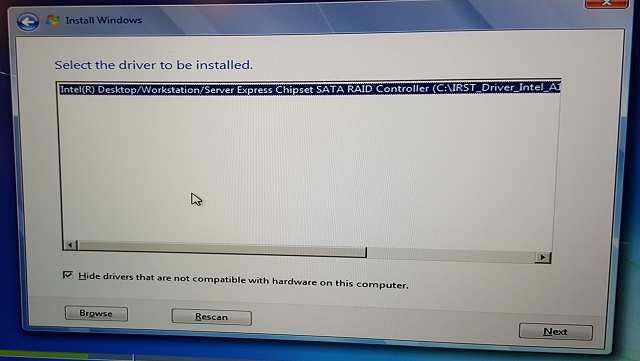
Figure 6. - IRST Driver selected click Next - You will see the partition table available: (See Figure 7.)
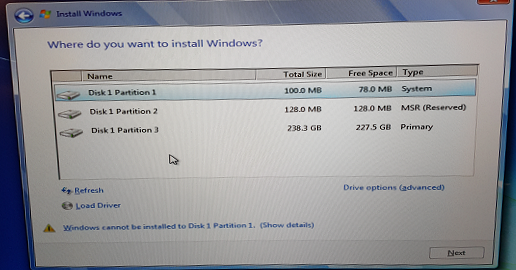
Figure 7. - Storage devices are now shown in the Windows 7 install process - Click Drive Options (advanced)
- Delete all of the partitions (if any)
- Click Next to complete the installation.
Właściwości artykułu
Produkt, którego dotyczy problem
Latitude E5270, Latitude E5570, Latitude E7270, Latitude E7470, Precision 5510, Precision 7510, Precision 7710
Data ostatniej publikacji
16 lut 2024
Wersja
4
Typ artykułu
Solution