Create Bootable USB for Windows using Dell Diagnostic Deployment Package
摘要: How to create a bootable USB flash drive for BIOS updates, operating system installations, and non-booting computers using the Dell Diagnostic Deployment Package (DDDP).
本文适用于
本文不适用于
本文并非针对某种特定的产品。
本文并非包含所有产品版本。
说明
Important: This article provides instructions for the DDDP method applicable to legacy systems. For comprehensive guidance on all BIOS update methods including modern UEFI systems, please refer to our complete BIOS and UEFI Update Guide which provides detailed coverage of all update scenarios and troubleshooting procedures.
When to Use the DDDP Method
Note: This process applies exclusively to legacy BIOS systems and is not compatible with UEFI-enabled computers.
This method is appropriate when you need to create a bootable USB drive for:
- BIOS updates outside the operating system on legacy systems
- Computers without an installed operating system
- Systems that cannot boot to the operating system
- Situations where BIOS updates fail within Windows due to permissions, restrictions, antivirus interference, or compatibility issues with the update schedule
Prerequisites
- USB flash drive
- Computer connected to the Internet
- Legacy BIOS system (not UEFI)
Warning: This process will permanently remove all data from the USB drive. Please ensure all personal data is backed up to an alternative storage device before proceeding.
Step-by-Step Instructions
1. Download and Extract DDDP
- Download the Dell Diagnostic Deployment Package (DDDP)
- When the File Download window appears, select Run
- If a User Account Control (UAC) window appears, select Yes
- In the Dell 32-bit diagnostic window, select Continue
- In the folder creation window, select OK to use the default folder
- When the extraction completes, select OK and close the DDDP window
2. Prepare the DIAGS Folder
- Navigate to the extraction folder (default:
C:\Dell\Drivers\R174621) - Open the DIAGS folder
- Remove all files EXCEPT these essential files:
- AUTOEXEC.bat
- COMMAND.com
- CONFIG.sys
- DELLBIO.bin
- DELLRMK.bin
3. Format USB Drive
Important: The USB drive must be formatted before copying any files to ensure proper file system compatibility.
- Insert your USB flash drive
For drives 32 GB or smaller:
- Right-click the drive in File Explorer and select Format
- Ensure the file system is configured as FAT32
For drives larger than 32 GB:
- Open PowerShell with Administrator privileges
- Enter the command:
format /FS:FAT32 X:(substitute X with your drive letter) - Press Enter to execute the command
4. Create Bootable USB
- Navigate to
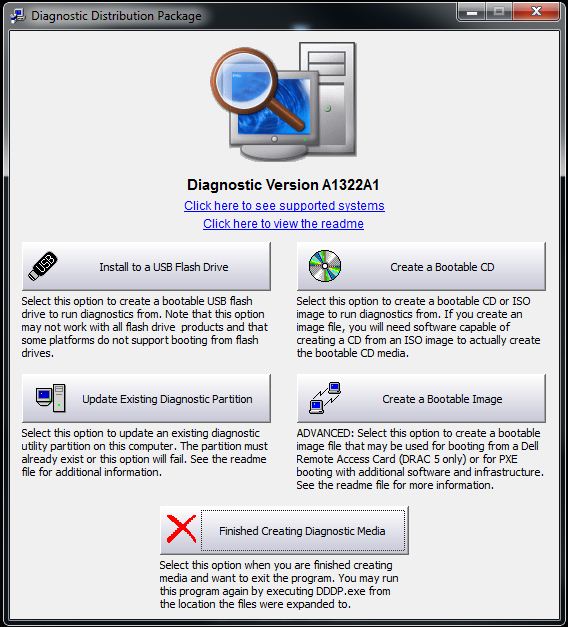
C:\Dell\Drivers\R174621\ - Double-click the DDDP application
- Choose Install to a USB flash drive
- The utility will copy the necessary files and make the drive bootable
5. Boot from USB
- Restart the target computer
- At the Dell logo, press F12 to enter One Time Boot Menu
- Select the USB storage device
- The computer will boot to a command prompt showing
C:\
Next Steps
You have successfully created a bootable USB drive for legacy BIOS systems. If you are using this drive for BIOS updates, please consult our comprehensive BIOS update guide for detailed instructions on BIOS flashing procedures and troubleshooting guidance.
Compatible Systems
This method is compatible with legacy Dell systems including Alienware, Inspiron, OptiPlex, Vostro, XPS, and other models that utilize traditional BIOS (not UEFI).
For UEFI-enabled systems: Please refer to our main BIOS update guide for appropriate update methods.
受影响的产品
Alienware, Dell Pro All-in-One, Dell Pro Max Micro, Dell Pro Max Slim, Dell Pro Max Tower, Dell Pro Micro, Dell Pro Slim, Dell Pro Tower, Dell Tower, Inspiron, Legacy Desktop Models, OptiPlex, Vostro, XPS, G Series, G Series, Alienware, Dell Pro
, Dell Pro Max, Dell Pro Plus, Dell Pro Premium, Inspiron, Latitude, Dell Pro Rugged, Vostro, XPS, Legacy Laptop Models, Fixed Workstations, Mobile Workstations, Dell Pro Max Micro XE FCM2250
...
文章属性
文章编号: 000145519
文章类型: How To
上次修改时间: 01 9月 2025
版本: 13
从其他戴尔用户那里查找问题的答案
支持服务
检查您的设备是否在支持服务涵盖的范围内。