Deploying PowerMax 25GbE iSCSI with Oracle Databases
Executive summary
Executive summary
The Dell EMC PowerMax family was specifically created to fully unlock the performance benefits that NVMe offers to applications. NVMe is a set of standards that defines a PCI express (PCIe) interface that is used to efficiently access Non-Volatile Memory (NVM) storage media. PowerMax NVM media includes both NAND-based flash storage and dual-ported Storage Class Memory (SCM) drive technology such as Intel Optane.
In the PowerMaxOS Q3 2019 release, PowerMax added support for SCM drives together with Machine Learning (ML) algorithms for data placement when both NAND and SCM drives are used. The update also introduced end-to-end FC-NVMe (NVMe over Fiber-Channel Fabrics) to optimize data access between server and storage, and 32 Gb front-end modules that allow faster connectivity speed per port.
In the PowerMaxOS Q3 2020 release, PowerMax added support for 25 GbE iSCSI front-end ports, allowing users to deploy faster IP-based SAN backbones in data centers. This feature enables users to implement a lower-cost SAN for converged and virtualized workloads, and provides room for future growth and scalability as throughput demands increase. iSCSI benefits include the ability to run existing applications at lower cost and to provision virtual machines with iSCSI storage interface directly connected to PowerMax. Additionally, 25 GbE Symmetrix Remote Data Facility (SRDF) is also supported for PowerMax remote replication.
The iSCSI protocol can achieve flexibility and operating efficiencies because the protocol allows SCSI traffic to be encapsulated over a standard TCP/IP connection and transported over an Ethernet-based network. This means that host-standard Ethernet network interface cards (NICs) and network switches can be used to carry storage traffic, eliminating the need for a specialized storage network using separate switches and host bus adapters (HBAs).
At the same time, the PowerMax family continues to provide all the features required by enterprise applications such as six-nines (99.9999%) availability, encryption, replications, data reduction, and massive consolidation. These features are now delivered with I/O latencies that are measured in microseconds.
This white paper explains the benefits and best practices of deploying Oracle databases on Dell EMC PowerMax storage systems using 25GbE iSCSI connectivity for SAN.
Audience
This white paper is intended for database and system administrators, storage administrators, and system architects who are responsible for implementing, managing, and maintaining Oracle databases with PowerMax storage systems. It is assumed that readers have some familiarity with Oracle and the PowerMax family, and are interested in achieving higher database availability, performance, and ease of storage management.
PowerMax iSCSI overview
What is iSCSI
Internet Small Computer Systems Interface (iSCSI) is an IP-based storage networking standard that is mainly used for linking hosts to storage devices. By transmitting SCSI commands over IP networks, iSCSI can facilitate block-level transfers over IP-based networks. The iSCSI architecture is similar to a client/server architecture. In this case, the client is an initiator, such as a Linux or Windows host that issues an I/O request, and the server is a target such as the PowerMax storage system.
iSCSI can leverage existing investments in Ethernet infrastructures and expertise. It can use an existing network infrastructure of Ethernet switches, IP routers, and network adapters instead of requiring additional hardware. With the introduction of higher speed Ethernet networking standards, iSCSI has steadily gained popularity as a deployed storage protocol in data centers because it can now deliver performance comparable to that of FC SAN. iSCSI provides additional types of host interfaces for the PowerMax storage system, giving customers a wide variety of choices for connectivity, combined with CHAP to address iSCSI security.
Primary benefits of PowerMax iSCSI implementation
The PowerMaxOS iSCSI target model has been designed to meet customer demands regarding control and isolation of resources, as well as to provide a platform for greater physical port utilization and efficiencies. This allows customers to build true multi-tenant environments on the PowerMax platform while keeping the provisioning method used for FC interface through masking views. The PowerMax iSCSI target implementation provides the following benefits:
- High performance and bandwidth due to higher adoption of 25 GbE and faster network interfaces—IP-based connectivity can now deliver bandwidth equivalent to or faster than 16 Gb FC SAN networks for most workloads. For online transaction processing (OLTP) workloads, iSCSI and FC provide nearly identical performance.
- Multi-tenancy and network isolation, leveraging VLAN, internal network IDs and static routes—VLANs provide virtual networks so iSCSI traffic can be isolated from other network activity, or from other tenants. An internal Network ID is a PowerMaxOS construct that the system uses internally to associate a storage system IP interface with a storage system iSCSI target and to isolate IP interfaces within same subnet. The valid range for Network IDs is 0 to 511. Static routes can be managed at the interface level.
- Separation of the iSCSI Target Node from the physical port and increased scale—Often, iSCSI deployments can only allocate a single IP address to each storage target port, limiting the deployment scale. PowerMax iSCSI targets are designed around virtual storage ports to overcome these limitations. Virtual storage ports are created when the target is created. This allows users to create individual target nodes without restrictions related to the physical ports. Targets can be easily moved from one physical port to another if needed. Individual iSCSI targets can be assigned one or more IP interfaces, which define network access paths for hosts to reach the target node.
- Added security—PowerMax provides unidirectional and bidirectional Challenge Handshake Authentication Protocol (CHAP) authentication for added security.
- Better throughput—Maximum Transmission Unit (MTU) of 9000 (Jumbo Frames) is supported on iSCSI interfaces for better throughput.
- Fast and dynamic—PowerMax host initiator groups are part of the PowerMax device-masking configuration which allows fast and flexible changes to relationships between host initiators, storage target ports, and storage devices. Only the participating members of a masking view are visible to each other.
- QoS—Storage-side Quality of Service (QoS) is implemented at the storage group (SG) level using host I/O limits and PowerMaxOS service levels.
- Converging storage and network infrastructure in the data center—These benefits include cost savings from maximizing existing network management skills, unifying infrastructure components, and the added simplicity of IP-based connectivity.
- Improved support for lower-cost test/dev environments—Even when existing primary databases use FC interfaces, PowerMax SnapVX can easily create database snapshots that can be accessed using iSCSI, for example, by development or QA groups.
Design considerations and best practices for iSCSI
Network design and connectivity considerations
The following sections describe considerations regarding the design and connectivity of the iSCSI network.
Ethernet work design
Network design is key to making sure iSCSI works properly and delivers the expected level of performance in any environment. This list defines the best practice considerations for iSCSI networks:
- Separate iSCSI traffic from general traffic by using either different physical networks or layer-2 VLANs. A best practice is to have a dedicated LAN for iSCSI traffic and not share the network with any other network traffic. Aside from minimizing network congestion, isolating iSCSI traffic on its own physical network or VLAN is required for security as iSCSI traffic is transmitted in an unencrypted format across the network.
- Use at least two interfaces on each database server for iSCSI connectivity. The use of two NICs would be ideal. Connect each interface to a different Ethernet switch and log each interface into a different target on the PowerMax.
- Implement jumbo frames by increasing the maximum transmission unit (MTU) value on Ethernet interfaces from the default value of 1,500 to 9,000 in order to deliver additional throughput. However, if jumbo frames are to be implemented, they require all devices on the network to be jumbo-frame compliant and to have jumbo frames enabled. When implementing jumbo frames, set server and storage MTUs to 9,000 and set switches to higher values such as 9,216 wherever possible.
Note: Especially in an Oracle database environment, where database block size is typically 8KB, a 9,000 MTU will be able to transport an Oracle block in a single frame, where a 1,500 MTU will require transmitting multiple packets for each database block read or write I/O operation.
- To minimize latency, avoid routing iSCSI traffic between database servers and storage system. Try to keep hops to a minimum. Ideally server and storage should coexist on the same subnet and be not more than one hop away.
Multipathing and high availability
Use either Dell EMC PowerPath or native Linux multipathing (DM-Multipath) on all database servers. It is important that the two do not coexist on the same database server as this can cause instability.
Utilize multipathing software enabled on the database server rather than multiple connections per iSCSI session (MC/S). MC/S is not supported for PowerMax iSCSI targets.
For Linux systems using device mapper multipath (DM-Multipath), use the "Round Robin (RR)" load balancing policy. Round Robin uses an automatic path selection rotating through all available paths, enabling the load to be distributed across the configured paths. This path policy can help improve I/O throughput. For PowerMax storage systems, all available paths will be used in the Round Robin policy.
For DM-Multipath, change “path_grouping_policy” from “failover” to “multibus” in the multipath.conf file. This will allow the load to be balanced over all paths. If one path fails, the load will be balanced over the remaining paths. A “failover” policy means that only a single path will be used at a time, negating any performance benefit. Use the “multipath -l” command to ensure that all paths are in the “active” state. If paths display an “enabled” status, they are in failover mode.
For PowerPath, use the “Symmetrix Optimized” (SymOpt) policy. This is the default policy, and it means that administrators do not need to change the configuration parameters. PowerPath load-balances I/Os across all paths based on the I/O load and health state of the path for that storage device.
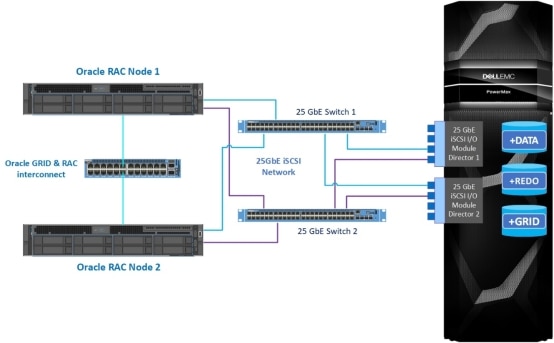
Figure 1. iSCSI network design for Oracle RAC
PowerMax iSCSI considerations
Take the following matters into account when planning your PowerMax iSCSI implementation.
PowerMax connectivity considerations
When planning PowerMax connectivity for performance and availability use a “go-wide before going deep” approach, which means it is better to connect storage ports across different engines or directors than to use all the ports by order on a single director. In this way, even if a component fails, the storage can continue to service database I/Os.
While creating a masking view, ensure that each storage group is accessible from the database server by at least two targets/iSCSI virtual ports. In that way, each storage device will be available on two or more paths from the database server. This topology increases both availability and performance.
PowerMax CPU resource planning
PowerMax CPU cores are a critical resource when planning for performance. PowerMax automatically allocates cores to each emulation, such as FC, iSCSI, SRDF, and so on. You can list the number of cores allocated for each emulation using the Solutions Enabler command: ‘symcfg list –dir all’. In certain cases—especially with a low number of PowerMax engines (bricks) count and many emulations—the default core allocation may not take into account specific application I/O bottlenecks. If your major workload is on iSCSI, ensure that enough cores have been allocated to SE emulation and the cores are balanced equally across directors and engines (bricks). The example below shows that core count for iSCSI (SE emulation) is 12 on both director boards.
# symcfg list -dir all
Symmetrix ID: 000197600352 (Local)
S Y M M E T R I X D I R E C T O R S
Ident Type Engine Cores Ports Status
----- ------------ ------ ----- ----- ------
IM-1A IM 1 4 0 Online
IM-2A IM 1 4 0 Online
…
SE-1E GigE 1 12 4 Online
SE-2E GigE 1 12 4 Online
If you suspect that insufficient number of cores are associated with the iSCSI emulation, contact your Dell EMC account representative to review the core allocation distribution between emulations.
Multiple iSCSI sessions and targets
When using host-based multipathing software like PowerPath or DM-Multipath, a single host initiator can access the same devices by presenting them through multiple targets on the storage system. This allows the host to see the devices through multiple paths. Each path from the initiator to the targets will have its own session and connection. This connectivity method is often referred to as “port binding”.
When configuring PowerMax iSCSI connectivity, Dell Technologies recommends that you use the port-binding method. Configure multiple targets on the PowerMax and establish connectivity from the database server initiator to each of the targets.
For most OLTP workloads, which feature a mixture of database reporting and batch jobs, 4 or 8 front-end ports providing 4 or 8 paths per device can provide very good throughput (IOPS) and moderate bandwidth (GB/s). Each path translates to one iSCSI session between initiator and target.
VLAN and host initiator groups
VLANs and PowerMax host initiator groups are used to support multi-tenancy on PowerMax. VLANs provide isolated virtual networks so that only tenants (initiators) that are on the same VLAN as the target can access the target. PowerMax host initiator groups are part of a PowerMax device masking configuration, which allows fast and flexible changes to relationships between host initiators, storage target ports, and storage devices. Only the participating initiators can see the assigned devices. The PowerMax iSCSI target is not tied to a specific port, and up to 64 targets can be mapped to a physical port. Each target can have up to 8 IP interfaces assigned to it, providing a high level of multi-tenancy with security. Multiple IP interfaces can share the same physical interface and can still be isolated using different VLANs and assigned to different targets on the same ports.
Storage Group’s Service Levels
With high-capacity and powerful NVMe flash storage such as the PowerMax storage system, there are often many databases and applications that are consolidated into one storage system. The PowerMax storage system uses Service Levels (SL) to determine the performance objectives and priorities of applications by managing the I/O latencies of the storage groups (SGs) in accordance with their SL.
By default, the PowerMax storage system assigns an Optimized SL to new SGs. This SL receives the best performance the system can give it, but has the same priority as all other SGs that are also set with the Optimized SL. In this case, it is possible that a sudden high load from one SG (such as an auxiliary application) might affect the performance of another SG (such as a key mission-critical application) because they all share the same system priorities and performance goals. Using specific SLs can prevent this situation.
Use cases for SLs include “caging” the performance of a “noisy neighbor”, prioritizing Production versus Test/Dev systems performance, and satisfying the needs of Service Providers or organizations using “chargeback” in which their clients pay for a service level.
Host I/O limits
The Host I/O limits is a quality of service (QOS) feature that provides the option to place specific IOPS or bandwidth limits on any storage group. Assigning a specific Host I/O limit for IOPS to a storage group with low performance requirements can ensure that a spike in I/O demand will not saturate or overload the storage and degrade the performance of more critical applications. Using Host I/O limits can ensure predictable performance for all servers in a multi-tenant environment. The Host I/O limits is applicable at the storage group level, so it is available for both FC and iSCSI storage access.
PowerMax iSCSI deployment with Oracle
This section describes how to deploy iSCSI on PowerMax with Oracle RAC. There are infrastructure requirements for iSCSI network connectivity as well as network subnet for Oracle Grid Infrastructure (GI) deployment, which is an Oracle RAC requirement. A summary of the installation of Oracle GI on a single node and the addition of a second node is provided in the Appendix. This section describes storage and iSCSI configuration on PowerMax for Oracle RAC.
iSCSI setup on PowerMax
This section describes the steps needed to configure PowerMax iSCSI using the Unisphere for PowerMax graphical user interface.
Note: Prior to configuring iSCSI using Unisphere for PowerMax, ensure that there is a dedicated network for iSCSI, and that the network and VLAN on the host and switch are set up correctly.
Step 1: Create iSCSI target
- For high availability and scale, create multiple iSCSI targets—at least one per iSCSI front end port. The following example shows the creation of a single iSCSI target on iSCSI director emulation 1E.
- From Unisphere for PowerMax Dashboard -> System click iSCSI. This will open the iSCSI Dashboard which is the base from which all ISCSI components are configured. On iSCSI Dashboard, the steps required to complete iSCSI configuration on PowerMax are listed for ease of navigation and management.
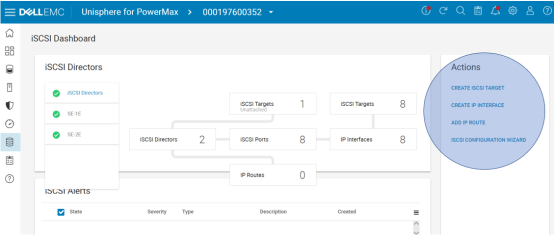
Figure 2. iSCSI dashboard and actions required for complete configuration
- From the iSCSI Dashboard, click on iSCSI Targets (Unattached) -> Create to open a dialog box to create iSCSI target.
- Select the director that your target will be presented from, the target IQN name (you can choose custom name or have the system automatically generate one), the Network ID, and the TCP port (default port is 3260 for iSCSI) and click OK. Note that the newly created target is in the disabled state. You must enable it while attaching it to an IP interface.
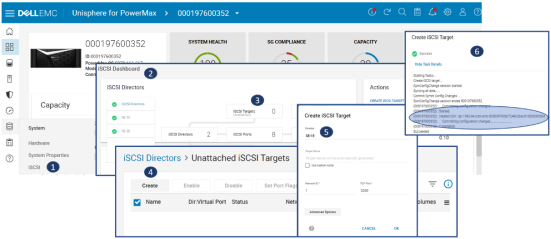
Figure 3. Create iSCSI Target
Step 2: Create IP Interface
To provide flexibility, you will create one or more IP interfaces on a physical port and then later attach them to a target created on the same director board in Step 1.
- From the iSCSI dashboard, click IP Interfaces to open the IP interfaces page and then click Create to open a dialog box to create the IP interface.
- Select iSCSI director, port, desired IP address, subnet prefix, Virtual Local Area Network (VLAN) ID, and Maximum Transaction Unit (MTU). The default MTU is 1500, but we recommend that you to set it to 9000 for better performance of the Microsoft applications database. A Network ID is a PowerMaxOS construct that is used internally by the system to associate an array IP interface with an array iSCSI target and isolate IP interfaces within same subnet. The valid range for a Network ID is from 0 to 511. VLAN ID of 28 is used in the configuration which should match with that on the switch.
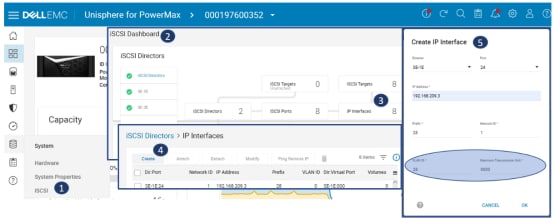
Figure 4. Create IP interface
Step 3: Enable Target and attach to IP interface
After a target is created, it is in disabled state by default and shows up in the list of unattached targets.
- To enable the target, click iSCSI Targets unattached, select the target and click Enable.
- To attach the target to an IP interface, select the target and click Attach.
- In the Attach dialog box, select an existing unused IP interface, or create a new one.
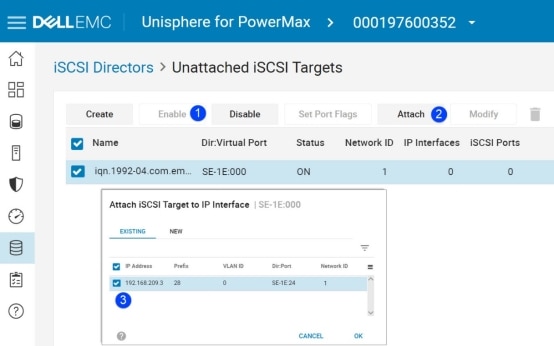
Figure 5. Enable Target and attach to IP interface
Step 4: Create a port group of iSCSI targets
- Select Hosts-> Port Groups-> Create to open the Create Port Group dialog box.
- Enter a port group name, select the iSCSI radio button and select the newly created target from the list. As shown in the list of ports, several storage virtual ports that are internally mapped to a physical iSCSI port are available for selection.
- From the drop-down menu in the bottom right (Add to job list menu), select Run Now.
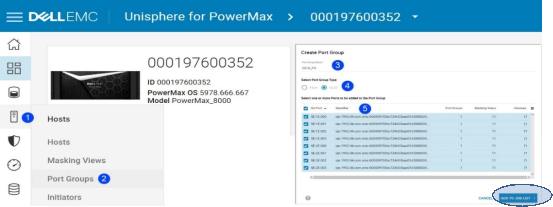
Figure 6. Create iSCSI port group
Step 5: Create an Initiator Group of host iSCSI IQN
Use the database server iSCSI initiator IQN to configure an iSCSI host initiator in Unisphere. The database server iSCSI initiators are not visible in Unisphere without logging into targets, so the easiest method to create an initiator group is to manually enter the database server IQN.
- Select Hosts-> Hosts-> Create->Create Host to open the Create Host dialog box.
- Enter a name, select the iSCSI radio button and manually add the database server IQN by clicking on the + symbol on the right side, followed by OK. From the drop-down in right bottom, select Run Now.
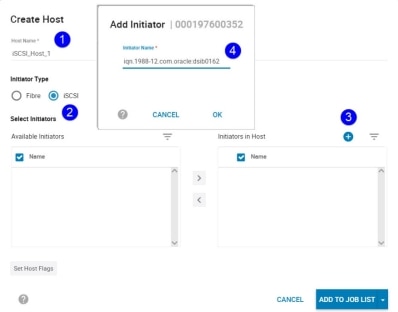
Figure 7. Create Host
Note: On Linux servers it is easy to identify the initiator’s IQN by looking at the contents of the file /etc/iscsi/initiatorname.iscsi for each of the node in cluster.
Step 6: Create a storage groups for Oracle
A storage group (SG) is a way to group devices together so they can be managed as a single entity. An SG can be stand-alone or in a parent-child relationship. A parent SG contains one or more child SGs. In this way, storage management operations on the stand-alone (or child) SG apply only to that SG, and operations on the parent apply to all its child SGs as a unit. In this example grid_sg contains the Oracle +GRID ASM disk group devices (Oracle GI), fra_sg contains the Oracle +FRA ASM disk group devices (archive logs), and db_sg is a parent SG, containing data_sg and redo_sg—Oracle +DATA ASM disk group devices (data files) and Oracle +REDO ASM disk group devices (redo logs).
To create the storage groups for the database, select the Create button in the Storage Group section in Unisphere. The storage group creation wizard allows the creation of just the storage group, which is done by executing the job after the first screen, creation of a storage group and placing it in a masking view, which is done by completing all the steps in the wizard.
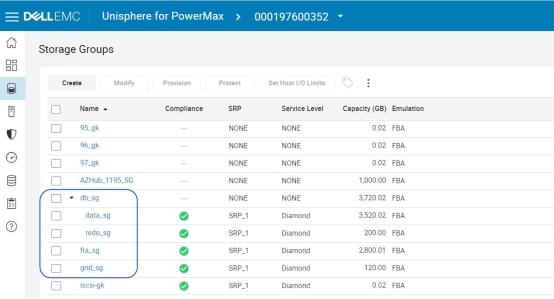
Figure 8. Storage Groups for Oracle
Step 7: Create masking views
PowerMax devices are made visible to hosts through masking views. To create a masking view, you need a storage group (SG), a port group (PG) and an initiator group (IG). The SG contains the devices you want to make visible. For iSCSI, the PG contains virtual iSCSI ports, where each port is associated with a target. The IG contains the iSCSI IQN of the database servers to which devices needs to be presented to. Each server that requires access to devices in a storage system needs to be part of a masking view in that storage system. Once the masking view is created, the devices in the SG are visible across the storage ports in the PG to the all the database servers with initiators in the IG.
- Go to the masking view menu (Hosts -> Masking Views->Create Masking View) and create the masking views using IG and PG created for iSCSI in the steps above.
- Create three masking views for three Oracle SGs: db_sg, fra_sg, and grid_sg.
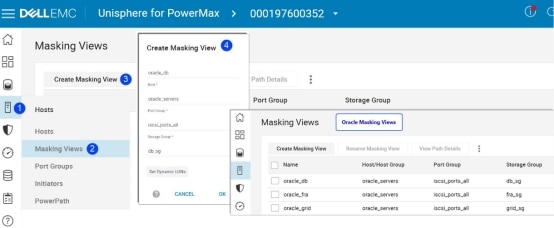
Figure 9. Masking View creation
iSCSI setup on database server
This section describes how to set up the Oracle database server to access PowerMax storage over iSCSI. In these examples, we are using Oracle Linux 8 server, but the process is relatively the same for all supported Linux distributions.
Step 1: Install iscsi-initiator-utils package
- Install the iscsi-initiator-utils package as follows:
# yum install iscsi-initiator-utils
- Get the host initiator name to be added on PowerMax. Change the name if needed to make it more user friendly:
# cat /etc/iscsi/initiatorname.iscsi
InitiatorName=iqn.1988-12.com.oracle:dsib0162
- Change the firewall settings on host to allow communication with the iSCSI target. Default port for iSCSI communication is 3260, if a different port is being used, modify the command accordingly:
# firewall-cmd –permanent –add-port=3260/tcp
# firewall-cmd –reload
Step 2: Install and configure multipathing software
Multipathing software is critical for any database deployment since it provides load balancing, path failover, and pseudo names for devices. In this document we are using native multipathing, device mapper (DM) as an example.
- Install device mapper multipath:
# yum install device-mapper-multipath
# mpathconf --enable --with_multipathd y
- Edit /etc/multipath.conf file to change path selection to round-robin for load balancing and path grouping policy to multibus to give equal priority to all paths. Configure aliases for each storage device to be used by oracle. This is important for cluster as each node should have the same device names for storage devices from PowerMax. Example of /etc/multipath.conf file:
# device-mapper-multipath configuration file
# For a complete list of the default configuration values, run either:
# # multipath -t
# or
# # multipathd show config
# For a list of configuration options with descriptions, see the
# multipath.conf man page.
defaults {
user_friendly_names yes
find_multipaths yes
enable_foreign "^$"
path_selector "round-robin 0"
path_grouping_policy "multibus"
}
blacklist_exceptions {
property "(SCSI_IDENT_|ID_WWN)"
}
blacklist {
}
multipaths {
multipath {
wwid 360000970000197600352533030304142
alias ora_grid1
}
multipath {
wwid 360000970000197600352533030304143
alias ora_grid2
}
...
...
Step 3: Configure CHAP authentication
If CHAP authentication has been configured on PowerMax for security, which can only be done using Solutions Enabler CLI for PowerMax, it also needs to be configured on the database servers so it will be possible to login to PowerMax iSCSI targets.
To use CHAP authentication, enable CHAP and set the username and password for the CHAP challenge to match what is configured on PowerMax by editing /etc/iscsi/iscsid.conf on host. After making changes, restart the iscsid daemon for the changes to take effect. The example below shows configuration changes for one-way CHAP authentication.
…
# *************
# CHAP Settings
# *************
# To enable CHAP authentication set node.session.auth.authmethod
# to CHAP. The default is None.
node.session.auth.authmethod = CHAP
…
# To set a CHAP username and password for initiator
# authentication by the target(s), uncomment the following lines:
node.session.auth.username = iqn.1988-12.com.oracle:dsib0162
node.session.auth.password = SecretDsib0162
…
# To enable CHAP authentication for a discovery session to the target
# set discovery.sendtargets.auth.authmethod to CHAP. The default is None.
discovery.sendtargets.auth.authmethod = CHAP
# To set a discovery session CHAP username and password for the initiator
# authentication by the target(s), uncomment the following lines:
discovery.sendtargets.auth.username = iqn.1988-12.com.oracle:dsib0162
discovery.sendtargets.auth.password = SecretDsib0162
Note: CHAP authentication on PowerMax can be configured only through SymCLI command line interface. It cannot be done using Unipshere. See Appendix for SymCLI examples for CHAP and other iSCSI related commands.
Step 4: Discover iSCSI targets and login
- Use SendTargets discovery method to discover the iSCSI targets at the specified IP address of the PowerMax iSCSI port. Repeat it for each of the PowerMax iSCSI IP interfaces that is attached to a target:
# iscsiadm -m discovery -t sendtargets -p 192.168.209.3
192.168.209.3:3260,0 iqn.1992-04.com.emc:600009700bc724603bac01d500000003
# iscsiadm -m discovery -t sendtargets -p 192.168.209.4
192.168.209.4:3260,0 iqn.1992-04.com.emc:600009700bc724603bac01d500000004
- Login to targets to establish iSCSI sessions:
# iscsiadm -m node -T iqn.1992-04.com.emc:600009700bc724603bac01d500000003 \
-p 192.168.209.3 -l
Logging in to [iface: default, target: iqn.1992-04.com.emc:600009700bc724603bac01d500000003, portal: 192.168.209.2,3260]
Login to [iface: default, target: iqn.1992-04.com.emc:600009700bc724603bac01d500000003, portal: 192.168.209.2,3260] successful.
# iscsiadm -m node -T iqn.1992-04.com.emc:600009700bc724603bac01d500000004 \
-p 192.168.209.4 -l
Logging in to [iface: default, target: iqn.1992-04.com.emc:600009700bc724603bac01d500000004, portal: 192.168.209.4,3260]
Login to [iface: default, target: iqn.1992-04.com.emc:600009700bc724603bac01d500000004, portal: 192.168.209.18,3260] successful.
- List iSCSI sessions:
# iscsiadm -m session
tcp: [1] 192.168.209.3:3260,0 iqn.1992-04.com.emc:600009700bc724603bac01d500000003 (non-flash)
tcp: [2] 192.168.209.4:3260,0 iqn.1992-04.com.emc:600009700bc724603bac01d500000004 (non-flash)
- Create a duplicate session for the existing sessions between initiator and target. Doing so creates an additional TCP session and can improve performance by eliminating the TCP session as a bottleneck. Using the session ID from the existing session, create a new session and verify that a new session is created with the same endpoints.
# iscsiadm -m session --sid=1 --op new
Logging in to [iface: default, target: iqn.1992-04.com.emc:600009700bc724603bac01d500000003, portal: 192.168.209.3,3260] (multiple)
Login to [iface: default, target: iqn.1992-04.com.emc:600009700bc724603bac01d500000003, portal: 192.168.209.3,3260] successful.
# iscsiadm -m session
tcp: [1] 192.168.209.3:3260,0 iqn.1992-04.com.emc:600009700bc724603bac01d500000003 (non-flash)
tcp: [2] 192.168.209.4:3260,0 iqn.1992-04.com.emc:600009700bc724603bac01d500000004 (non-flash)
tcp: [9] 192.168.209.3:3260,0 iqn.1992-04.com.emc:600009700bc724603bac01d500000003 (non-flash)
- In this example, session 9 is a duplicate of session 1. Repeat this process for all the sessions.
PowerMax iSCSI and Oracle performance test
This section describes the performance tests and results we achieved running Oracle OLTP workloads in our lab over iSCSI connectivity to PowerMax. It is important to note that the PowerMax storage system we used for the tests was a single-engine (brick) system. Therefore, the performance numbers should not be viewed as a platform’s best numbers. Instead, they provide an example of the performance levels an Oracle database workload can achieve with a relatively small configuration (a single PowerMax 8000 brick and two 40-core PowerEdge R740 servers). These tests also allowed us to leverage and demonstrate the best practices described in this paper.
Summary
Summary
As this white paper demonstrates, 25GbE iSCSI is a viable option for Oracle database connectivity that can simplify the data center infrastructure, converge SAN to IP networks, and utilize the simplicity of IP network management.
PowerMax support for 25 GbE iSCSI provides flexibility, scale, high performance, and security, while still leveraging PowerMax features that include data protection, replications, resiliency, and availability. This provides the flexibility to deploy Oracle over FC or iSCSI for connectivity to storage without sacrificing performance or reliability.
Appendix
PowerMax iSCSI configuration using SYMCLI
This section shows the steps needed to configure PowerMax iSCSI using a Solutions Enabler command line interface (SYMCLI). Solutions Enabler CLI is another way to configure PowerMax in addition to Unisphere.
Create IP interface for each iSCSI front-end interface on PowerMax:
# symconfigure -sid 352 -cmd "create ip_interface dir 1e port 24, ip_address=192.168.209.3, ip_prefix=28,network_id=1,vlanid=0,mtu=9000;" commit -nop
A Configuration Change operation is in progress. Please wait...
Establishing a configuration change session...............Established.
Processing symmetrix 000197600352
Performing Access checks..................................Allowed.
Checking Device Reservations..............................Allowed.
Committing configuration changes..........................Started.
Committing configuration changes..........................Committed.
Terminating the configuration change session..............Done.
The configuration change session has successfully completed.
Create Target for the port by specifying director port and network ID. Optionally IQN for the target can be specified. If No IQN is specified, PowerMax generates one automatically:
# symconfigure -sid 352 -cmd "create iscsi_tgt dir 1e,network_id=1;" commit -nop
A Configuration Change operation is in progress. Please wait...
Establishing a configuration change session...............Established.
Processing symmetrix 000197600352
Performing Access checks..................................Allowed.
Checking Device Reservations..............................Allowed.
Committing configuration changes..........................Started.
created IQN : iqn.1992-04.com.emc:600009700bc724603bac01d500000003
Committing configuration changes..........................Committed.
Terminating the configuration change session..............Done.
The configuration change session has successfully completed.
Attach the IP interface with the Target:
# symconfigure -sid 352 -cmd "attach ip_interface ip_address=192.168.209.3 to iscsi_tgt iqn=iqn.1992-04.com.emc:600009700bc724603bac01d500000003;" commit -nop
A Configuration Change operation is in progress. Please wait...
Establishing a configuration change session...............Established.
Processing symmetrix 000197600352
Performing Access checks..................................Allowed.
Checking Device Reservations..............................Allowed.
Committing configuration changes..........................Started.
Committing configuration changes..........................Committed.
Terminating the configuration change session..............Done.
The configuration change session has successfully completed.
Create a port group for iSCSI ports and add targets to port group:
# symaccess -sid 352 -type port -name iscsi-pg create
# symaccess -sid 352 -type port -name iscsi-pg -iqn iqn.1992-04.com.emc:600009700bc724603bac01d500000003 add
Create initiator group for host and add initiators to it. Initiator ID should match the IQN configured in file /etc/iscsi/initiatorname.iscsi file of Linux host:
# symaccess -sid 352 -type initiator -name i-dsib0162 create
# symaccess -sid 352 -type initiator -name i-dsib0162 -iscsi iqn.1988-12.com.oracle:dsib0162 add
Create Masking View to present volumes to Host over iSCSI:
# symaccess -sid 352 create view -name iscsi-db -sg db_sg -pg iscsi-pg -ig i-dsib0162
Configure CHAP Authentication (optional): The example here is to setup unidirectional CHAP where PowerMax authenticates initiator. The value for -cred has to match username in the host/initiator configuration file and -secret to password. The -iscsi is set to the IQN of the initiator.
# symaccess -sid 352 -iscsi iqn.1988-12.com.oracle:dsib0162 set chap -cred iqn.1988-12.com.oracle:dsib0162 -secret SecretDsib0162
# symaccess -sid 352 -iscsi iqn.1988-12.com.oracle:dsib0162 enable chap