Article Number: 000120071
How to Expand the Database and Disk Size on Dell EMC OpenManage Network Manager 6.2 Virtual Appliance
Summary: How to expand the disc size for Open Manage Network Manager, extend storage on OMNM, How to increase database size in OMNM, How to increase database in Open Manage Network Manager
Article Content
Instructions
In this article we’ll be discussing how to increase virtual disk size of the Dell EMC OpenManage Network Manager Virtual Appliance and allocate that space to the existing CentOS root volume, as well as increase the max allowed size of the application database.
The following is a brief overview of steps to be covered.
- Stopping the web, application, and database services on the VM
- Increasing virtual disk size of VM from ESXi vSphere client
- Using fdisk to print the CentOS partition table and create a new partition
- Rebooting the VM from CLI
- Using vgdisplay to display the volume group
- Using vgextend to add the new partition and extend the volume group
- Using lvextend to extend the logical volume
- Using resize2fs to allocate the space to the file system
- Editing the max allowed size of the MySQL ibdata1 file
1. Connect to the OMNM VM Appliance via SSH or VMware console session. Then stop the OMNM Web, Application, and Database services using the following commands from the VM's CentOS CLI.
- Shutting down the Synergy Web Portal
[synergy@synergy ~]$ sudo service synergy stop
[synergy@synergy ~]$ sudo service synergy status
[synergy@synergy ~]$ sudo service synergy status
- Shutting down the Oware Application Server
[synergy@synergy ~]$ pmstopall
[synergy@synergy ~]$ pmgetstatus
[synergy@synergy ~]$ pmgetstatus
- Shutting down the Owaredb service (MySQL database)
[synergy@synergy ~]$ sudo service owaredb stop
[synergy@synergy ~]$ sudo service owaredb status
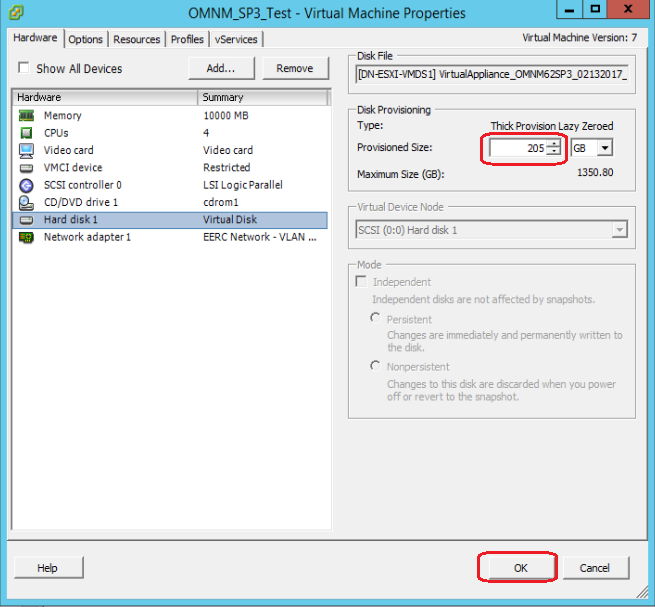
2. From the VMware WebUI or vSphere Client expand the VM disk to the desired size by right-clicking on the VM and editing its settings. In this example we've changed the hard disk size from 105 GB to 205 GB.
[synergy@synergy ~]$ sudo service owaredb status
3. Now back to the CentOS CLI. Use fdisk to edit the partition table of the VM and extend the installation volume.
[synergy@synergy ~]$ sudo fdisk /dev/sda
WARNING: DOS-compatible mode is deprecated. It's strongly recommended to
switch off the mode (command 'c') and change display units to
sectors (command 'u').
Command (m for help): m
Command action
a toggle a bootable flag
b edit bsd disklabel
c toggle the dos compatibility flag
d delete a partition
l list known partition types
m print this menu
n add a new partition
o create a new empty DOS partition table
p print the partition table
q quit without saving changes
s create a new empty Sun disklabel
t change a partition's system id
u change display/entry units
v verify the partition table
w write table to disk and exit
x extra functionality (experts only)
Command (m for help): p
Disk /dev/sda: 220.1 GB, 220117073920 bytes
255 heads, 63 sectors/track, 26761 cylinders
Units = cylinders of 16065 * 512 = 8225280 bytes
Sector size (logical/physical): 512 bytes / 512 bytes
I/O size (minimum/optimal): 512 bytes / 512 bytes
Disk identifier: 0x00049006
Device Boot Start End Blocks Id System
/dev/sda1 * 1 64 512000 83 Linux
Partition 1 does not end on cylinder boundary.
/dev/sda2 64 5222 41430016 8e Linux LVM
/dev/sda3 5222 13054 62913215 83 Linux
Command (m for help): n
Command action
e extended
p primary partition (1-4)
p
Selected partition 4
First cylinder (13055-26761, default 13055):
Using default value 13055
Last cylinder, +cylinders or +size{K,M,G} (13055-26761, default 26761):
Using default value 26761
Command (m for help): t
Partition number (1-4): 4
Hex code (type L to list codes): 8e
Changed system type of partition 4 to 8e (Linux LVM)
Command (m for help): w
The partition table has been altered!
Calling ioctl() to re-read partition table.
WARNING: Re-reading the partition table failed with error 16: Device or resource busy.
The kernel still uses the old table. The new table will be used at
the next reboot or after you run partprobe(8) or kpartx(8)
Syncing disks.
[synergy@synergy ~]$ sudo reboot -h now
5. Reconnect to the VM once it comes back up. Stop the OMNM Web, Application, and Database services again. Same as step 1.
6. From CentOS CLI use vgdisplay command to show the volume group.
[synergy@synergy ~]$ sudo vgdisplay
--- Volume group ---
VG Name VolGroup
System ID
Format lvm2
Metadata Areas 2
Metadata Sequence No 5
VG Access read/write
VG Status resizable
MAX LV 0
Cur LV 2
Open LV 2
Max PV 0
Cur PV 2
Act PV 2
VG Size 99.50 GiB
PE Size 4.00 MiB
Total PE 25473
Alloc PE / Size 25218 / 98.51 GiB
Free PE / Size 255 / 1020.00 MiB
VG UUID CS6e6H-wOdG-mlvy-pv71-mVkC-rLaQ-jlUOuW
7. Use fdisk to see the new partition table.
--- Volume group ---
VG Name VolGroup
System ID
Format lvm2
Metadata Areas 2
Metadata Sequence No 5
VG Access read/write
VG Status resizable
MAX LV 0
Cur LV 2
Open LV 2
Max PV 0
Cur PV 2
Act PV 2
VG Size 99.50 GiB
PE Size 4.00 MiB
Total PE 25473
Alloc PE / Size 25218 / 98.51 GiB
Free PE / Size 255 / 1020.00 MiB
VG UUID CS6e6H-wOdG-mlvy-pv71-mVkC-rLaQ-jlUOuW
[synergy@synergy ~]$ sudo fdisk /dev/sda
WARNING: DOS-compatible mode is deprecated. It's strongly recommended to
switch off the mode (command 'c') and change display units to
sectors (command 'u').
Command (m for help): p
Disk /dev/sda: 220.1 GB, 220117073920 bytes
255 heads, 63 sectors/track, 26761 cylinders
Units = cylinders of 16065 * 512 = 8225280 bytes
Sector size (logical/physical): 512 bytes / 512 bytes
I/O size (minimum/optimal): 512 bytes / 512 bytes
Disk identifier: 0x00049006
Device Boot Start End Blocks Id System
/dev/sda1 * 1 64 512000 83 Linux
Partition 1 does not end on cylinder boundary.
/dev/sda2 64 5222 41430016 8e Linux LVM
/dev/sda3 5222 13054 62913215 83 Linux
/dev/sda4 13055 26761 110101477+ 8e Linux LVM
Command (m for help): q
8. Use vgextend command to extend the volume group.
WARNING: DOS-compatible mode is deprecated. It's strongly recommended to
switch off the mode (command 'c') and change display units to
sectors (command 'u').
Command (m for help): p
Disk /dev/sda: 220.1 GB, 220117073920 bytes
255 heads, 63 sectors/track, 26761 cylinders
Units = cylinders of 16065 * 512 = 8225280 bytes
Sector size (logical/physical): 512 bytes / 512 bytes
I/O size (minimum/optimal): 512 bytes / 512 bytes
Disk identifier: 0x00049006
Device Boot Start End Blocks Id System
/dev/sda1 * 1 64 512000 83 Linux
Partition 1 does not end on cylinder boundary.
/dev/sda2 64 5222 41430016 8e Linux LVM
/dev/sda3 5222 13054 62913215 83 Linux
/dev/sda4 13055 26761 110101477+ 8e Linux LVM
Command (m for help): q
[synergy@synergy ~]$ sudo vgextend VolGroup /dev/sda4
dev_is_mpath: failed to get device for 8:4
No physical volume label read from /dev/sda4
Physical volume /dev/sda4 not found
Physical volume "/dev/sda4" successfully created
Volume group "VolGroup" successfully extended
9. Use lvextend command to extend the logical volume.
dev_is_mpath: failed to get device for 8:4
No physical volume label read from /dev/sda4
Physical volume /dev/sda4 not found
Physical volume "/dev/sda4" successfully created
Volume group "VolGroup" successfully extended
[synergy@synergy ~]$ sudo lvextend VolGroup/lv_root -l +100%FREE
Extending logical volume lv_root to 203.59 GiB
Logical volume lv_root successfully resized
10. Use resize2fs command resize the file system on the volume.
Extending logical volume lv_root to 203.59 GiB
Logical volume lv_root successfully resized
[synergy@synergy ~]$ sudo resize2fs /dev/mapper/VolGroup-lv_root
resize2fs 1.41.12 (17-May-2010)
Filesystem at /dev/mapper/VolGroup-lv_root is mounted on /; on-line resizing required
old desc_blocks = 7, new_desc_blocks = 13
Performing an on-line resize of /dev/mapper/VolGroup-lv_root to 53370880 (4k) blocks.
The filesystem on /dev/mapper/VolGroup-lv_root is now 53370880 blocks long.
NOTE: Use the following command to verify whether or not resize2fs is still running. Depending on the size of the volume it could take longer to complete.
[synergy@synergy ~]$ ps aux | grep resize2fs
The df command will show you the actual disk space after the file system has been resized.
[synergy@synergy ~]$ df -h
Filesystem Size Used Avail Use% Mounted on
/dev/mapper/VolGroup-lv_root 201G 4.6G 186G 3% /
tmpfs 4.8G 0 4.8G 0% /dev/shm
/dev/sda1 477M 49M 403M 11% /boot
11. Now we need to resize the OMNM database by changing the max allowed size of the MySQL ibdata1 file via editing the MySQL configuration file my.cnf. In this example we're changing it from the default 78.1 GB max to 175 GB max. resize2fs 1.41.12 (17-May-2010)
Filesystem at /dev/mapper/VolGroup-lv_root is mounted on /; on-line resizing required
old desc_blocks = 7, new_desc_blocks = 13
Performing an on-line resize of /dev/mapper/VolGroup-lv_root to 53370880 (4k) blocks.
The filesystem on /dev/mapper/VolGroup-lv_root is now 53370880 blocks long.
NOTE: Use the following command to verify whether or not resize2fs is still running. Depending on the size of the volume it could take longer to complete.
[synergy@synergy ~]$ ps aux | grep resize2fs
The df command will show you the actual disk space after the file system has been resized.
[synergy@synergy ~]$ df -h
Filesystem Size Used Avail Use% Mounted on
/dev/mapper/VolGroup-lv_root 201G 4.6G 186G 3% /
tmpfs 4.8G 0 4.8G 0% /dev/shm
/dev/sda1 477M 49M 403M 11% /boot
a. [synergy@synergy ~]$ sudo vi /opt/VAroot/dell/openmanage/networkmanager/oware3rd/mysql/my.cnf
b. From vi text editor find the following line and press i to insert text.
b. From vi text editor find the following line and press i to insert text.
innodb_data_file_path = /opt/VAroot/dell/openmanage/networkmanager/oware3rd/mysql/ibdata/ibdata1:250M:autoextend:max:80000M
c. Change the above line to the following and then press Esc to exit insert mode within the text editor.
innodb_data_file_path = /opt/VAroot/dell/openmanage/networkmanager/oware3rd/mysql/ibdata/ibdata1:250M:autoextend:max:1792000M
d. Then save the changes and quit by typing :wq and pressing Enter.
e. You can verify the change with the following command.
e. You can verify the change with the following command.
[synergy@synergy ~]$ cat /opt/VAroot/dell/openmanage/networkmanager/oware3rd/mysql/my.cnf | grep max:1792000M
Web server Status
[synergy@synergy ~]$ sudo service synergy status
Application Server Status
[synergy@synergy ~]$ watch -n 10 pmgetstatus ----press ctrl+c to exit once you see status ready (normally takes about 5 minutes to start)
13. You're Finished!!!
Application Server Status
[synergy@synergy ~]$ watch -n 10 pmgetstatus ----press ctrl+c to exit once you see status ready (normally takes about 5 minutes to start)
Article Properties
Affected Product
Dell OpenManage Network Manager
Last Published Date
21 Feb 2021
Version
3
Article Type
How To