Article Number: 000179557
How to deploy Oracle 12c Release 2 Grid and RAC Database on RHEL 7.x
Summary: Steps and images to help deploy Oracle 12c Release 2 Grid and RAC Database on RHEL 7.x
Article Content
Instructions
1. Software and Hardware Requirements
1.1. Hardware Requirements
- Oracle requires at least 8 GB of physical memory
- Swap space is proportional to the amount of RAM allocated to the system
| RAM | Swap space |
| Between 1.5GB and 16GB | Equal to the size of RAM |
| More than 16GB | 16GB |
 If you enable HugePages, then you should deduct the memory allocated to HugePages from the available RAM before calculating swap space
- The following table describes the disk space required for an Oracle installation
| Software Installation Location | Minimum Disk Space Requirements |
| Grid Infrastructure home | At least 8 GB of disk space |
| Oracle Database home | At least 6.4 GB of disk space |
| Shared storage disk space | Sizes of Database and Flashback Recovery Area |
- Oracle's temporary space (/tmp) must be at least 1 GB in size
- A monitor that supports resolution of 1024 x 768 to correctly display the Oracle Universal Installer (OUI)
1.2 Network Requirements
- It is recommended to ensure each node contains at least three network interface cards (NICs). One NIC for public network, two NICs for private network to ensure high availability of the Oracle RAC cluster. If you are going to use Automatic Storage Management (ASM) in the cluster, you need at least one Oracle ASM network. The ASM network can share the network interface with a private network.
- Public, Private and ASM interface names must be the same on all nodes. For example, if em1 is used as the public interface on node one, all other nodes require em1 as the public interface
- All public interfaces for each node should be able to communicate with all nodes within the cluster.
- All private and ASM interfaces for each node should be able to communicate with all nodes within the cluster
- The hostname of each node must follow the RFC 952 standard (www.ietf.org/rfc/rfc952.txt). Hostname that include an underscore ("_") are not permitted
1.3. Operating System Requirements
- Red Hat Enterprise Linux (RHEL) 7.x (Kernel 3.10.0-693.el7.x86_64 or higher)
1.3.1. Operating System Disk Partition
Below is the recommended disk partitioning scheme entries when installing RHEL 7 using a kickstart file on the local HDDs with at least 1.2 TB space available
part /boot --asprimary --fstype="xfs" --ondisk=sda --size=1024
part pv.1 --size=1 --grow --ondisk=sda --asprimary
volgroup rhel7 pv.1
logvol / --name=root --fstype=xfs --vgname=rhel7 --size=51200
logvol swap --fstype swap --name=swap --vgname=rhel7 --size=17408
logvol /home --name=home --fstype=xfs --vgname=rhel7 --size=51200
logvol /var --name=var --fstype=xfs --vgname=rhel7 --size=20480
logvol /opt --name=opt --fstype=xfs --vgname=rhel7 --size=20480
logvol /tmp --name=tmp --fstype=xfs --vgname=rhel7 --size=5120
logvol /u01 --name=u01 --fstype=xfs --vgname=rhel7 --size=1 --grow
2. Preparing Servers for Oracle Installation
Before installing Grid and database make sure to install below deployment scripts from Dell EMC which will set environment for
Oracle database installation.
2.1. Attaching systems to Red Hat Network (RHN)/Unbreakable Linux Network (ULN) Repository
All the pre-requisites rpms need to installed before any GRID/DB installation is performed.
Step 1:
- rhel-7-server-optional-rpms
- rhel-7.x
Step 2:
Most of the pre-requisite RPMs for Oracle GRID/DB install are available as part of the base ISO. However, few RPMs like compat-libstdc++. is not available in the base (RH) ISO file and needs to be downloaded and installed manually prior to installing the preinstall RPMS provided by Dell for Red Hat
Setup a local yum repository to automatically install the rest of dependency RPMS for performing GRID/DB install
- The recommended configuration is to serve the files over http using an Apache server (package name: httpd). This section discusses hosting the repository files from a local file system storage. While other options to host repository files exist, they are outside of the scope of this document. It is highly recommended to use local filesystem storage for speed and simplicity of maintenance.
mkdir /media/myISO
mount -o loop myISO.iso /media/myISO
- To install and configure the http daemon, configure the machine that will host the repository for all other machines to use the DVD image locally. Create the file /etc/yum.repos.d/local.repo and enter the following:
[local]
name=Local Repository
baseurl=file:///media/myISO
gpgcheck=0
enabled=0
- Now we will install the Apache service daemon with the following command which will also temporarily enable the local repository for dependency resolution:
yum -y install httpd --enablerepo=local
systemctl start httpd; systemctl enable httpd in RH/OL 7
- To use Apache to serve out the repository, copy the contents of the DVD into a published web directory. Run the following commands as root (make sure to switch myISO with the name of your ISO)command:
mkdir /var/www/html/myISO
cp -R /media/myISO/* /var/www/html/myISO
cp -R /media/myISO/* /var/www/html/myISO
- This step is only necessary if you are running SELinux on the server that hosts the repository. The following command should be run as root and will restore the appropriate SELinux context to the copied files:
restorecon -Rvv /var/www/html/
- The final step is to gather the DNS name or IP of the server that is hosting the repository. The DNS name or IP of the hosting server will be used to configure your yum repository repo file on the client server. The following is the listing of an example configuration using the RHEL 7.x Server media and is held in the configuration file:/etc/yum.repos.d/myRepo.repo
[myRepo]
name=RHEL 7.x Base ISO DVD
baseurl= http://reposerver.mydomain.com/myISO
enabled=1
gpgcheck=0
Replace reposerver.mydomain.com with your server's DNS name or IP address. Copy the file to /etc/yum.repos.d in all the necessary servers where GRID/DB will be installed
- Install the compat-libstdc++ rpm manually using rpm or yum command in the directory where the rpms are copied.
Ex: rpm -ivh
yum localinstall -y
Step 3:
Skip 1 in step 3 if Step 2 was done.
- Install the compat-libstdcc++ rpms by running the following command
yum install –y compat-libstdc++.i686
yum install –y compat-libstdc++.x86_64
- Download/copy the rpms provided by DELL by navigating to Dell Oracle Deployment RPMs for Oracle 12cR2 on RHEL7.x for RH to the servers where GRID/DB Installations will be performed. List of RPMs are as follows and download only necessary RPMs
dell-redhat-rdbms-12cR2-preinstall-2018.06-1.el7.noarch.rpm
dell-redhat-rdbms-utilities-2018.06-1.el7.noarch.rpm
dell-redhat-rdbms-12cR2-preinstall-2018.06-1.el7.noarch.rpm is designed to do the following
- Disable transparent_hugepages in grub2.cfg
- Disable numa in grub2.cfg
- Create Oracle user and groups oinstall & dba
- Set sysctl kernel parameters
- Set user limits (nofile, nproc, stack) for Oracle user
- Set NOZEROCONF=yes in /etc/sysconfig/network file
dell-redhat-rdbms-utilities-2018.06-1.el7.noarch.rpm is designed to do the following
- Create grid user and groups asmadmin, asmdba, asmoper, backupdba, dgdba, kmdba
- Set user limits (nofile, nproc, stack) for Grid user.
- Set sysctl kernel parameters
- Set RemoveIPC=no to ensure semaphores set for users are not lost after user logout
- Install these two rpms
yum localinstall –y dell-redhat-rdbms-12cR2-preinstall-2018.06-1.el7.noarch.rpm
All dependency RPMs are installed if YUM repository is setup properly
yum localinstall –y dell-redhat-rdbms-utilities-2018.06-1.el7.noarch.rpm
2.2. Setting up the Network
2.2.1. Public Network
Ensure that the public IP address is a valid and routable IP
To configure the public network on each node
- Log in as root.
- Navigate to /etc/sysconfig/network-scripts and edit the ifcfg-em# file where # is the number of the network device
NAME="Oracle Public"
DEVICE= "em1"
ONBOOT=yes
TYPE= Ethernet
BOOTPROTO=static
IPADDR=<routable IP address>
NETMASK=<netmask>
GATEWAY=<gateway_IP_address>
- Set the hostname via below command
hostnamectl set-hostname <host-name>
where <host-name> is the hostname that we are using for installation
- Type service network restart to restart the network service
- Type ifconfig to verify that the IP addresses are set correctly
- To check your network configuration, ping each public IP address from a client on the LAN that is not a part of the cluster
- Connect to each node to verify that the public network is functioning. Type ssh to verify that the secure shell (ssh) command is working
2.2.2. Private Network
The private network configuration consists of two network interfaces em2 and em3. The private network is used to provide interconnect communication between all the nodes in the cluster. This is accomplished via Oracle's Redundant Interconnect, also known as Highly Available Internet Protocol (HAIP), that allows the Oracle Grid Infrastructure to activate and load balance traffic on up to four Ethernet devices for private interconnect communication.
Each of the two NIC ports for the private network must be on separate PCI buses
The example below provides step-by-step instructions on enabling redundant interconnect using HAIP on a fresh Oracle 12c Grid Infrastructure installation
- Edit the file /etc/sysconfig/network-scripts/ifcfg-emX, where X is the number of the em device, ifcfg-emX configuration files of the network adapters to be used for your private interconnect.
DEVICE=em2
BOOTPROTO=static
HWADDR=
ONBOOT=yes
NM_CONTROLLED=yes
IPADDR=192.168.1.140
NETMASK=255.255.255.0
DEVICE=em3
HWADDR=
BOOTPROTO=static
ONBOOT=yes
NM_CONTROLLED=yes
IPADDR=192.168.1.141
NETMASK=255.255.255.0
- Once you have saved both the configuration files, restart your network service using below commands
nmcli connection reload
nmcli device disconnect em2
nmcli connection up em2
- Repeat the steps for each interface that has been modified.
- The completion of the steps above have now prepared your system to enable HAIP using the Oracle Grid Infrastructure installer. When you have completed all the Oracle prerequisites and are ready to install Oracle, you will need to select em2 and em3 as 'private' interfaces at the 'Network Interface Usage' screen
- This step enables redundant interconnectivity once your Oracle Grid Infrastructure has successfully completed and is running
2.2.3. Oracle Flex ASM Network
Oracle Flex ASM can use either the same private networks as Oracle Clusterware, or use its own dedicated private networks. Each network can be classified PUBLIC or PRIVATE+ASM or PRIVATE or ASM
2.2.4. IP Address and Name Resolution Requirements
We can configure IP address of the cluster nodes with one of the following option
- Domain Name Server (DNS)
2.2.4.1. Domain Name Server (DNS)
To set up an Oracle 12c RAC using Oracle (without GNS):
A SCAN NAME must be configured on the DNS for Round Robin resolution to three addresses (recommended) or at least one address. The SCAN addresses must be on the same subnet as Virtual IP addresses and public IP addresses
For high availability and scalability, it is recommended that you configure the SCAN to use Round Robin resolution to three IP addresses. The name for the SCAN cannot begin with a numeral. For installation to succeed, the SCAN must resolve to at least one address
The table below describes the different interfaces, IP address settings and the resolutions in a cluster
|
Interface
|
Type
|
Resolution
|
|
Public
|
Static
|
DNS
|
|
Private
|
Static
|
Not required
|
|
ASM
|
Static
|
Not required
|
|
Node Virtual IP
|
Static
|
Not required
|
|
SCAN virtual IP
|
Static
|
Not required
|
Configuring a DNS Server
To configure changes on a DNS server for an Oracle 12c cluster using DNS (without GNS):
Configure SCAN NAME resolution on DNS server. A SCAN NAME configured on the DNS server using the Round Robin policy should resolve to three public IP addresses (recommended), however the minimum requirement is one public IP address
For example
scancluster IN A 192.0.2.1
IN A 192.0.2.2
IN A 192.0.2.3
Where scancluster is the SCAN NAME provided during Oracle Grid installation
The SCAN IP address must be routable and must be in public range
Configuring a DNS Client
To configure the changes required on the cluster nodes for name resolution:
- You must configure the resolv.conf on the nodes in the cluster to contain name server entries that are resolvable to DNS server.
nmcli connection modify ipv4.dns ipv4.dns-search
- Verify the order configuration /etc/nsswitch.conf controls the name service order. In some configurations, the NIS can cause issues with Oracle SCAN address resolution. It is recommended that you place the NIS entry at the end of the search list.
For example, hosts: dns files nis
3. Preparing Shared Storage for Oracle RAC Installation
In this section, the terms disk(s), volume(s), virtual disk(s), LUN(s) mean the same and are used interchangeably, unless specified otherwise. Similarly, the terms Stripe Element Size and Segment Size both can be used interchangeably
Oracle RAC requires shared LUNs for storing your Oracle Cluster Registry (OCR), voting disks, Oracle Database files, and Flash Recovery Area (FRA). The following table shows the typical recommended storage volume design for Oracle 12c Database
| Database Volume Type/Purpose | Number of Volumes | Volume Size |
| OCR/VOTE | 3 | 50GB each |
| DATA | 4 | 250GB1 each |
| REDO2 | 2 | At least 50GB each |
| FRA | 1 | 100GB3 |
| TEMP | 1 | 100GB |
1 – Adjust each volume size based on your database; 2 – At least two REDO ASM diskgroups are recommended, each with at least one storage volume; 3 – Ideally, the size should be 1.5x the size of the database if storage usable capacity permits
The use of device mapper multipath is recommended for optimal performance and
persistent name binding across nodes within the cluster
persistent name binding across nodes within the cluster
3.1. Setting up Device Mapper Multipath for XtremIO storage
The purpose of Device Mapper Multipath is to enable multiple I/O paths to improve performance and provide consistent naming. Multipathing accomplishes this by combining your I/O paths into one device-mapper path and properly load balancing the I/O. This section will provide the best practices on how to setup your device mapper multipathing within your Dell PowerEdge server. Verify that your device-mapper and multipath driver are at least the version shown below or higher:
- rpm -qa | grep device-mapper-multipath
device-mapper-multipath
- Enable multipath by mpathconf –enable
- Configure XtremIO multipath by modifying /etc/multipath.conf with the following
device {
vendor XtremIO
product XtremApp
path_grouping_policy multibus
path_checker tur
path_selector "queue-length 0"
rr_min_io_rq 1
user_friendly_names yes
fast_io_fail_tmo 15
failback immediate
}
- Add appropriate user friendly names to each volume with the corresponding scsi_id. We can get scsi_ids with the below command
/usr/lib/udev/scsi_id -g -u -d /dev/sdX
- Locate the multipath section within your /etc/multipath.conf file. In this section you will provide the scsi_id of each volume and provide an alias in order to keep a consistent naming convention across all of your nodes. An example is shown below
multipaths {
multipath {
wwid <out put of step4 for volume1>
alias alias_of_volume1
}
multipath {
wwid <out put of step4 for volume2>
alias alias_of_volume2
}
}
- Restart your multipath daemon service using
Service multipathd restart
- Verify that your multipath volumes alias are displayed properly
multipath -ll
- Repeat all trhe steps for all nodes
3.2. Partitioning the Shared Disk
This section describes how to use parted utility to create a single partition on a volume/virtual disk that spans the entire disk.
Partition each database volume that was setup using device-mapper by running the following command:
$> parted -s /dev/mapper/<volume1> mklabel msdos
$> parted -s /dev/mapper/<volume1> primary 2048s 100%
Repeat this for all the required volumes
-
Repeat above steps for all volumes and restart multipathd on all other nodes
systemctl restart multipathd.service
-
Reboot the system if your newly created partition is not displayed properly
3.3 Using udev Rules for disk permissions and persistence
Red Hat Enterprise Linux 7.x have the ability to use udev rules to ensure that the system properly manages permissions of device nodes. In this case, we are referring to properly setting permissions for our LUNs/volumes discovered by the OS. It is important to note that udev rules are executed in enumerated order. When creating udev rules for setting permissions, please include the prefix 60- and append .rules to the end of the filename.
- Create a file 60-oracle-asmdevices.rules under /etc/udev/rules.d
- Ensure each block device has an entry in the file as shown below
#---------------------start udev rule contents ------------------------#
KERNEL=="dm-*", ENV =="C1_OCR1p?", OWNER:="grid", GROUP:="asmadmin", MODE="0660"
KERNEL=="dm-*", ENV =="C1_OCR2p?", OWNER:="grid", GROUP:="asmadmin", MODE="0660"
KERNEL=="dm-*", ENV =="C1_OCR3p?", OWNER:="grid", GROUP:="asmadmin", MODE="0660"
KERNEL=="dm-*", ENV =="C1_DATA1p?", OWNER:="grid", GROUP:="asmadmin", MODE="0660"
KERNEL=="dm-*", ENV =="C1_DATA2p?", OWNER:="grid", GROUP:="asmadmin", MODE="0660"
KERNEL=="dm-*", ENV =="C1_DATA3p?", OWNER:="grid", GROUP:="asmadmin", MODE="0660"
KERNEL=="dm-*", ENV =="C1_DATA4p?", OWNER:="grid", GROUP:="asmadmin", MODE="0660"
KERNEL=="dm-*", ENV =="C1_REDO1p?", OWNER:="grid", GROUP:="asmadmin", MODE="0660"
KERNEL=="dm-*", ENV =="C1_REDO2p?", OWNER:="grid", GROUP:="asmadmin", MODE="0660"
KERNEL=="dm-*", ENV =="C1_FRA?", OWNER:="grid", GROUP:="asmadmin", MODE="0660"
KERNEL=="dm-*", ENV =="C1_TEMP?", OWNER:="grid", GROUP:="asmadmin", MODE="0660"
#-------------------------- end udev rule contents ------------------#
- Run "udevadm trigger" to apply the rule.
- Copy the udev rules to all the nodes and run udevadm trigger to apply rules
4. Installing Oracle 12c Grid Infrastructure for a Cluster
This section gives you the installation information of Oracle 12c grid infrastructure for a cluster.Before you install the Oracle 12c RAC software on your systeme ensure that you have already configured your operating system,network and storage based on the steps from the previous sections within this document and locate your Oracle 12c kit.
4.1 Configure the System Clock Settings for All Node
To prevent failures during the installation procedure, configure all the nodes with identical system clock settings. Synchronize your node system clock with the Cluster Time Synchronization Service (CTSS) which is built in Oracle 12c. To enable CTSS, disable the operating system network time protocol daemon (ntpd) service using the following commands in this order:
-
systemctl stop chronyd.service
-
systemctl disable chronyd.service
-
mv /etc/chrony.conf /etc/ntp.chrony.orig
The following steps are for node one of your cluster environment, unless otherwise specified.
- Log in as root.
- If you are not in a graphical environment, start the X Window System by typing: startx
- Open a terminal window and type: xhost +
- Mount the Oracle Grid Infrastructure media.
- Log in as grid user, for example: su - grid.
- Type the following command to start the Oracle Universal Installer: /runInstaller
- In the Select Configuration Option window, select Configure Grid Infrastructure for a Cluster and click Next

- In the Cluster Configuration window, select Configure an Oracle Standalone Cluster, and click Next.

- In the Grid Plug and Play Information window, enter the following information:
-
Cluster Name—Enter a name for your cluster
-
SCAN Name—Enter the named registered in the DNS server which is unique for the entire cluster. For more details on setting up your SCAN name see, "IP Addres and Name Resolution reuirements.
-
SCAN Port—retain the default port of 1521.
-

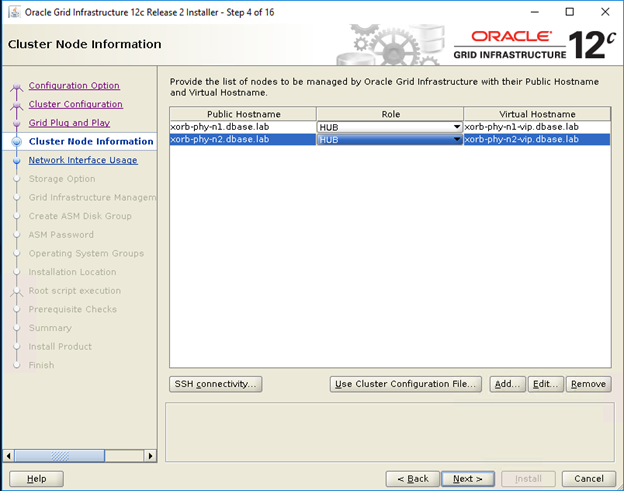
- In the Cluster Node Information window, click Add to add additional nodes that must be managed by the Oracle Grid Infrastructure.
- Enter the public Hostname information for Hub and Leaf cluster member nodes
- Enter the Role of Cluster member node.
- Repeat the above 3 steps for each node in cluster.

- Click SSH connectivity and configure passwordless SSH connectivity by entering the OS password for the grid user and click setup.
- Click Ok and the click Next to go to Next window.
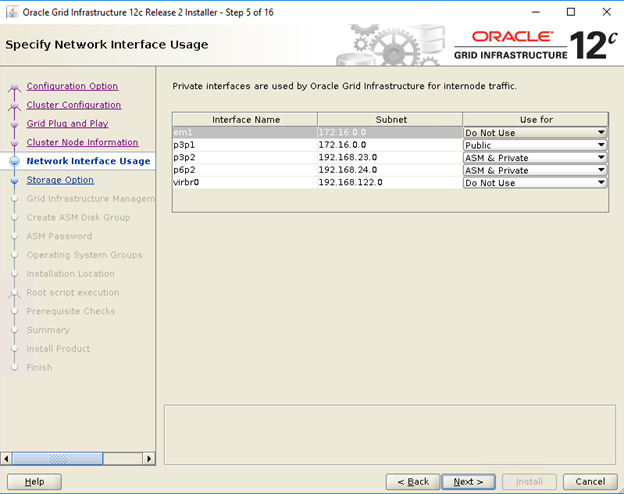
- In the Specify Network Interface Usage window, make sure that the correct interface usage types are selected for the interface names. From the ‘Use for’ drop-down list,Select the required interface type.The avilable options are Public,Private,ASM,ASM and private. Click Next
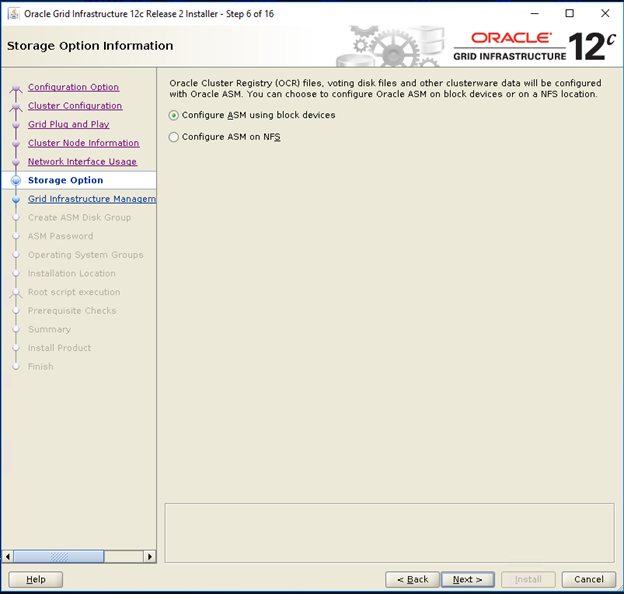
- In the Storage option information Window select Configure ASM using block devices and click Next.
- In the Grid Infrastructure Management Repository Option window select No for Configure Grid Infrastructure Management and click Next.
- In the Create ASM Disk Group window, enter the following information:
-
Disk Group Name— Enter a name, for example: OCR
-
Redundancy— For your OCR and voting disks, select High if five ASM disks are available, select Normal if three ASM disks are available, or select External if one ASM disk is available (not recommended).
-
: If no candidate disks are displayed, click Change Discovery Path and enter /dev/mapper/*.

- In the ASM Password window, choose the relevant option under Specify the passwords for these accounts and enter the relevant values for the password. Click Next.
- In the Failure Isolation Support window, select Do Not use Intelligent Platform Management Interface (IPMI)
- In the Management options window chose default and click Next
- In the Privileged Operating Systems Groups window, select:
-
asmdba for Oracle ASM DBA (OSASM) Group
-
asmoper for Oracle ASM Operator (OSOPER) Group
-
asmdba for Oracle ASM Administrator (OSDBA) Group
-

- In the Specify Installation Location window, specify the values of your Oracle Base and Software Location as configured within the Dell Oracle utilities RPM
The default locations used within the Dell Oracle utilites RPM are:
- Oracle Base -/u01/app/grid
- Software Location - /u01/app/12.1.0/grid_1

- In the Create Inventory window, specify the location for your Inventory Directory. Click Next
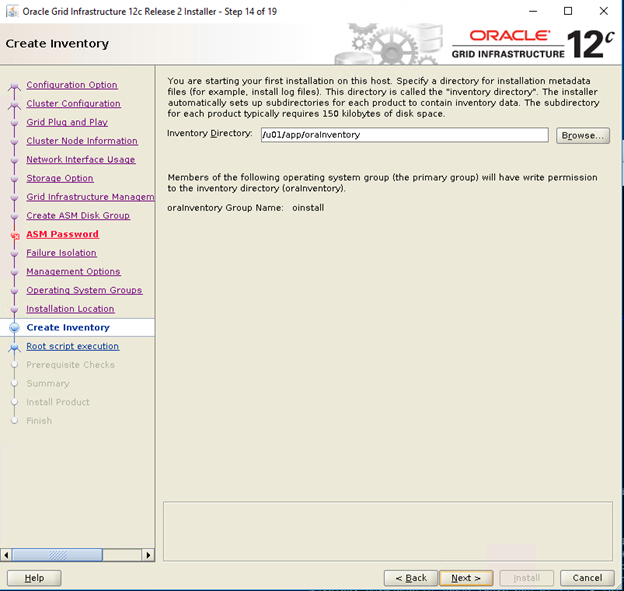
 The default location based on the Dell Oracle utilites RPM for Inventory Directory is /u01/app/oraInventory
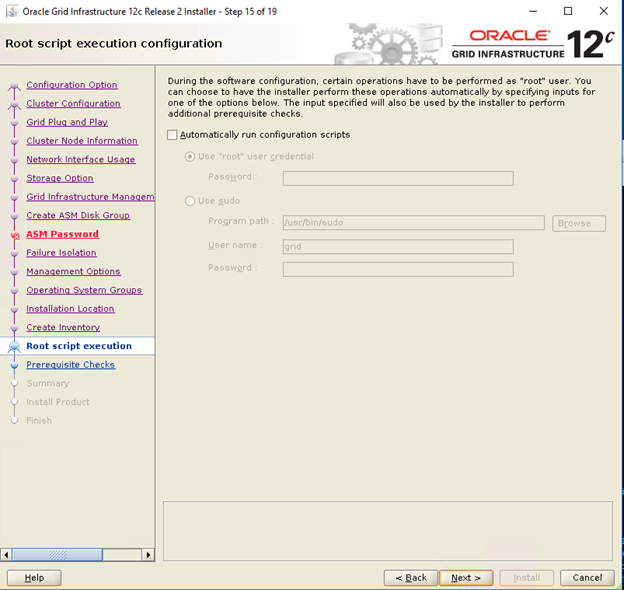
- In the Root script execution configuration window, unselect automatically run configuration scripts click Next
- In the Summary window, verify all the settings and select Install
- In the Install Product window check the status of the Grid Infrastructure Installation
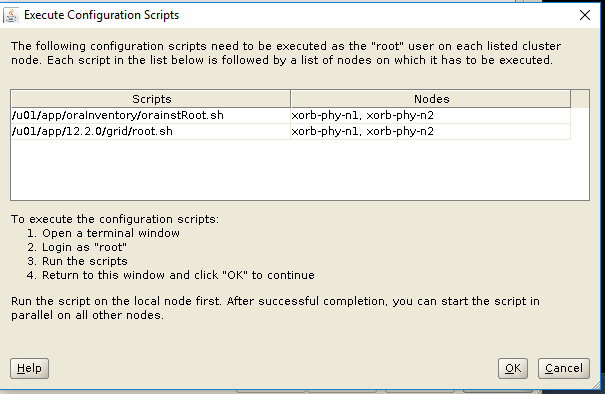
- In the Execute Configuration Scripts window execute root.sh scripts on both nodes and click ok.
- In the Finish window, click Close
5. Installing Oracle 12c Database
5.1. Installing Oracle 12c Database (RDBMS) Software
The following steps are for node 1 of your cluster environment, unless otherwise specified.
- Log in as root and type: xhost+.
- Mount the Oracle Database 12c media.
- Log in as Oracle user by typing:su - oracle
- Run the installer script from your Oracle database media:
<CD_mount>/runInstaller
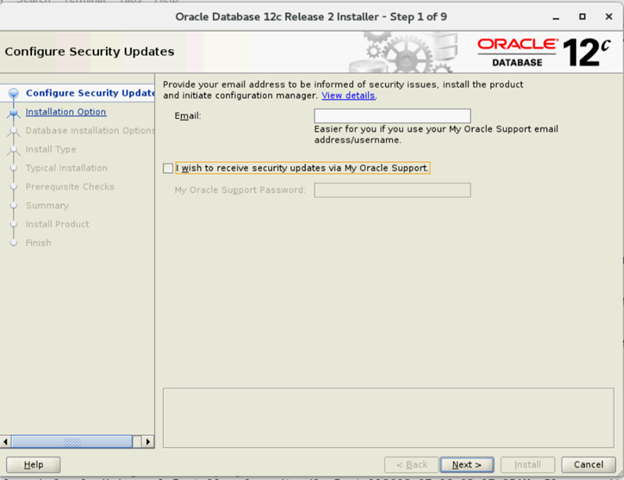
- In the Configure Security Updates window, enter your My Oracle Support credentials to receive security updates, else click Next
- In the Select Installation Option window, select Install database software only.

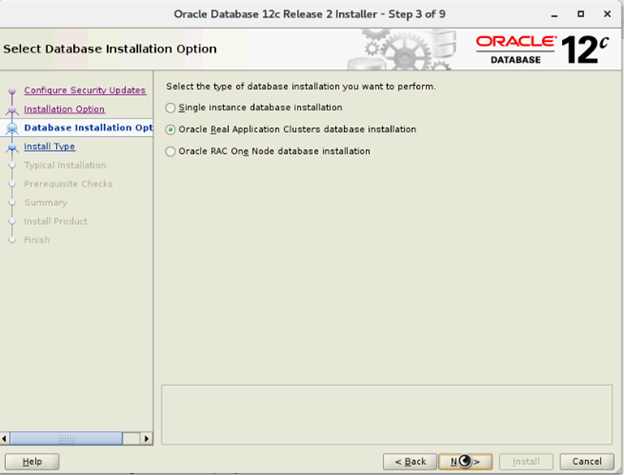
- In the Select Database Installation Options window Select Oracle Real Application Clusters database installation and click Next

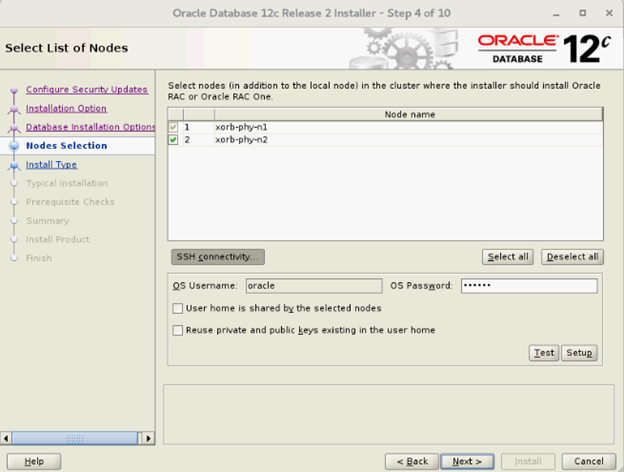
- In the Select List of Nodes window select all the Hub nodes and omit Leaf nodes and Click SSH Connectivity and configure your passwordless SSH connectivity by entering the OS Password for the oracle user and selecting Setup. Click Ok and click Next to go the next window

- In the Select Database Installation Options window Select Oracle Real Application Clusters database installation and click Next
- In the Select List of Nodes window select all the Hub nodes and omit Leaf nodes and Click SSH Connectivity and configure your passwordless SSH connectivity by entering the OS Password for the oracle user and selecting Setup. Click Ok and click Next to go the next window
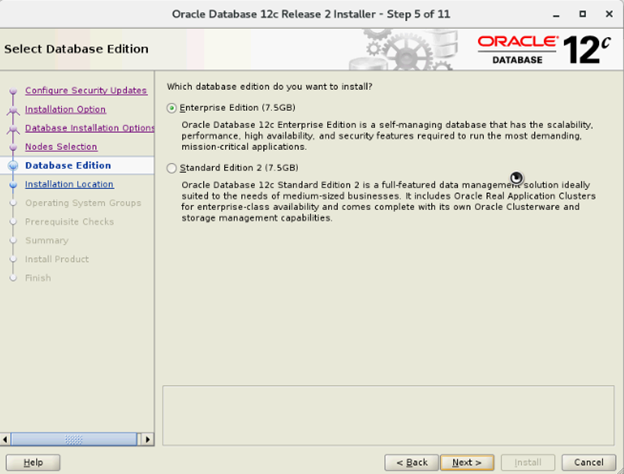
- In the Select Database Edition window, select Enterprise Edition and click Next
- In the Specify Installation Location window, Specify the location of your Oracle Base configured within the Dell oracle utilities RPM
The default locations used within the Dell Oracle utilites RPM are as follows:
- Oracle Base—/u01/app/oracle
- Software Location—/u01/app/oracle/product/12.1.0/dbhome_2

- In the Privileged Operating System Groups window, select dba for Database Administrator (OSDBA) group, dba for Database Operator (OSOPER) group, backupdba for Database Backup and Recovery (OSBACKUPDBA) group, dgdba for Data Guard administrative (OSDGDBA) group and kmdba for Encryption Key Management administrative (OSKMDBA) group and click Next.

- In the Summary window verify the settings and select Install
- On completion of the installation process, the Execute Configuration scripts wizard is displayed. Follow the instructions in the wizard and click Ok .

Root.sh should be run on one node at a time
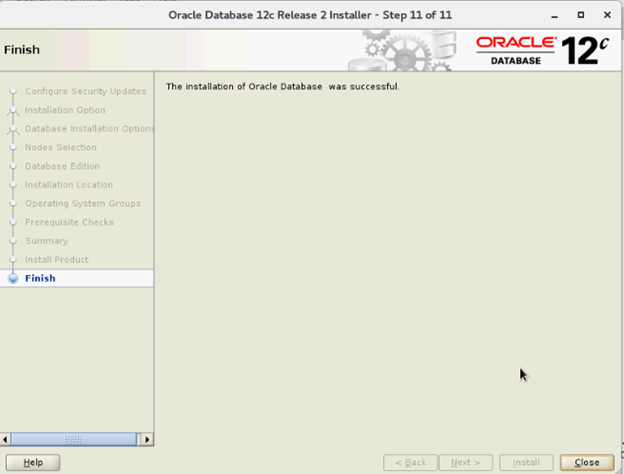
- In the Finish window, click Close
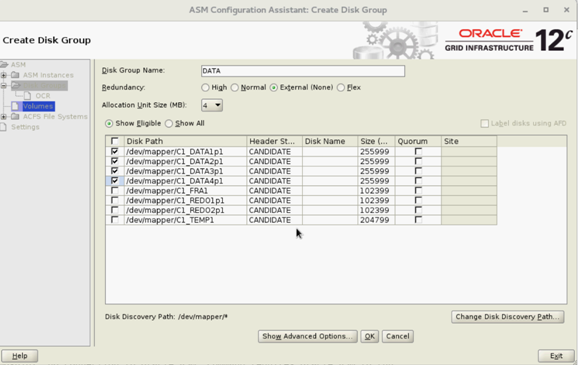
6. Creating Diskgroup Using ASM Configuration Assistant (ASMCA)
This section contains procedures to create the ASM disk group for the database files and Flashback Recovery Area (FRA).
- Login as grid user start asmca from /u01/app/12.2.0/grid/bin/asmca
- Create ‘DATA’ disk group with External Redundancy by selecting appropriate candidate disks
- Create two ‘REDO’ disk groups – REDO1 and REDO2 - with External Redundancy by selecting at least one candidate disk per REDO disk group

- Create ‘FRA’ disk group with External Redundancy by selecting appropriate candidate disks

- Create ‘TEMP’ disk group with External Redundancy by selecting appropriate candidate disks

- Verify all required disk groups and click Exit to close from ASMCA utility

- Change ASM striping to fine-grained for REDO, TEMP and FRA diskgroups as a grid user using below commands
We must change to fine-grained striping before we run DBCA
SQL> ALTER DISKGROUP REDO ALTER TEMPLATE onlinelog ATTRIBUTES (fine)
SQL> ALTER DISKGROUP TEMP ALTER TEMPLATE tempfile ATTRIBUTES (fine)
SQL> ALTER DISKGROUP FRA ALTER TEMPLATE onlinelog ATTRIBUTES (fine)
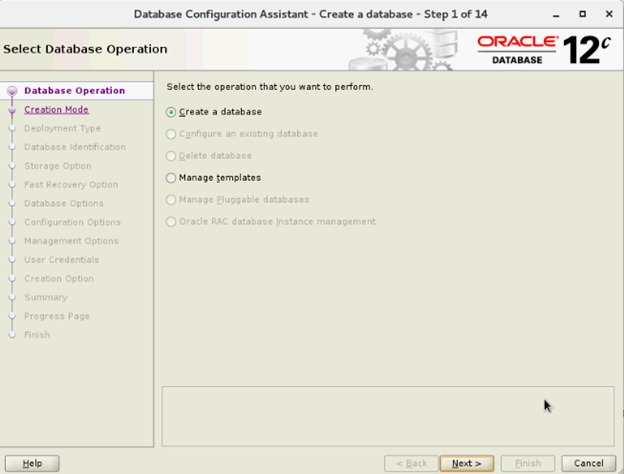
7. Creating Database Using DBCA
The following steps are applicable for node 1 of your cluster environment, unless otherwise specified:
- Login as oracle user
- From $, run the DBCA utility by typing: $/bin/dbca
- In the Select Database Operation window, select Create Database and click Next
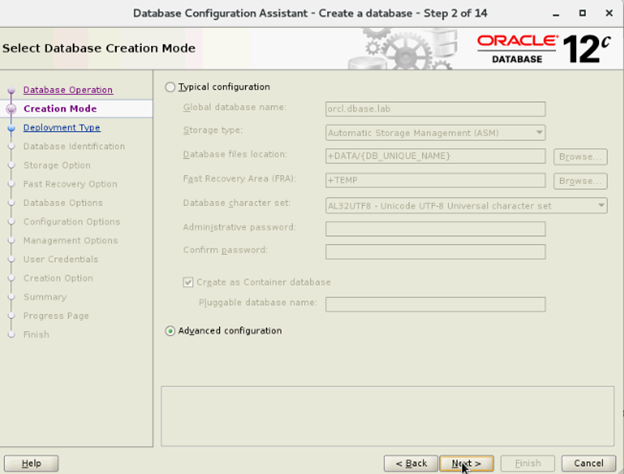
- In the Select Creation Mode window, select Advanced Mode, and click Next
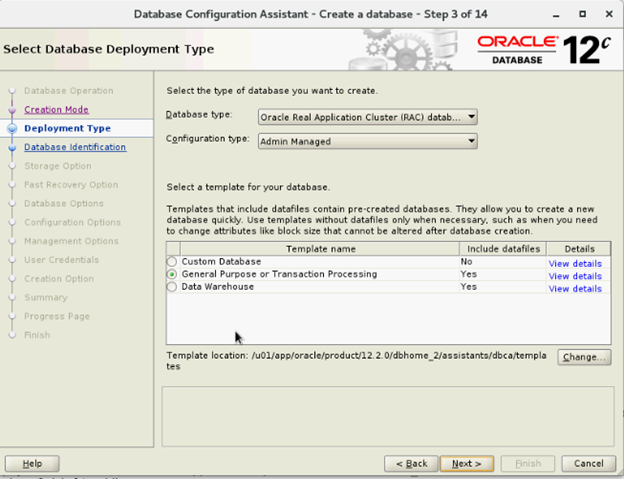
- In the Select Database Deployment window, Select Oracle Real Application Cluster (RAC) database in the Database type and Select Admin-Managed for Configuration Type and Select Template, and click Next
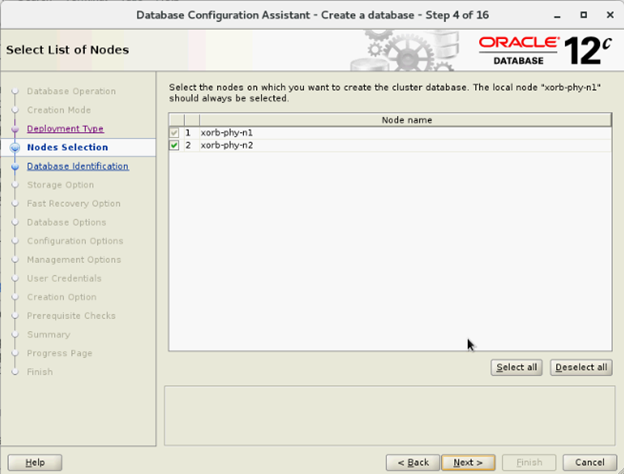
- In the Select List of nodes window select nodes and click Next
- In the Specify Database Identification Details window:

- In the Storage Options Window select Datafiles storage location and Unselect Use Oracle- Managed Files (OMF) and click Next

- In the Select Fast Recovery Option window, select Specify Fast Recovery Area location and click Next

- In the Select Oracle Data Vault Config Option window, select default values and click Next

- In the Specify Configuration Options window put required SGA and PGA values and click Next

- In the Specify Management Options window select default and click Next
- In the Specify Database User Credentials window input password and click Next

- In the Select Database Creation Options window, Click on Customize Storage Locations

- Create/modify the Redo Log Groups based on the following design recommendation
| Redo Log Group Number | Thread Number | Disk Group Location | Redo Log Size |
| 1 | 1 | +REDO1 | 5 GB |
| 2 | 1 | +REDO2 | 5 GB5 GB |
| 3 | 1 | +REDO1 | 5 GB |
| 4 | 1 | +REDO2 | 5 GB |
| 5 | 2 | +REDO1 | 5 GB |
| 6 | 2 | +REDO2 | 5 GB |
| 7 | 2 | +REDO1 | 5 GB |
| 8 | 2 | +REDO2 | 5 GB |

- In the Summary window, click Finish to create database

Database creation can take some time to complete
- Click Close on the Finish window after the database creation is complete

Article Properties
Affected Product
Red Hat Enterprise Linux Version 7
Last Published Date
21 Feb 2021
Version
4
Article Type
How To