Article Number: 000179545
Connectrix Brocade: How to Enable Root Login Access
Summary: How to enable root login access.
Article Content
Instructions
Root access is disabled by default after upgrading from FOS 7.x to FOS 8.0.x or later, or if the firmwarecleaninstall command is used.
Attempts to login with root access may result in a message stating the account (root is not listed) is disabled.
Attempts to login with root access may result in a message stating the account (root is not listed) is disabled.
Diagnosing the Issue:
- To display the status of root access settings from the admin access level, run the command:
switch:admin> rootaccess --show

If the resulting RootAccess setting shown is none, then root access is disabled.
- To display the status of root user settings, run the command:
switch:admin> userconfig --show root
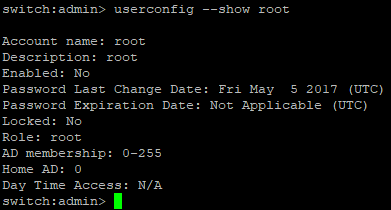
- Verify that Account name is root.
- If the Enable attribute that is shown is No, then root account is disabled.
Resolution
The following two commands allow root account access. Either or both commands work depending on the status of the previous --show commands:
-
Modify the root access settings to allow or disallow root access, type the rootaccess --set <none/consoleonly/all> command.
- None: Disables root account access on all interfaces
- ConsoleOnly: Allows root account access using the console only (this is default enabled option)
- All: Allows root access on all interfaces
Example:
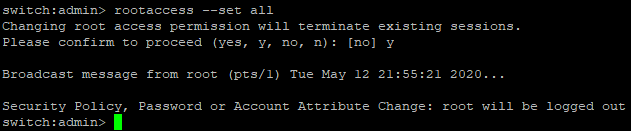
- To enable root access on all interfaces, run the command:
switch:admin> rootaccess --set all
- To verify that root access is set, run the command:
switch:admin> rootaccess --show

- Verify the RootAccess setting that is shown is all.
- To enable or disable the root account, type the userconfig --change root -e <yes | no> command.
- The -e option enables or disables an account. Specify yes to enable or no to disable an account.
Example:
- To enable root account, run command:
switch:admin> userconfig --change root -e yes

- To verify that the root account is enabled, run the command:
switch:admin> userconfig --show root

- Verify that Account name is root.
- If the Enable attribute that is shown is Yes, then root account is now enabled.
The first root login to a switch prompts you to change the default root password, without a chance or option to cancel (Ctrl+C) or leave it as the default root password. You MUST change the password.
Article Properties
Affected Product
Brocade 6505, Brocade 6510, Brocade 6520, Brocade G620, Brocade M6505, Connectrix B-Series Hardware, Connectrix DS-6505B, Connectrix DS-6510B, Connectrix DS-6520B, Connectrix DS-6610B, Connectrix DS-6620B, Connectrix DS-6630B, Connectrix ED-DCX6-4B
, Connectrix ED-DCX6-8B, Connectrix ED-DCX8510-4B, Connectrix ED-DCX8510-8B, Dell EMC Networking MX-G610s
...
Last Published Date
11 Feb 2022
Version
5
Article Type
How To