Troubleshoot a Dell computer that does not boot to Windows 11 or Windows 10
Zusammenfassung: Basic troubleshooting steps for Personal Computers that power on but fail to boot into Windows. Computers passing the BIOS screen but fail to load the OS are experiencing a no boot state. ...
Dieser Artikel gilt für
Dieser Artikel gilt nicht für
Dieser Artikel ist nicht an ein bestimmtes Produkt gebunden.
In diesem Artikel werden nicht alle Produktversionen aufgeführt.
Weisungen
NOTE: Microsoft will end support for Windows 10 on October 14, 2025. See our Microsoft Windows 10 End of Support Announcement for more information.
BEFORE YOU START:
Ensure that you have completed the basic troubleshooting steps outlined on the Dell Computer Cannot Boot into Windows library page. This article picks up where those steps leave off. We walk you through advanced solutions to help resolve your boot problems. These methods address deeper system issues that prevent Windows from loading properly.
The following video helps you identify if your computer is experiencing a boot issue.
Symptoms of a Dell computer that does not boot
Duration: 0:39
Closed captions: This video is available in multiple languages. Click the Closed Caption icon and select the language that you want.
Quick Reference:
| Problem | Try This Solution |
|---|---|
| Recent update or software caused the issue | Use a System Restore Point |
| Do not know what is wrong | Reset Windows While Keeping Files |
| Login failures, user profile service errors, or instability within a specific user account. | Profile Solutions Fixes |
| "Missing operating system" error | System File Repair Methods |
| Boot Configuration Data file is missing," "Windows failed to start," "Missing BOOTMGR" type messages. | Boot Configuration Fixes |
| Nothing works | When to Consider a Fresh Installation |
Use a System Restore Point
A System Restore point can undo recent changes that may prevent normal booting. To access the System Restore point application, perform the following steps:
- Access the Windows Recovery Environment (WinRE) (instructions are located at bottom of the article).
- Select Troubleshoot > Advanced Options > System Restore (Figure 1)

Figure 1: Advanced options - Click Next.
- Select a restore point from before the boot problems started (if no restore points are available, go to the Reset Windows While Keeping Files) section.
- Follow the wizard to complete the restoration
NOTE: System Restore does not affect personal files but removes recently installed programs and drivers.
Reset Windows While Keeping Files
This option reinstalls Windows while preserving your personal data:
- Access Reset Options.
- Access the Windows Recovery Environment (WinRE) (instructions are located at bottom of the article).
- Select Troubleshoot > Reset this PC (Figure 2).
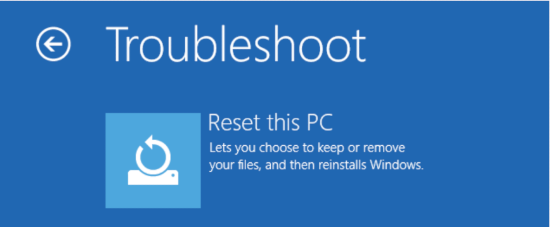
Figure 2: Reset this PC - Choose Keep my files.
- If your computer is encrypted with BitLocker, enter the recovery key when asked. You can find the key by logging into your account at account.microsoft.com and checking the Devices section.
- Select additional options.
- Select Local reinstall (faster) or Cloud download (gets latest Windows version).
- Complete the reset.
- Follow the on-screen prompts.
- The process takes 1-3 hours depending on your system.
NOTE: This process keeps personal files but removes installed programs and resets settings to defaults.
Profile Solutions
Fix Corrupted User Profiles.
User profile corruption can prevent Windows from loading completely:
- Access the Windows Recovery Environment (WinRE) (instructions are located at bottom of the article).
- Select Troubleshoot > Advanced Options > Startup Settings
- Click Restart.
- If your computer is encrypted with BitLocker, enter the recovery key when asked. You can find the key by logging into your account at account.microsoft.com and checking the Devices section.
- Select:
- 4 or F4 for Safe Mode (Figure 3).
- 5 or F5 for Safe Mode with Networking (Figure 3).
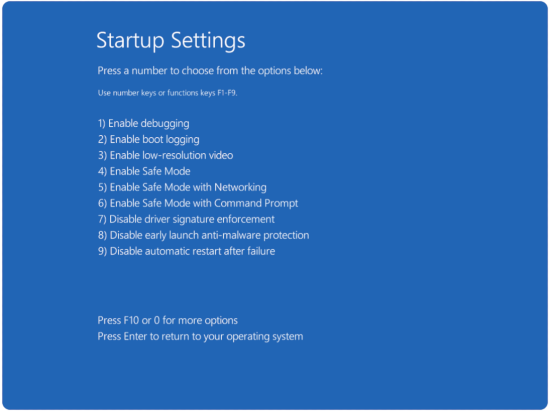
Figure 3: Startup Settings Options
- Check for profile errors in Safe Mode.
- Navigate to C:\Users\.
- Look for folders with .bak extensions.
- Create a new user profile if needed.
- In Safe Mode, go to Settings > Accounts > Family & other users.
- Click Add someone else to this PC.
- Follow the prompts to create a new local account.
System File Repair Methods
Fix Windows Boot Manager Issues.
When the start-up files become corrupted, Windows cannot start properly. Here is how to rebuild them:
- Access the Windows Recovery Environment (WinRE) (instructions are located at bottom of the article).
- Select Troubleshoot > Advanced Options > Command Prompt (Figure 4)

Figure 4: Advanced options - If your computer is encrypted with BitLocker, enter the recovery key when asked. You can find the key by logging into your account at account.microsoft.com and checking the Devices section.
NOTE: If prompted, type Y to add Windows installations to the boot list.
- Rebuild the Boot Configuration Data (BCD)
- In the command prompt, type bootrec /fixmbr, and then press the Enter key.
- In the command prompt, type bootrec /fixboot, and then press the Enter key.
NOTE: You may get an access denied message, if so, go to the next command.
- In the command prompt, type bootrec /scanos, and then press the Enter key.
- In the command prompt, type bootrec /rebuildbcd, and then press the Enter key.
- Verify the repair
- Type exit and restart your computer.
- Check if Windows boots correctly.
Repair System Files with Advanced Commands
System File Checker might miss some issues. Use these comprehensive repair methods:
- Access Command Prompt in Recovery Environment
- Access the Windows Recovery Environment (WinRE) (instructions are located at bottom of the article).
- Select Troubleshoot > Advanced Options > Command Prompt (Figure 5)
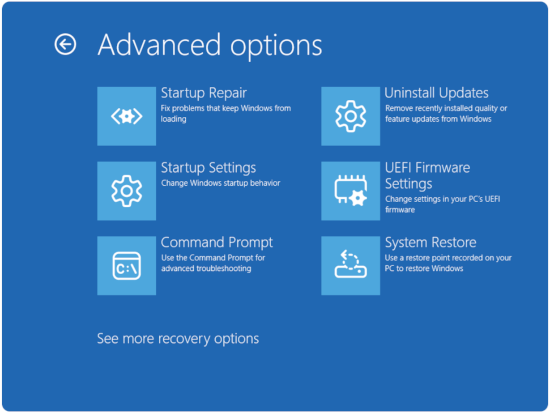
Figure 5: Advanced options - If your computer is encrypted with BitLocker, enter the recovery key when asked. You can find the key by logging into your account at account.microsoft.com and checking the Devices section.
- Use SFC with offline repair
- Type sfc /scannow /offbootdir=C:\ /offwindir=C:\Windows in the command prompt, and then press the Enter key.
- Check for specific file corruption
- Type findstr /c:"[SR]" %windir%\logs\cbs\cbs.log >sfcdetails.txtin in the command prompt, and then press the Enter key.
NOTE: If you see the message "Windows Resource Protection found corrupt files but was unable to fix some of them," these commands often resolve what standard SFC cannot.
Boot Configuration Fixes
- Access the Windows Recovery Environment (WinRE) (instructions are located at bottom of the article).
- Select Troubleshoot > Advanced Options > Command Prompt (Figure 6)

Figure 6: Advanced options - If your computer is encrypted with BitLocker, enter the recovery key when asked. You can find the key by logging into your account at account.microsoft.com and checking the Devices section.
Fix UEFI Boot Issues.
Modern systems use UEFI instead of legacy BIOS. Here is how to repair UEFI boot problems:
- Re-create EFI boot partition.
- In the command prompt, type diskpart, and then press the Enter key.
- In the command prompt, type select disk 0, and then press the Enter key.
- In the command prompt, type list partition, and then press the Enter key.
- In the command prompt, type select partition [EFI partition number], and then press the Enter key.
- In the command prompt, type assign letter=S, and then press the Enter key.
- In the command prompt, type exit, and then press the Enter key.
- Rebuild EFI bootloader
- In the command prompt, type bcdboot C:\Windows /s S: /f UEFI, and then press the Enter key.
- Remove the temporary drive letter.
- In the command prompt, type diskpart, and then press the Enter key.
- In the command prompt, type select disk 0, and then press the Enter key.
- In the command prompt, type select partition [EFI partition number], and then press the Enter key.
- In the command prompt, type remove letter=S, and then press the Enter key.
- In the command prompt, type exit, and then press the Enter key.
When to Consider a Fresh Installation
Signs You Need a Clean Install:
- Multiple repair attempts have failed
- System files are extensively corrupted
- Boot problems persist after hardware verification
- Performance remains poor even after successful boot
Backup Considerations Before Clean Install
- Recover important data.
- The most dependable way to back up your data is by using bootable external media or physically removing the hard drive. This lets you access your internal files from another operating system, even if your computer does not boot.
- Document your software.
- List installed programs
- Note license keys and activation information.
For more information, see Dell Knowledge Base article Repair and Restore your Computer Using SupportAssist OS Recovery.
The following video provides two options on how to perform an Operating System Restore on your computer.
How to Perform an OS System Restore (With Data Backup)
Duration: 4:20
Closed captions: This video is available in multiple languages. Click the Closed Caption icon and select the language that you want.
How to access the Windows Recovery Environment (WinRE)
- Starting with the computer off. Press the Power button on the computer and immediately start pressing the F12 key once a second to access the System Boot menu.
- Select SupportAssist OS Recovery to boot to SupportAssist OS Recovery.
- In SupportAssist OS Recovery, click the 3 dots
 at the upper right side of the OS Recovery Home screen and this provides a dropdown menu.
 - Select Windows recovery.
- The computer reboots into the Windows Recovery Environment (WinRE).
Betroffene Produkte
Alienware, Dell All-in-One, Dell Pro All-in-One, Dell Pro Max Micro, Dell Pro Max Slim, Dell Pro Max Tower, Dell Pro Micro, Dell Pro Slim, Dell Pro Tower, Dell Slim, Dell Tower, Inspiron, OptiPlex, Vostro, XPS, G Series, G Series, Alienware
, Dell Laptops, Dell Plus, Dell Pro, Dell Pro Max, Dell Pro Plus, Dell Pro Premium, Inspiron, Latitude, Dell Pro Rugged, Vostro, XPS, Fixed Workstations, Mobile Workstations, Dell Pro Max Micro XE FCM2250, Dell Pro Max Slim XE FCS1250, Dell Pro Max Tower T2 XE FCT2250, Dell Pro Max 16 XE MC16250, Dell Pro Micro Plus XE QBM1250, Dell Pro Slim Plus XE5 QBS1250, Dell Pro Tower Plus XE5 QBT1250
...
Artikeleigenschaften
Artikelnummer: 000124359
Artikeltyp: How To
Zuletzt geändert: 05 Nov. 2025
Version: 42
Antworten auf Ihre Fragen erhalten Sie von anderen Dell NutzerInnen
Support Services
Prüfen Sie, ob Ihr Gerät durch Support Services abgedeckt ist.