PowerEdge: How to Use the iDRAC Direct Feature
Summary: This article explains how to use iDRAC Direct to manage your PowerEdge server.
This article applies to
This article does not apply to
This article is not tied to any specific product.
Not all product versions are identified in this article.
Instructions
The iDRAC direct feature allows you to directly connect your laptop to the iDRAC Direct USB port. This feature does not require any special licenses nor does it require previous setup of the server or iDRAC. This article explains how to use iDRAC Direct function for server management, initial setup, and maintenance.
There are noteworthy differences with iDRAC Direct between generations of PowerEdge servers.
- iDRAC9 - Used in 14th through 16th generation servers
- iDRAC10 - Introduced in 17th generation servers
Table of Contents:
- iDRAC9: Requirements
- iDRAC9: Steps to access the iDRAC interface over the USB port
- iDRAC10: Requirements
- iDRAC10: Steps to access the iDRAC interface over the USB port
- iDRAC10: Troubleshooting
iDRAC9: Requirements
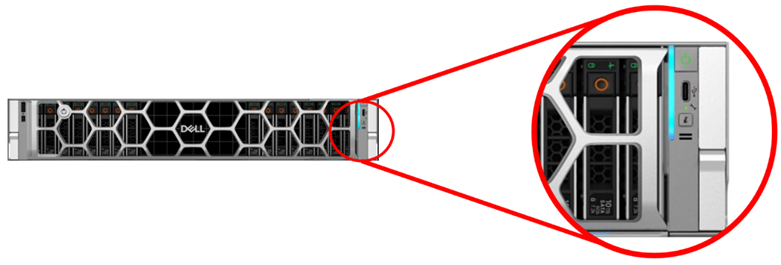
To connect using the Direct iDRAC feature, you must locate the micro-USB port in front of the server. The location of the iDRAC direct port can usually be found here:

Figure 1: R740 front (example)
Below is the figure of a USB to micro-USB cable (see figure 2), this cable is required to perform the operation:

Figure 2: USB to micro-USB cable
When inserting the micro-USB cable, you must pay attention to the direction to avoid damage caused by mis-insertion.
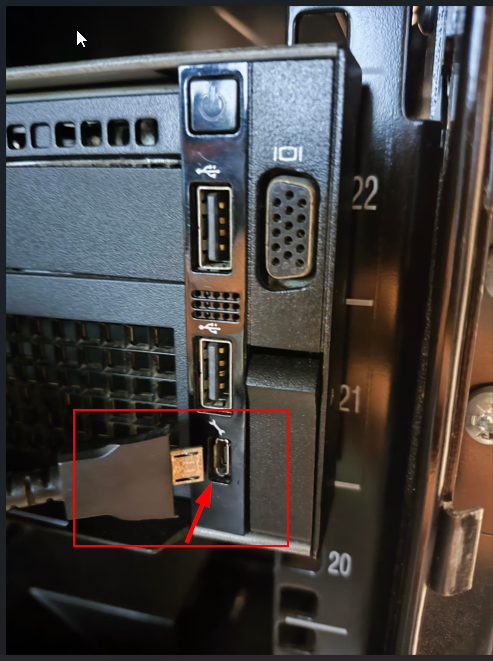
Figure 3: Confirm the direction of the connection.
After the cable is connected, the green light flashes indicating that the connection is normal and there is no problem. If the light is off, you must consider changing the micro-USB cable.
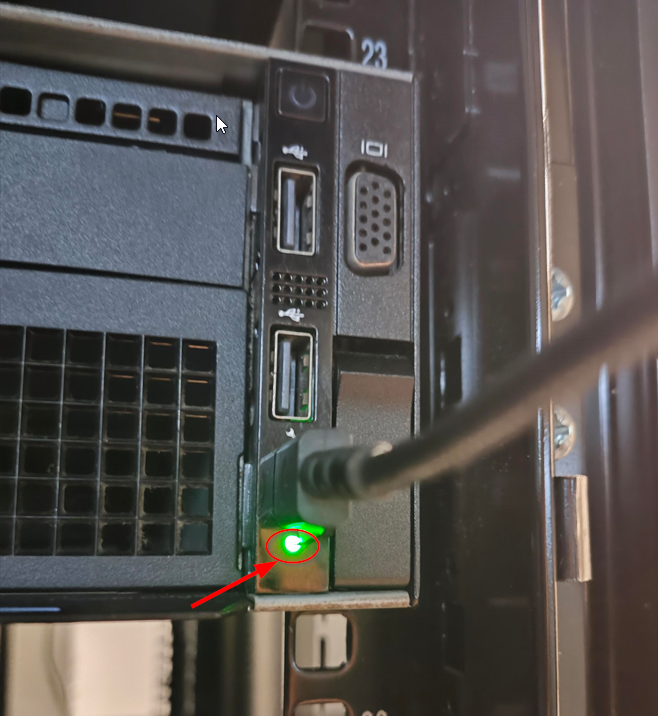
Figure 4: Confirm the status of the light.
iDRAC9: Steps to access the iDRAC interface over the USB port
- Turn off any wireless networks and disconnect from any other hard wired network.
- Ensure that the USB port is enabled.
Note: On the server, you can enable or disable the iDRAC Direct USB Port using the system BIOS. Go to System BIOS > Integrated Devices.

Figure 5: Extract of the user guide showing the Internal USB port setting options.
- After you connect the USB cable, the laptop downloads the iDRAC Virtual NIC USB Device driver automatically.
Note: On supported Windows and Linux Operating systems, no additional installation is required. (See iDRAC Release Notes for supported Operating Systems.)
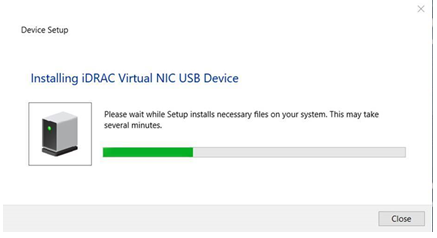
Figure 6: Installing iDRAC Virtual NIC USB device
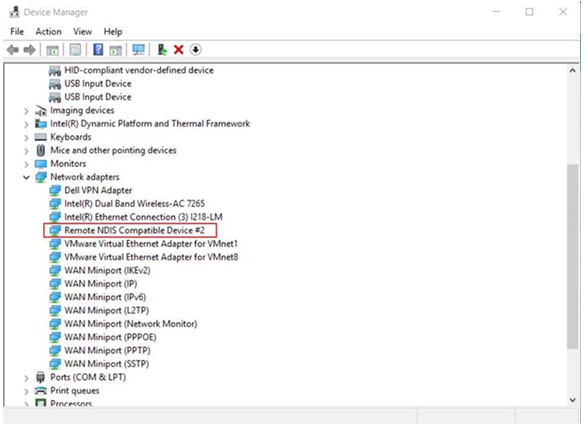
Then you see the Remote NDIS Compatible Device #2 appearing in Device Manager, Network Adapter.

Figure 7: Windows device manager showing the device needed
- Wait for the laptop to obtain the IP address 169.254.0.4. It is always the same IP address. It may take several seconds for the IP addresses to be acquired. iDRAC acquires the IP address 169.254.0.3.
To check if the iDRAC is responding, launch the ping command.
Note: iDRAC initialization takes time, and some may take around 10 minutes.
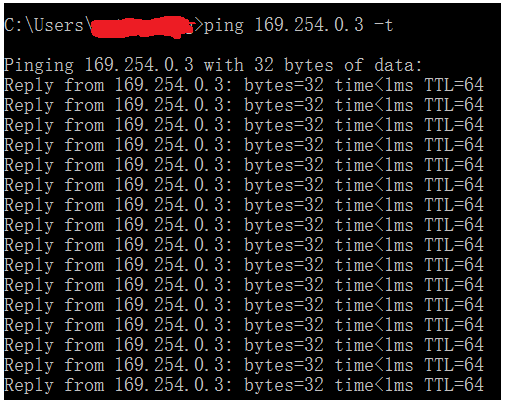
Figure 8: Ping test
- Now, you can start using the iDRAC network interfaces such as the web interface, RACADM, Redfish, or WSMan. For example, to access the iDRAC web interface, open a supported browser, and type the address 169.254.0.3 and press enter. The iDRAC login screen is displayed.
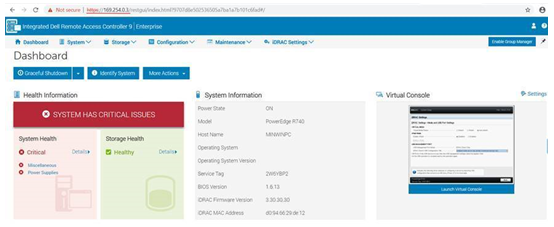
Figure 9: iDRAC9 web interface
- When iDRAC is using the USB port, the LED blinks indicating activity. The blink frequency is 4 per second. After completing the wanted actions, disconnect the USB cable from the system. The LED turns off.
- If the Micro USB cable cannot be recognized, go to iDRAC Settings > Media and USB Port Settings > iDRAC Direct Only.

Figure 10: iDRAC settings page in system setup
iDRAC10: Requirements
For 17th generation servers, the iDRAC Direct USB port has been upgraded to USB-C. Locate this port, it is usually at the front of the server next to a spanner or wrench icon.
For best results, it is recommended to use a USB-C to USB-A cable.
- Depending on the laptop or tablet being used this may require the use of a converter.
The USB-C port on the server must be placed in iDRAC Direct mode, this can be done before or after plugging in the cable. Press and hold the System ID button (i button) for 5 or more seconds. A green LED turns on next to the spanner or wrench icon. This indicates that iDRAC Direct access is enabled.
-
Note: This step is new for iDRAC10 as this port is multifeatured and can be used by the host when not enabled for iDRAC Direct usage.

Ensure that the USB-C side of the cable is plugged into the servers iDRAC Direct USB port and the USB-A side of the cable is plugged into the laptop or tablet.
- When the laptop or tablet establishes a connection, the green LED next to the spanner or wrench icon slowly blinks green.
- An amber LED indicates that the connection was unsuccessful.
iDRAC10: Steps to access the iDRAC interface over the USB port
- It is recommended to turn off all wireless networks and disconnect any wired network connections on the laptop or tablet.
- Open a web browser and navigate to 169.254.0.3
- This IP address is always the same when using iDRAC Direct.
- If the iDRAC has not been previously used, credentials may be the defaults and are located on the luggage tag of the server.
iDRAC10: Troubleshooting
If issues are experienced while using iDRAC Direct:
- Ensure the led next to the wrench or spanner icon (see above figure) is solid green or slowly blinking green.
- Solid green indicates that iDRAC Direct port use is enabled, but a connection to a laptop or tablet is not established.
- Slowly blinking green indicates a connection between iDRAC and the laptop or tablet.
- Use a different USB cable and port on the laptop or tablet.
- Confirm that the laptop or tablet has obtained the IP address 169.254.0.4
- Perform ping tests to see if 169.254.0.3 is responding.
- Confirm that the OS has installed the correct driver and is not reporting any issues. In Windows use Device Manager and locate the Remote NDIS Compatible Device listed under Network Adapters.
- The iDRAC Direct port may have been disabled at some point (it is enabled by default).
For more information, see the:
Dell Info hub article: iDRAC10: Direct USB Access for Full PowerEdge Server Control
Affected Products
C Series, HS Series, Rack Servers, Tower Servers, XE Servers, XR Servers, iDRAC9, OEM Server Solutions, DD3300 Appliance, DD6300 Appliance, DD6400 Appliance, DD6410 Appliance, DD6900 Appliance, DD9400 Appliance, DD9410 Appliance, DD9900 Appliance
, DD9910 Appliance, iDRAC10 - 1.10.xx Series, iDRAC10 - 1.20.xx Series, Storage Spaces Direct R440 Ready Node, Storage Spaces Direct R640 Ready Node, Storage Spaces Direct R740xd Ready Node, Storage Spaces Direct R740xd2 Ready node, OEMR XL R670, OEMR XL R770, OEMR R240, OEMR R250, OEMR XE R250, OEMR R260, OEMR XE R260, OEMR R340, OEMR R350, OEMR XE R350, OEMR R360, OEMR XE R360, OEMR R440, PowerEdge XR2, OEMR R450, OEMR R540, OEMR R550, OEMR R5500, OEMR R640, OEMR XL R640, OEMR R6415, OEMR R650, OEMR R650xs, OEMR R6515, OEMR R6525, OEMR R660, OEMR XL R660, OEMR R660xs, OEMR R6615, OEMR R6625, OEMR R740, OEMR XL R740, OEMR R740xd, OEMR XL R740xd, OEMR R740xd2, OEMR R7415, OEMR R7425, OEMR R750, OEMR R750xa, OEMR R750xs, OEMR R7515, OEMR R7525, OEMR R760, OEMR R760xa, OEMR R760XD2, OEMR XL R760, OEMR R760xs, OEMR R7615, OEMR R7625, OEMR R840, OEMR R860, OEMR R940, OEMR R940xa, OEMR R960, OEMR T140, OEMR T150, OEMR T340, OEMR T350, OEMR T360, OEMR T440, OEMR T550, OEMR T560, OEMR T640, OEMR XL T640, OEMR XL R240, OEMR XL R340, OEMR XL R660xs, OEMR XL R6615, OEMR XL R6625, OEMR XL R6715, OEMR XL R6725, OEMR XL R760xs, OEMR XL R7615, OEMR XL R7625, OEMR XL R7715, OEMR XL R7725, OEMR XR11, OEMR XR12, OEMR XR5610, OEMR XR7620, DD9910F Appliance, Poweredge C4140, PowerEdge C6420, PowerEdge C6520, PowerEdge C6525, PowerEdge C6615, PowerEdge C6620, PowerEdge FC640, PowerEdge HS5610, PowerEdge HS5620, PowerEdge M640, PowerEdge M640 (for PE VRTX), PowerEdge MX740C, PowerEdge MX750c, PowerEdge MX760c, PowerEdge MX840C, PowerEdge R240, PowerEdge R250, PowerEdge R260, PowerEdge R340, PowerEdge R350, PowerEdge R360, PowerEdge R440, PowerEdge R450, PowerEdge R470, PowerEdge R540, PowerEdge R550, PowerEdge R570, PowerEdge R640, PowerEdge R6415, PowerEdge R650, PowerEdge R650xs, PowerEdge R6515, PowerEdge R6525, PowerEdge R660, PowerEdge R660xs, PowerEdge R6615, PowerEdge R6625, PowerEdge R670, PowerEdge R6715, PowerEdge R6725, PowerEdge R740, PowerEdge R740XD, PowerEdge R740XD2, PowerEdge R7415, PowerEdge R7425, PowerEdge R750, PowerEdge R750XA, PowerEdge R750xs, PowerEdge R7515, PowerEdge R7525, PowerEdge R760, PowerEdge R760XA, PowerEdge R760xd2, PowerEdge R760xs, PowerEdge R7615, PowerEdge R7625, PowerEdge R770, PowerEdge R770AP, PowerEdge R7715, PowerEdge R7725, PowerEdge R7725xd, PowerEdge R840, PowerEdge R860, PowerEdge R940, PowerEdge R940xa, PowerEdge R960, PowerEdge T140, PowerEdge T150, PowerEdge T160, PowerEdge T340, PowerEdge T350, PowerEdge T360, PowerEdge T440, PowerEdge T550, PowerEdge T560, PowerEdge T640, PowerEdge XE2420, PowerEdge XE7100, PowerEdge XE7420, PowerEdge XE7440, PowerEdge XE8545, PowerEdge XE8640, PowerEdge XE9640, PowerEdge XE9680, PowerEdge XR11, PowerEdge XR12, PowerEdge XR5610, PowerEdge XR7620, PowerFlex appliance R650, PowerFlex appliance R6525, PowerFlex appliance R660, PowerFlex appliance R6625, Powerflex appliance R750, PowerFlex appliance R760, PowerFlex appliance R7625, PowerFlex appliance R860, PowerFlex custom node R650, PowerFlex custom node R6525, PowerFlex custom node R660, PowerFlex custom node R6625, PowerFlex custom node R750, PowerFlex custom node R760, PowerFlex custom node R7625, PowerFlex custom node R860, PowerScale F210, PowerScale F710, PowerScale F910, PowerScale PA110, VxFlex Ready Node R640, VxFlex Ready Node R740xd, Dell EMC vSAN C6420 Ready Node, Dell EMC vSAN MX740c Ready Node, Dell EMC vSAN MX750c Ready Node, Dell vSAN Ready Node MX760c, Dell EMC vSAN R440 Ready Node, Dell EMC vSAN R640 Ready Node, Dell EMC vSAN R6415 Ready Node, Dell EMC vSAN R650 Ready Node, Dell EMC vSAN R6515 Ready Node, vSAN Ready Node R660, Dell vSAN R6615 Ready Node, Dell vSAN R670 Ready Node, Dell vSAN R6715 Ready Node, Dell EMC vSAN R740 Ready Node, Dell EMC vSAN R740xd Ready Node, Dell EMC vSAN R750 Ready Node, Dell EMC vSAN R7515 Ready Node, Dell EMC vSAN R760 Ready Node, Dell vSAN R7615 Ready Node, Dell vSAN Ready Node R7625, Dell vSAN R770 Ready Node, Dell vSAN R7715 Ready Node, Dell vSAN R7725 Ready Node, Dell EMC vSAN R840 Ready Node, Dell EMC vSAN T350 Ready Node, PowerFlex appliance R640, PowerFlex appliance R740XD, PowerFlex appliance R7525, PowerFlex appliance R840, VxFlex Ready Node R840
...
Article Properties
Article Number: 000130077
Article Type: How To
Last Modified: 04 Dec 2025
Version: 16
Find answers to your questions from other Dell users
Support Services
Check if your device is covered by Support Services.