Data Domain - Creating interface groups for backups
Summary: About interface groups: This feature lets you combine multiple Ethernet links into a group and register only one interface on the protection system with the backup application. The DD Boost Library negotiates with the system to obtain the best interface to send data. Load balancing provides higher physical throughput to the system. Configuring an interface group creates a private network within the system, consisted of the IP addresses designated as a group. Clients are assigned to a single group, and the group interface uses load balancing to improve data transfer performance and increase reliability. ...
Instructions
Creating interface groups with UI
Use the IP Network tab to create interface groups and to add interfaces and clients to the groups.
About this task Multiple interface groups, improve the efficiency of DD Boost by allowing you to:
● Configure DD Boost to use specific interfaces configured into groups.
● Assign clients to one of those interface groups.
● Monitor which interfaces are active with DD Boost clients.
Create interface groups first, and then add clients (as new media servers become available) to an interface group.
Steps
1. Select Protocols > DD Boost > IP Network.
2. In the Interface Groups section, click Add (+).
3. Enter the interface group name.
4. Select one or more interfaces. A maximum of 32 interfaces can be configured.
5. Click OK.
6. In the Configured Clients section, click Add (+).
7. Enter a fully qualified client name or *.mydomain.com.
8. Select a previously configured interface group and click OK.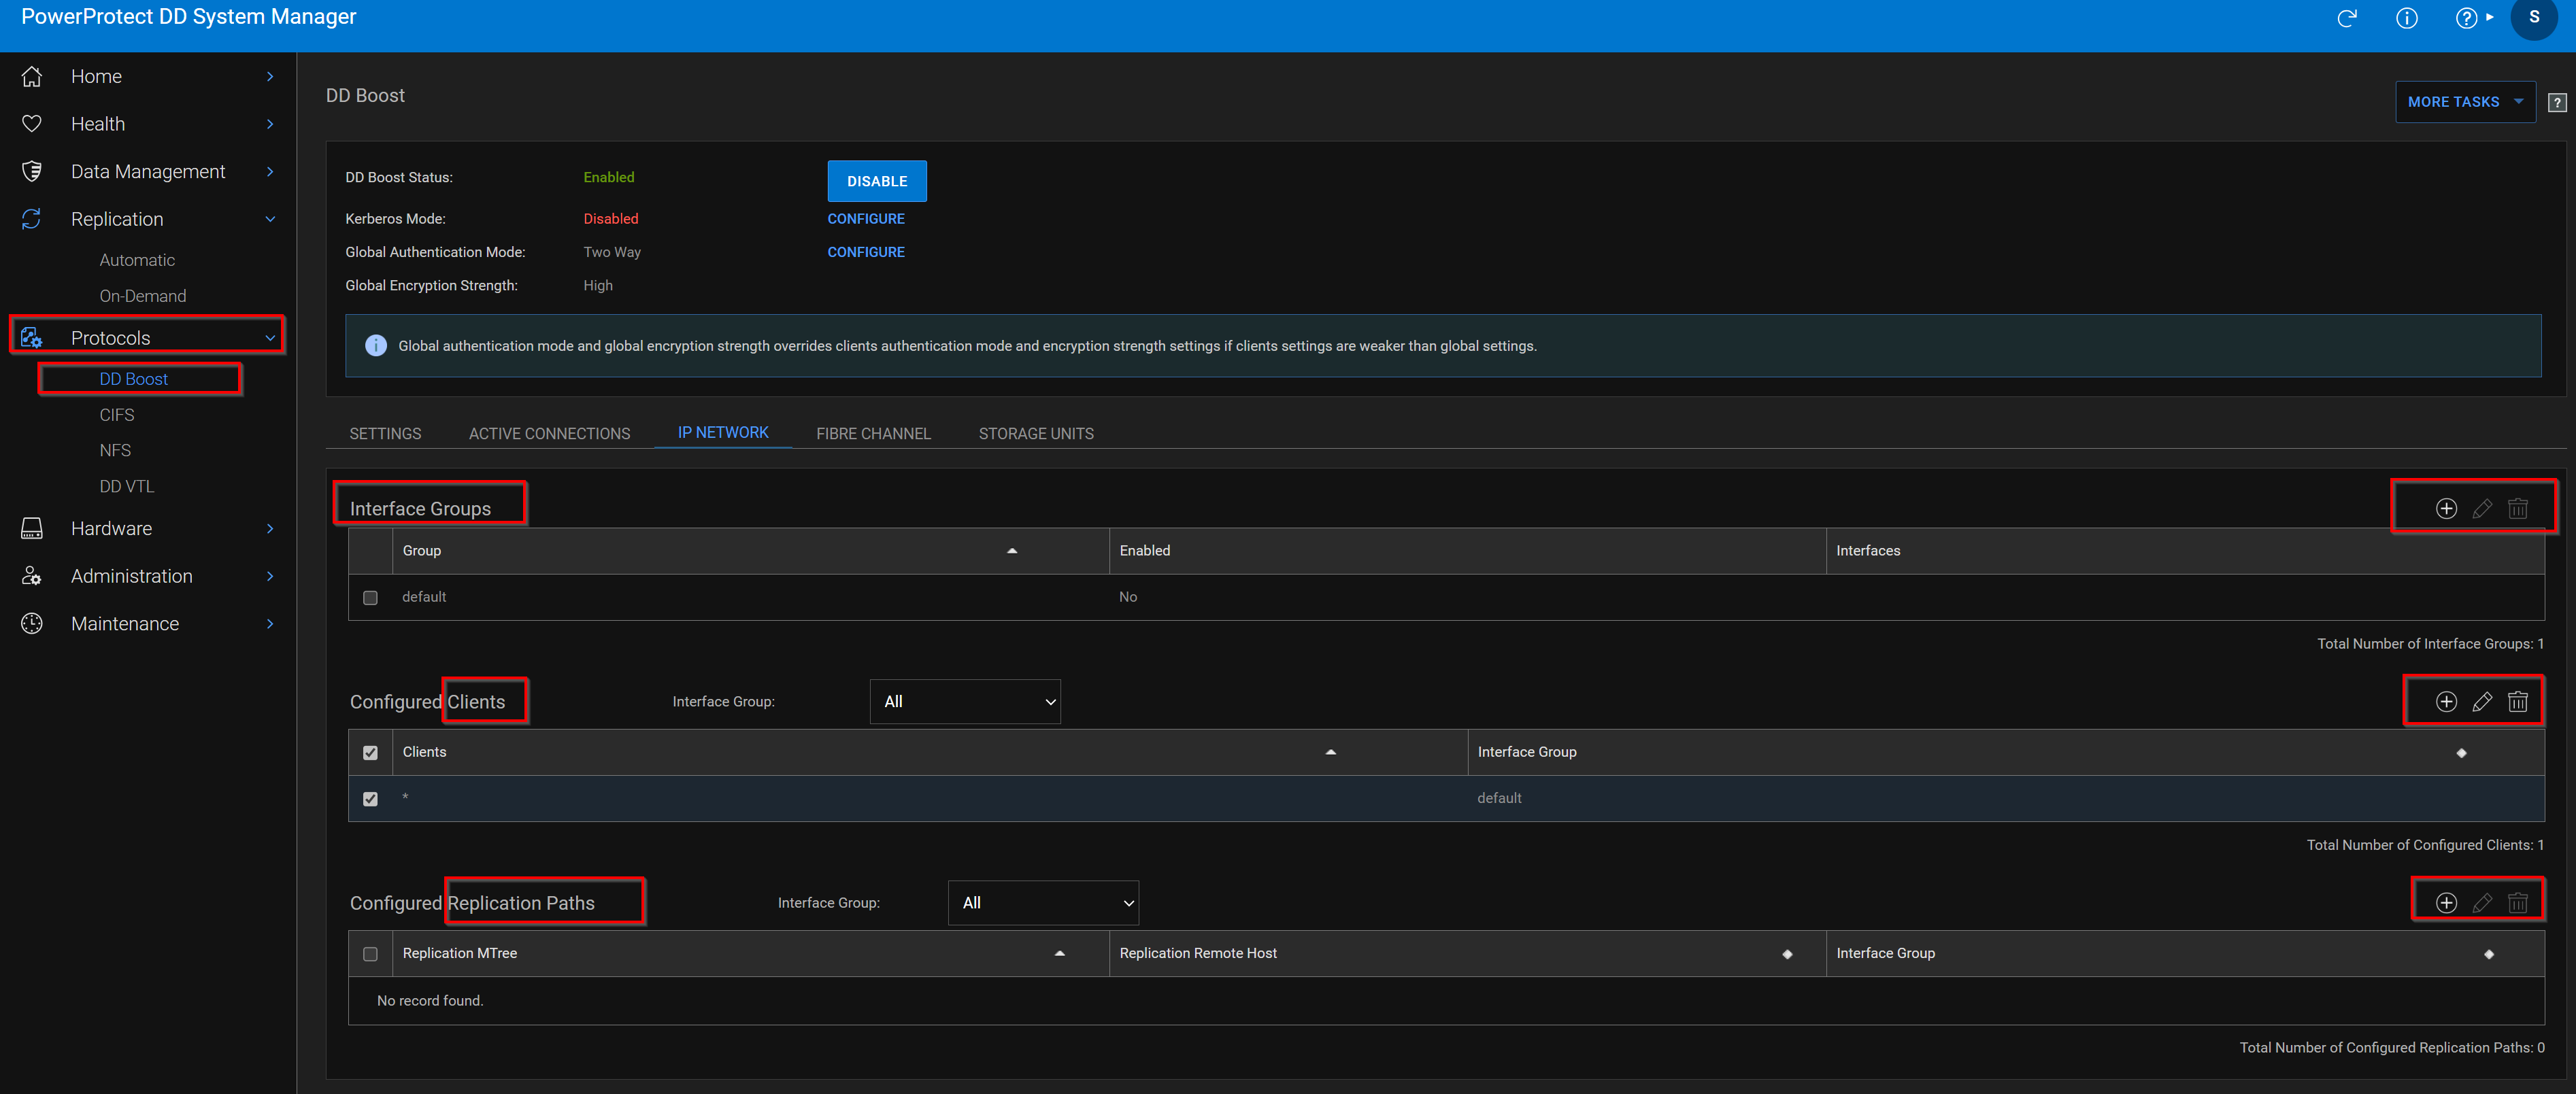
Enabling and disabling interface groups
Use the IP Network tab to enable and disable interface groups.
Steps
1. Select Protocols > DD Boost > IP Network.
2. In the Interface Groups section, select the interface group in the list.
NOTE: If the interface group does not have both clients and interfaces assigned, you cannot enable the group.
3. Click Edit (pencil).
4. Click Enabled to enable the interface group; clear the checkbox to disable.
5. Click OK
Modifying an interface group's name and interfaces
Use the IP Network tab to change an interface group's name and the interfaces associated with the group.
Steps
1. Select Protocols > DD Boost > IP Network.
2. In the Interface Groups section, select the interface group in the list.
3. Click Edit (pencil).
4. Retype the name to modify the name. The group name must be one to 24 characters long and contain only letters, numbers, underscores, and dashes. It cannot be the same as any other group name and cannot be "default," "yes," "no," or "all." 5. Select or clear client interfaces in the Interfaces list. NOTE: If you remove all interfaces from the group, it is automatically disabled.
6. Click OK
Deleting an interface group
Use the IP Network tab to delete an interface group.
Deleting an interface group deletes all interfaces and clients associated with the group.
Steps
1. Select Protocols > DD Boost > IP Network.
2. In the Interface Groups section, select the interface group in the list. The default group cannot be deleted.
3. Click Delete (X).
4. Confirm the deletion.
Adding a client to an interface group
Use the IP Network tab to add clients to interface groups.
Steps
1. Select Protocols > DD Boost > IP Network.
2. In the Configured Clients section, click Add (+).
3. Enter a name for the client. Client names must be unique and may consist of:
● FQDN
● *.domain
● Client public IP range:
○ For IPv4, xx.xx.xx.0/24 provides a 24-bit mask against the connecting IP.
The /24 represents what bits are masked when the client's source IP address is evaluated for access to the IFGROUP.
○ For IPv6, xxxx::0/112 provides a 112-bit mask against the connecting IP.
The /112 represents what bits are masked when the client's source IP address is evaluated for access to the IFGROUP.
Client names have a maximum length of 128 characters.
4. Select a previously configured interface group and click OK.
Modifying a client's name or interface group
Use the IP Network tab to change a client's name or interface group.
Steps
1. Select Protocols > DD Boost > IP Network.
2. In the Configured Clients section, select the client.
3. Click Edit (pencil).
4. Type a new client name.
Client names must be unique and may consist of:
● FQDN
● *.domain
● Client public IP range:
○ For IPv4, xx.xx.xx.0/24 provides a 24-bit mask against the connecting IP.
The /24 represents what bits are masked when the client's source IP address is evaluated for access to the IFGROUP.
○ For IPv6, xxxx::0/112 provides a 112-bit mask against the connecting IP. The /112 represents what bits are masked when the client's source IP address is evaluated for access to the IFGROUP. Client names have a maximum length of 128 characters.
5. Select a new interface group from the menu.
NOTE: The old interface group is disabled if it has no clients.
6. Click OK.
Deleting a client from the interface group
Use the IP Network tab to delete a client from an interface group.
Steps
1. Select Protocols > DD Boost > IP Network.
2. In the Configured Clients section, select the client.
3. Click Delete (X). NOTE: If the interface group to which the client belongs has no other clients, the interface group is disabled.
Configuring Dynamic Interface Groups with CLI
About this task
When a protection system receives a connection request from a client in a configured interface group, the DIG feature assigns the connection to the least used interface in the group, providing load balancing and higher input/output throughput. To configure DIG, create an interface group on the protection system by adding existing interfaces to the group as described below.
Steps
1. Create the interface group:
# ifgroup create group_name
Examples:
# ifgroup create external
# ifgroup create lab10G
NOTE: The group_name "default" can be used without being created first. In all the remaining ifgroup commands,
the "default" group is used if not specified.
2. Add clients and interfaces to each interface group. The interfaces must already have been created with the net command.
# ifgroup add group_name
{interface {ipaddr | ipv6addr} | client host}
This command provides full interface group support for static IPv6 addresses, providing the same capabilities for IPv6 as
for IPv4. Concurrent IPv4 and IPv6 client connections are allowed. A client connected with IPv6 sees IPv6 interface group
interfaces only. A client connected with IPv4 sees IPv4 interface-group interfaces only. Individual interface groups include all
IPv4 addresses or all IPv6 addresses.
Examples:
# ifgroup add interface 10.6.109.140 client *.datadomain.com
# ifgroup add interface 10.6.109.141 client *
# ifgroup add ipv4-group interface 192.4.5.21
# ifgroup add ipv4-group interface 192.4.5.22
# ifgroup add ipv4-group interface 192.4.5.23
# ifgroup add ipv4-group interface 192.4.5.24
# ifgroup add ipv6-group interface 2000::af:21
# ifgroup add ipv6-group interface 2000::af:22
# ifgroup add ipv6-group interface 2000::af:23
# ifgroup add ipv6-group interface 2000::af:24
# ifgroup add ipv4-group client 128.5.1.25.0/24
# ifgroup add ipv6-group client 2620::128:25:0/112
● IPv6 addresses can be entered using upper- or lower-case characters and with multiple zeroes.
● These commands properly detect any mismatches with IPv4 or IPv6 interfaces.
3. Select one interface on the protection system to register with the backup application. It is recommended that you create a failover aggregated interface and register that interface with the backup application.
It is a best practice to register the interface with a resolvable name using DNS or any other name resolution mechanism.
Using NetBackup and assuming that 192.168.1.1 is named dd22.abc.com, perform the following command on the media server:nbdevconfig -creatests -st 9 -stype Data Domain -storage_server dd22.abc.com-media_server load64
If this interface is not available, then backups to that protection system are not possible.
4. Once an interface and client are configured, the group is automatically enabled. Check the status (enabled or disabled) of
the interface group:
# ifgroup status [group_name]
Status of ifgroup “default” is “enabled”
NOTE: If no group_name is specified, the default group is used.
5. Verify the entire configuration of all the groups with interfaces and clients:
# ifgroup show config all
Results
Sample output is displayed in the following table.
Group Name Status Interfaces Clients
 Count Count
-----------------------------------------------------------------
default enabled 2 1
external enabled 2 1
lab10G enabled 2 2
-----------------------------------------------------------------
Group Name Status Interfaces
------------------------------------------------------------
default enabled 10.6.109.141
default enabled 10.6.109.41
external enabled 10.6.109.140
external enabled 10.6.109.142
lab10G enabled 192.168.1.220
lab10G enabled 192.168.1.221
-----------------------------------------------------------------
Group Name Status Clients
------------------------------------------------------------
default enabled *
external enabled *.datadomain.com
lab10G enabled ddboost-dl.datadomain.com
lab10G enabled yellowmedia.datadomain.com
------------------------------------------------------------
Modifying an Interface Group
About this task
After the interface group is set up, you can add or delete interfaces from the group. The following example shows how to
remove an interface from the configured interface group on the protection system.
Steps
1. Make sure that no jobs are active from the backup application to the protection system on the interface you are removing
from the group. You can do this from the protection system by checking the status of existing connections in the interface
group by enter the following command:
# ddboost show connections
2. Delete an interface or client from group-name or default group on the protection system.
# ifgroup del default interface 10.6.109.144
After this, the interface is released from the group and would no longer be used by the DD Boost Storage Server for any jobs
from the media servers.
media servers. The configuration of the interface group on the protection system is not deleted.
Results
remove the interface from the group and add it back.
configured for interface group, perform the ddboost show connections command to update the load-balancing view.
Updating the load balancing view allows the interface group to use the interface.
Removing an Interface Group
About this task
The following example illustrates removing a configured interface group on the protection system.
Steps
1. Make sure that no jobs are active from the backup application to the protection system. Check the status of connections in
the interface group by using the following command on a protection system:
# ifgroup show connections
2. Ensure there are no pending jobs from media servers connected to the protection system.
3. Disable the group-name or default group on the system:
# ifgroup disable <group-name>
4. Reset the interface group:
# ifgroup reset <group-name>
Results
All the interfaces are released from the group. However, media servers can still access the DD Boost storage server on the
protection system on the interface registered with the backup application.
When a group is no longer needed, use the destroy option to remove the group from the configuration:
# ifgroup destroy group-name

Example:
# ifgroup destroy external
Clients are matched to a group by their hostname independent of the group status (enabled/disabled). Therefore, disabling
a group will not force a client to use a different group. When a client is found in a disabled group, it will use the registered
interface and stay on the original connection.
Additional Information
About interface groups
This feature lets you combine multiple Ethernet links into a group and register only one interface on the protection system with the backup application. The DD Boost Library negotiates with the system to obtain the best interface to send data. Load balancing provides higher physical throughput to the system.
Configuring an interface group creates a private network within the system, consisted of the IP addresses designated as a group. Clients are assigned to a single group, and the group interface uses load balancing to improve data transfer performance and increase reliability.
For example, in the Veritas NetBackup environment, media server clients use a single public network IP address to access the system. All communication with the system is initiated using this administered IP connection, which is configured on the NetBackup server. If an interface group is configured, when the system receives data from the media server clients, the data transfer is load balanced and distributed on all the interfaces in the group, providing higher input/output throughput, especially for customers who use multiple 1 GigE connections.
The data transfer is load-balanced based on the number of connections outstanding on the interfaces. Only connections for backup and restore jobs are load-balanced. Check the Active Connections for more information about the number of outstanding connections on the interfaces in a group. Should an interface in the group fail, all the in-flight jobs to that interface are automatically resumed on healthy operational links (unbeknownst to the backup applications). Any jobs that are started after the failure are also routed to a healthy interface in the group. If the group is disabled or an attempt to recover on an alternate interface fails, the administered IP is used for recovery. Failure in one group will not use interfaces from another group. Consider the following information when managing interface groups.
● The IP address must be configured on the system, and its interface enabled. To check the interface configuration, select Hardware > Ethernet > Interfaces page, and check for free ports. See the net chapter of the DDOS Command Reference Guide for information about configuring an IP address for an interface.
● You can use the ifgroup commands to manage interface groups; these commands are described in detail in the DDOS Command Reference Guide.
● Interface groups provide full support for static IPv6 addresses, providing the same capabilities for IPv6 as for IPv4. Concurrent IPv4 and IPv6 client connections are allowed. A client connected with IPv6 sees IPv6 ifgroup interfaces only. A client connected with IPv4 sees IPv4 ifgroup interfaces only. Individual ifgroups include all IPv4 addresses or all IPv6 addresses.
- Data Domain: What is the maximum number of ifgroups supported? (Login to Dell account is required to view article)
- Deciding when to use DD Boost ifgroup or LACP bonding and the use of both at the same time. (Login to Dell account is required to view article)
- Data Domain - How do DDboost Ifgroups work on Data Domain - high level view (Login to Dell account is required to view article)
- Data Domain : How to Configure DDboost Ifgroups for Backups and Replication (Login to Dell account is required to view article)
- NET: DD Boost Ifgroup troubleshooting guide (Login to Dell account is required to view article)