How to Manually Set nomodeset Kernel Boot Line Option in Linux
Summary: Resolve graphics-related boot problems with Linux. Learn how to set the GRUB "nomodeset" Ubuntu boot option and use the "nomodeset" kernel boot line for smoother booting.
This article applies to
This article does not apply to
This article is not tied to any specific product.
Not all product versions are identified in this article.
Symptoms
YGeneric Canonical Ubuntu media (some OEM Dell media) or other Linux media does not boot to the live environment or installer as usual and instead the computer may stop responding or get stuck.
The first troubleshooting step that may resolve your boot issue and allow you to install Ubuntu is to disable the intel graphics features by setting the nomodeset option before boot.
You can do this either for one-time booting as shown in Solution 1 or you can also make it permanent as seen in Solution 2.
Cause
Note: Solution 1 is good for booting off USB or Install media. Solution 2 is good for making permanent if your OS crashes or stops responding after installing.
Resolution
Solution 1
- With media attached, turn on the computer.
- Watch for the GNU GRUB bootloader screen.
- When you see the option for Ubuntu as shown, press the E key on your keyboard.
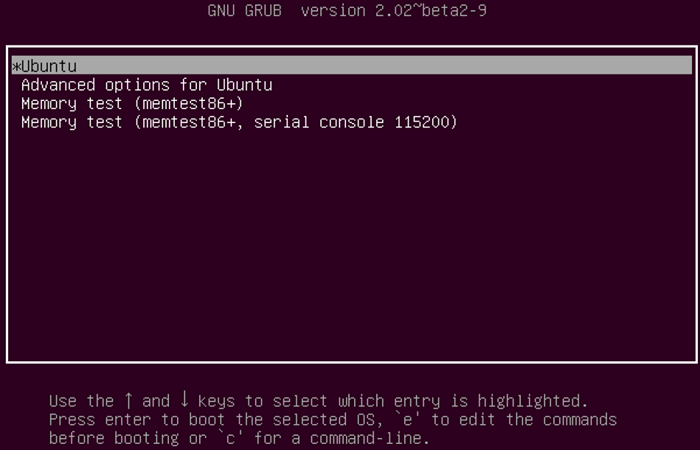
- In the editor, use the arrow keys to locate the end of the line that starts with the following. Each bootloader may say something slightly different.
linux /boot/vmlinuz***
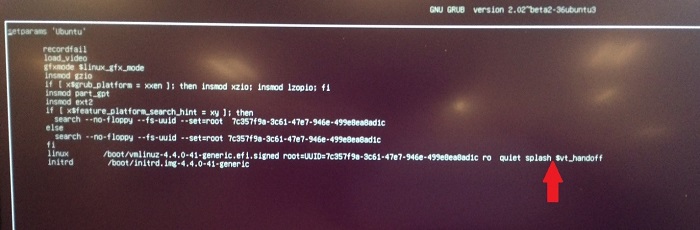
- Type the following line option into the end of the line.
nomodeset
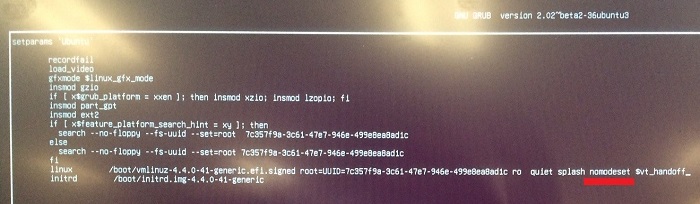
- Press CTRL+X keys to boot to the normal installer or live environment like normal.
Solution 2
- Open a terminal and type the following:
sudo gedit /etc/default/grub - Enter your password if prompted.
- Move the cursor to the line that looks like the following:
GRUB_CMDLINE_LINUX_DEFAULT="quiet splash"
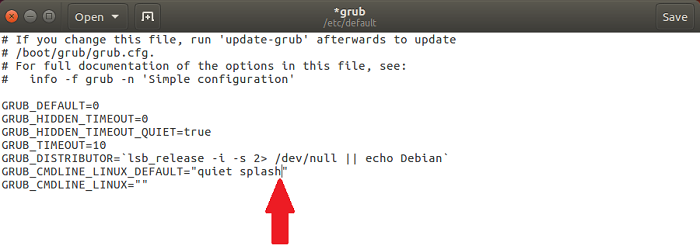
- Change that line to match the following:
GRUB_CMDLINE_LINUX_DEFAULT="quiet splash nomodeset"
(you can also remove quiet and or splash variables to troubleshoot no-boot issues)
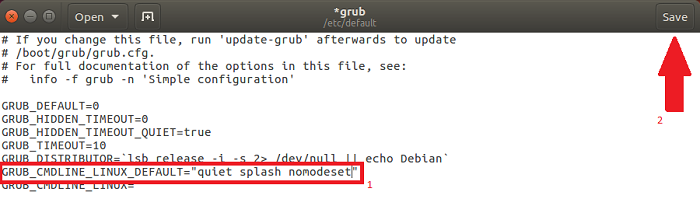
- Click Save.
- Close the window.
- In the terminal, type the following and press enter:
sudo update-grub2 - Once complete, reboot your computer with this change made.
Additional Information
 Out of warranty? No problem. Browse to the Dell.com/support website and enter your Dell Service Tag and view our offers.
NOTE: Offers are only available for US, Canada, UK, France, Germany, and China personal computer customers. Server and Storage not applicable.
Article Properties
Article Number: 000123893
Article Type: Solution
Last Modified: 21 Jul 2026
Version: 11
Find answers to your questions from other Dell users
Support Services
Check if your device is covered by Support Services.