Dell Encryption Enterprise and Dell Encryption Personal Best Practices: Windows 10 Feature Update or Migration
Summary: This article identifies which versions of Dell Encryption Enterprise Shield (formerly Dell Data Protection | Enterprise Edition Shield) and Dell Encryption Personal (formerly Dell Data Protection | Personal Edition) are fully compatible with Windows 10. ...
This article applies to
This article does not apply to
This article is not tied to any specific product.
Not all product versions are identified in this article.
Instructions
Affected Products:
- Dell Encryption Enterprise
- Dell Encryption Personal
- Dell Encryption External Media
- Dell Endpoint Security Suite Enterprise
- Dell Data Protection | Enterprise Edition
- Dell Data Protection | Personal Edition
- Dell Data Protection | External Media Edition
- Dell Endpoint Security Suite Pro
Table of Contents:
Dell Technologies recommends a full backup before changing your computer’s operating system.
Dell has introduced the ability to upgrade your operating system from Windows 7, Windows 8, Windows 8.1, or Windows 10 RTM to Windows 10 feature updates version 1511 (November Update / Threshold 2) and later. For the latest information about the latest Windows 10 Feature Update compatibility, reference Dell Data Security / Dell Data Protection Windows 10 Feature Update Compatibility.
When transitioning from Windows 7 to Windows 10, follow the method that is described for the target version of Windows 10 that the devices are transitioning to.
Note:
- Keep in mind when upgrading to Windows 10 that matching Windows versions is required to ensure a smooth transition between operating systems. Upgrades from dissimilar versions (for example, Windows 10 Professional version 1709 to Windows 10 Enterprise version 1809) may result in anomalies during the upgrade that are based on Microsoft limitations.
- No changes are required for the update or on the endpoints running Dell Encryption, when using the Servicing Model of Windows 10 Feature Updates.
v8.18.0 and Later
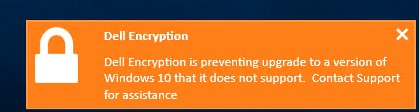
This method functions when upgrades to Windows 10 feature update version 1803 (Spring Creators Update/ Redstone 4) and later (for example version 1903 (May 2019 Update / 19H1). Dell and Microsoft have made strides to enhance the interoperability of applications with the Feature Update process to allow for an upgrade with little to no user interaction. During the Feature Update process, Windows now initiates notifications to application for various check-points within the Feature Update process. These check-points allow for applications to know the progress of the Windows Feature Update and deploy command that is based on the status and progress of the update. Dell Encryption uses these check-points to determine if the Windows 10 version that is being applied through the Feature Update is compatible with the current version of Dell Encryption. If the applying version of Windows 10 is not compatible, a notification is presented indicating so:

If the Feature Update is compatible, Dell Encryption automatically prepares for the Feature Upgrade (wsprobe -z automatically runs, and drivers that are required in the upgrade process are injected). A notification presents when Dell Encryption initiates it automatic preparation. This dialog can present quickly, and may not have been seen on fast computers:
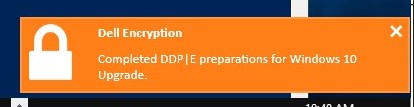
Once Dell Encryption has run through its preparation, the Feature Update should progress.
Windows 10 offers feature updates now through Windows Updates and various other sources. With 8.18.0 and later clients Dell Encryption supports updating Windows with Feature Updates, allowing Dell Encryption to remain installed and having files stay encrypted throughout the Windows Feature Update process. The methods that are outlined in this article are through Windows Updates, through Standalone Media, or through Deployment Models.
Windows Updates would entail an in Operating System upgrade through the typical method of update delivery.
Stand-alone Media encompasses downloading the Windows Feature Update install media from Microsoft.
Deployment Models explains how to prep for an upgrade through various deployment tools that offer managed Operating System Upgrades.
The Windows 10 Upgrade must be run from an unencrypted directory. Because USER or COMMON encryption is NOT unlocked during the Windows 10 Upgrade process, when the upgrade is run from a USER or COMMON encrypted directory, the upgrade fails even though the Dell Encryption Windows 10 Upgrade is performed correctly.
Dell Suggests the following Exclusions to be added to the Dell Encryption policies for Windows Feature Updates based on this requirement. These should be added to both Fixed Disk Exclusions (For SDE keys) and General Encryption Exclusions (Common/User):
-^%ENV:SYSTEMDRIVE%\$WINDOWS.~BT
-^%ENV:SYSTEMDRIVE%\_SMSTaskSequence
-^%ENV:SYSTEMDRIVE%\$GetCurrent\
-^%ENV:SYSTEMDRIVE%\$SysReset\
-^%ENV:SYSTEMDRIVE%\$Windows.~WS\
-^%ENV:SYSTEMDRIVE%\$Hyper-v.tmp\
-^%ENV:SYSTEMDRIVE%\Windows\SoftwareDistribution\
-^%ENV:SYSTEMDRIVE%\Windows10Upgrade\
Required for Feature Updates being pushed through SCCM and other third-party management applications:
-^%ENV:SYSTEMDRIVE%\Windows\ccmcache
-^%ENV:SYSTEMDRIVE%\Windows\TEMP\BootImages
-^%ENV:SYSTEMDRIVE%\Windows\Security\database\;chk.edb.jrs.log.sdb
-^%ENV:SYSTEMDRIVE%\_SMSTSVolumeID.7159644d-f741-45d5-ab29-0ad8aa4771ca
Note: These exclusions were updated on June 11, 2018, to add exclusions for various upgrade paths.
No modifications are required when running Windows Feature Updates when running Dell Encryption version 8.18.0 or later. All Feature Updates through Windows Update will no longer prompt to remove Dell Encryption.
Microsoft offers the ability to download Windows Feature Updates as ISO files for upgrades and deployments. You can get that media here: https://support.microsoft.com/en-us/help/12387/windows-10-update-history
No modifications are required when running Windows Feature Updates when running Dell Encryption version 8.18.0 or later. All Feature Updates through Standalone Media will no longer prompt to remove Dell Encryption.
Microsoft offers the ability to download Windows Feature Updates as ISO files for upgrades and deployments. You can get that media here: https://support.microsoft.com/en-us/help/12387/windows-10-update-history
To prepare a Windows Feature Update for deployment, most environments have to leverage an install.wim file. Due to the nature of how Dell Encryption supports the Windows Feature Update path, we have to inject the drivers and necessary registry files into the install media.
The Windows 10 Application Development Kit (ADK) is required to accomplish this. You can find the latest version here: https://developer.microsoft.com/en-us/windows/hardware/windows-assessment-deployment-kit
You also need a batch file and appropriate registry keys, which are unable to be linked externally for customer download. You can get these from support by calling the support line at: 877.459.7304 Ext. 4310039, for support outside the US, reference ProSupport’s International Contact numbers list. This batch file takes an expanded Windows Feature Update ISO (downloaded above) and injects drivers and registry files into the install.wim and WinRE.wim files within the upgrade ISO.
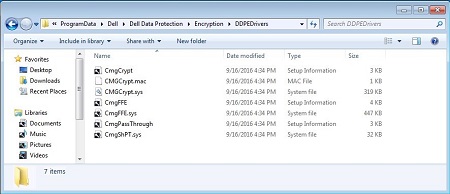
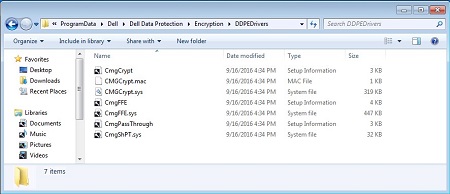
We must pull the drivers from a device that is running the version of Dell Encryption that is installed on your endpoints, to find the appropriate drivers for your upgrade media and the appropriate Operating System bit rate (32-bit or 64-bit). In 8.10.1 through 8.17.2, drivers for Dell Encryption are found in "C:\ProgramData\Dell\Dell Data Protection\Encryption\DDPEDrivers\." In 8.18.0 and later, this location has been moved to: "C:\Windows\System32\Update\Run\B67DD994-EDF9-4D19-8A1C-88B12D796657\ReflectDrivers"
We must pull the drivers from a device that is running the version of Dell Encryption is installed on your endpoints, to find the appropriate drivers for your upgrade media and the appropriate Operating System bit rate (32-bit or 64-bit). These are found in C:\ProgramData\Dell\Dell Data Protection\Encryption\DDPEDrivers\
Note: Using mismatching drivers from Dell Encryption within the Windows Upgrade media compared to the endpoint may result in a failure to upgrade, or Dell Encryption being in a bad state post Windows Feature Update.
- Batch script (provided by Dell Support)
- Extracted ISO of the Windows Feature Update installer (Provided by Microsoft)
- Registry Keys (Provided by Dell Support with script)
- Dell Encryption Drivers (Pulled from a device on your network, or provided by Dell Support)
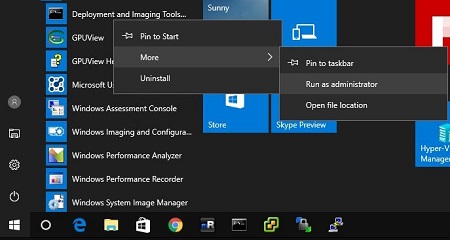
Open the Deployment and Imaging Tools Environment as an administrator.
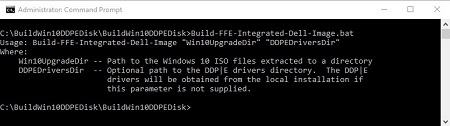
Then run the batch script. Entering the batch file gives information about syntax.
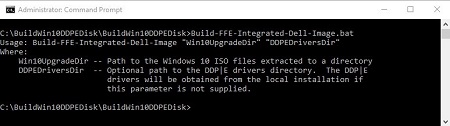
Syntax is:
Usage: Build-FFE-Integrated-Dell-Image "Win10UpgradeDir" "DDPEDriversDir"
Where:
Win10UpgradeDir -- Path to the Windows 10 ISO files that are extracted to a directory DDPEDriversDir -- Optional path to the Dell Data Protection | Encryption drivers directory. The Dell Data Protection | Encryption drivers are obtained from the local installation if this parameter is not supplied.
Note: It is expected that the .bat file and the
RegistryFiles folder are in the same location.
Once the process has finished, you end up with an upgraded install.wim file within the extracted ISO directory that you provided to the tool.
The install files are now ready for use.
Note:
WSProbe -z is no longer required to be ran on the endpoints before the Windows Feature Update is run.
Dell Encryption as of 8.18 and later automatically checks the version of the Operating System that is being installed against an internal list of supported Operating System versions. If a match is not found, the Feature Update is blocked and a notification is presented to the logged in user:
These blocks can be overwritten to allow for testing with an unsupported Operating System. A registry key enables this ability:
HKLM\Software\Dell\Dell Data Protection\Encryption
REG_SZ:SupportedWindows10Upgrade
Value: <HighestSupportedBuildHere>
This example would allow any Windows 10 build to install up to 10.0.17300.1.
HKLM\Software\Dell\Dell Data Protection\Encryption
REG_SZ:SupportedWindows10Upgrade
Value: <10.0.17300.1>
This functionality relies on Windows 10 build versions to allow for future granularity of Cumulative Update and Feature Update support. The build number of the installing feature update is displayed within the Windows Update:
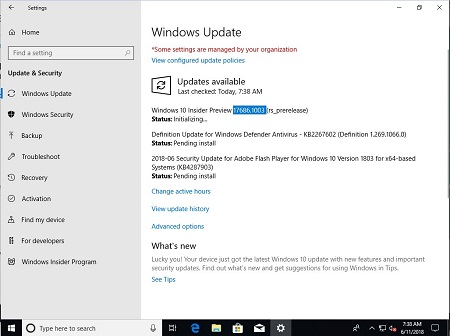
In this example, the value for "SupportedWindows10Upgrade" must be "10.0.17686.1003" or higher.
Note: Using Dell Encryption with an unsupported version of Windows 10 may cause adverse effects, which can include data loss. Dell Technologies recommends that you test unsupported Feature Updates on nonproduction devices for application compatibility only.
v8.10.0 and Later
This upgrade methodology leverages a command through the Dell Encryption application (wsprobe -z) which modifies how encryption keys are unlocked during the Feature Update process. Leveraging this process allows for data to remain encrypted on the drive, and ensures that Common and User key encrypted data remain locked during the upgrade process, allowing for secure updates.
Windows 10 offers feature updates now through Windows Updates and various other sources. With 8.10.1 and later clients Dell Encryption supports updating Windows with Feature Updates, allowing Dell Encryption to remain installed, and having files remain encrypted throughout the Windows Feature Update process. The methods that are outlined are through Windows Updates, Stand-alone Media, or Deployment Models.
Windows Updates entails an Operating System upgrade through the typical method of update delivery.
Stand-alone Media encompasses downloading the Windows Feature Update install media from Microsoft.
Deployment Models explains how to prep for an upgrade through various deployment tools that offer managed Operating System Upgrades.
The Windows 10 Upgrade must be run from an unencrypted directory. Because USER or COMMON encryption is not unlocked during the Windows 10 Upgrade process, when the upgrade is run from a USER or COMMON encrypted directory, the upgrade fails even though the Dell Encryption Windows 10 Upgrade is performed correctly.
Dell Suggests the following Exclusions to be added to the Dell Encryption policies for Windows Feature Updates based on this requirement. These should be added to both Fixed Disk Exclusions (For SDE keys) and General Encryption Exclusions (Common/User):
-^%ENV:SYSTEMDRIVE%\$WINDOWS.~BT
-^%ENV:SYSTEMDRIVE%\_SMSTaskSequence
-^%ENV:SYSTEMDRIVE%\$GetCurrent\
-^%ENV:SYSTEMDRIVE%\$SysReset\
-^%ENV:SYSTEMDRIVE%\$Windows.~WS\
-^%ENV:SYSTEMDRIVE%\$Hyper-v.tmp\
-^%ENV:SYSTEMDRIVE%\Windows\SoftwareDistribution\
-^%ENV:SYSTEMDRIVE%\Windows10Upgrade\
Required for Feature Updates being pushed through SCCM and other third-party management applications:
-^%ENV:SYSTEMDRIVE%\Windows\ccmcache
-^%ENV:SYSTEMDRIVE%\Windows\TEMP\BootImages
-^%ENV:SYSTEMDRIVE%\Windows\Security\database\;chk.edb.jrs.log.sdb
-^%ENV:SYSTEMDRIVE%\_SMSTSVolumeID.7159644d-f741-45d5-ab29-0ad8aa4771ca
The steps to pulling feature updates through Windows Updates are shown below.
You may encounter a failure indicating that Dell Encryption is required to be uninstalled before continuing.
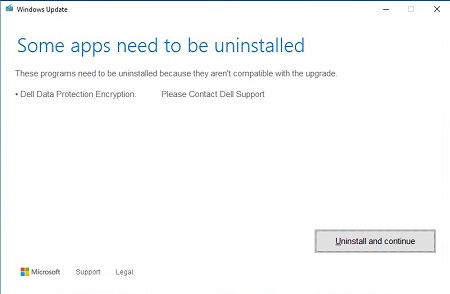
Close this screen, run WSProbe -z (as an administrator from command prompt) and then try the update again.
Note: If a reboot occurs before your next attempt to update,
WSProbe -z (run from an administrative command prompt) will be run again.
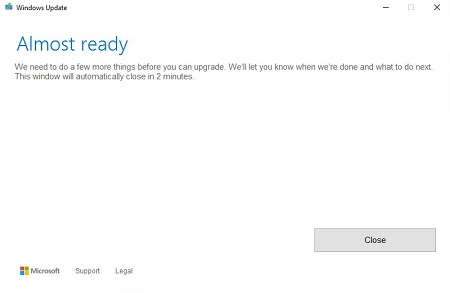
The update prompts stating that more preparing items are run in the background.
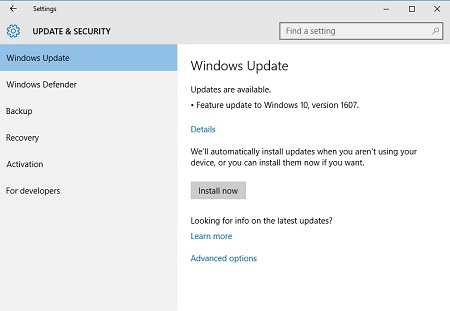
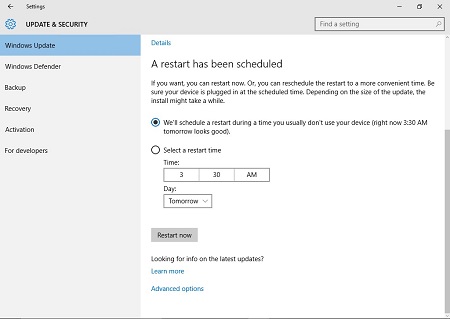
The status for updates can be checked in the new Settings menu for Windows 10.
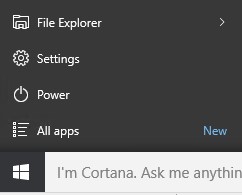
To access the Update items using the settings menu:
- Click the Start button, then click Settings.
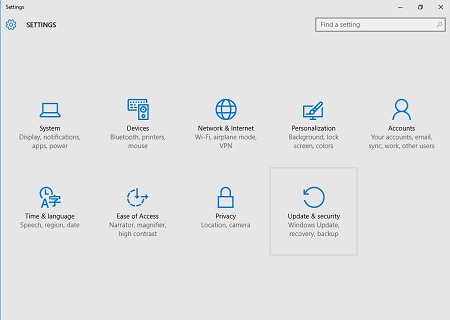
- In Settings, click Update & Security.
- When ready, the Update & Security section shows that a restart has been scheduled. Rebooting begins the update process.

- The upgrade finishes, during login, Windows indicates that the personal computer was updated, and all your data are in the same location.
You can validate the new version of Windows was properly installed by checking the version of windows through the command "winver," run at a command prompt or in PowerShell.

Note: Some devices running Dell Data Protection | Encryption version 8.10.1 or 8.11.0 must update their SetupConfig.ini file within
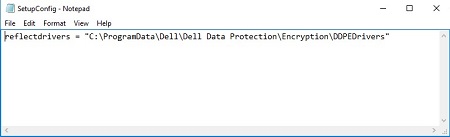
Add the header to make it:
This file applies to all local updates and automates the pass to the
C:\Users\Default\AppData\Local\Microsoft\Windows\WSUS. The current file is missing a header of [SetupConfig]. We show:
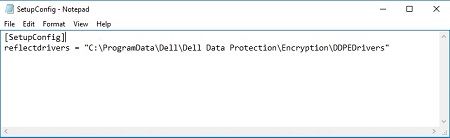
Add the header to make it:
This file applies to all local updates and automates the pass to the
reflectdrivers command to the Windows Feature update coming through Windows Update. The changes have been made within the product, and no longer required to be manually changed as of 8.12.0.
Microsoft offers the ability to download Windows Feature Updates as ISO files for upgrades and deployments. Get the download here: https://support.microsoft.com/en-us/help/12387/windows-10-update-history
Note: This process requires 8.10.1 or later of the Dell Encryption Client.
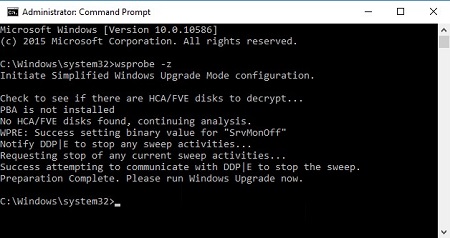
Before inserting the media, run WSProbe -z as an administrator from command prompt. This prepares the encrypted data for the upgrade process (no decryption is done).
Note: If a reboot occurs before your next attempt to update,
WSProbe -z (run from an administrative command prompt) must be run again.
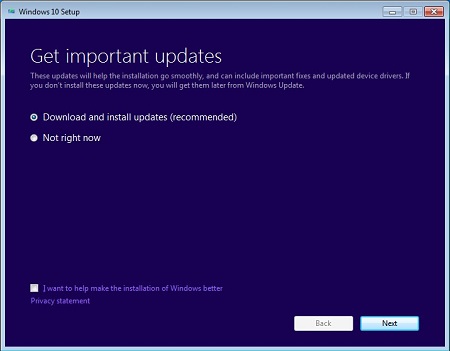
When this media is inserted into a computer running earlier versions of Microsoft Windows, a prompt to upgrade is presented.
Close out of this prompt, as the upgrade must be run with a specific command.
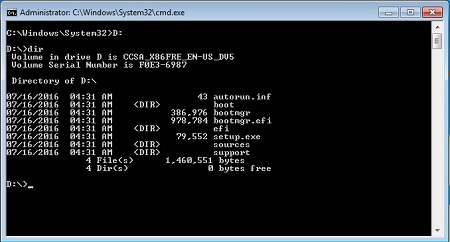
Open an administrative command prompt (or leverage the command prompt that is open for the WSProbe -z functionality).
Go to the drive letter that contains the Windows Feature Update media. In this example, D: is the drive that contains the Windows Feature Update media.
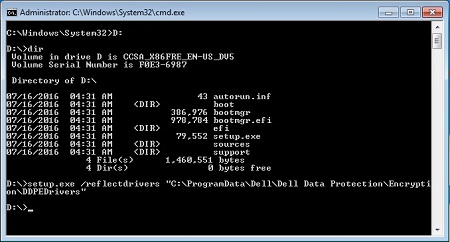
Run the setup.exe with this command to inject the Dell Encryption Drivers:
Setup.exe /reflectdrivers "C:\ProgramData\Dell\Dell Data Protection\Encryption\DDPEDrivers"
Note: This folder is only present in 8.10.1 and later versions of Dell Encryption. In 8.18.0 and later, this folder is "
C:\Windows\System32\Update\Run\B67DD994-EDF9-4D19-8A1C-88B12D796657\ReflectDrivers" by default.
This command launches the Windows Feature Update process. Proceed through the prompts, no other steps must be taken.
Microsoft offers the ability to download Windows Feature Updates as ISO files for upgrades and deployments. Get the download here: https://support.microsoft.com/en-us/help/12387/windows-10-update-history
To prepare a Windows Feature Update for deployment, most environments have to leverage an install.wim file. Due to the nature of how Dell Encryption supports the Windows Feature Update path, we have to inject the drivers and necessary registry files into the install media.
The Windows 10 Application Development Kit (ADK) is required to accomplish this. You can find the latest version here: https://developer.microsoft.com/en-us/windows/hardware/windows-assessment-deployment-kit
You need a batch file and appropriate registry keys, which are unable to be linked externally for customer download. You can get these from support by calling the support line at: 877.459.7304 Ext. 4310039, for support outside the US, reference ProSupport’s International Contact numbers list. This batch file takes an expanded Windows Feature Update ISO (downloaded above) and injects drivers and registry files into the install.wim and WinRE.wim files within the upgrade ISO.
To find the appropriate drivers for your upgrade media, we must pull the drivers from a device that is 8.10.1 or later for the appropriate Operating System bit rate (32-bit or 64-bit). These are found in C:\ProgramData\Dell\Dell Data Protection\Encryption\DDPEDrivers\. In 8.18.0 and later, this folder has been changed to "C:\Windows\System32\Update\Run\B67DD994-EDF9-4D19-8A1C-88B12D796657\ReflectDrivers."
- Batch script (provided by Dell Support)
- Extracted ISO of the Windows Feature Update installer (Provided by Microsoft)
- Registry Keys (Provided by Dell Support with script)
- Dell Encryption Drivers (Pulled from a device on your network, or provided by Dell Support)
To generate media:
- Open the Deployment and Imaging Tools Environment as an administrator.

- Run the batch script. Entering the batch file gives information about syntax.
Syntax is:
Usage: Build-FFE-Integrated-Dell-Image "Win10UpgradeDir" "DDPEDriversDir"
Where:
Win10UpgradeDir -- Path to the Windows 10 ISO files that are extracted to a directory.
DDPEDriversDir -- Optional path to the DDP|E drivers directory (the Dell Data Protection | Encryption drivers are obtained from the local installation if this parameter is not supplied).
Note: It is expected that the
.bat file and the RegistryFiles folder are in the same location.
Once the process finishes, you end up with an upgraded install.wim file within the extracted ISO directory that you provided to the tool.
The install files are now ready for use.
Note:
Wsprobe -z is still required with this method, as this command unlocks key material for the upgrade process to be able to consume with the drivers that are now loaded into the install media.
v8.9.1 to 8.16.2
This Methodology decrypts the drive in the background, allowing for a transition to the latest feature update. This should be leveraged as a final option if the solutions for "8.18.0 and later" as well as the options for "8.10.1 and later" do not deliver the wanted results.
- As an administrator, open a command prompt in the same location as the
WSProbe.exefile and enter the applicable command:- Windows 10 Upgrade mode to authenticate against a key bundle file for Dell Encryption Personal (formally Dell Data Protection | Personal Edition) you must first use the command below, which is part of the upgrade preparation (the
LSARecoveryfile that is backed up during Dell Encryption Personal's provisioning process):WSProbe -E -B "backup_file_path" "password"
- Windows 10 Upgrade mode to authenticate against a key bundle file for Dell Encryption Personal (formally Dell Data Protection | Personal Edition) you must first use the command below, which is part of the upgrade preparation (the
Note: For Dell Encryption Personal computers, if the decryption fails to start, you must copy the
LSARecovery file to C:\Program Files\Dell\Dell Data Protection\Encryption\ and select the LSARecovery file from that location. Dell is researching this to ensure the best experience possible is delivered.
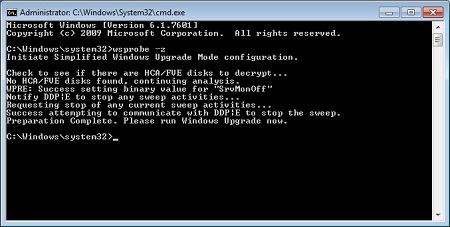
To check progress of the preparation process, you can run. WSProbe –E
- The computer is ready for upgrade when the following message displays "Preparation complete. Run Windows Upgrade now."
- Restart the computer, if prompted.
- Run the Windows upgrade.
- Restart the computer.
- Once the upgrade has finished, open a command prompt and enter:
WSProbe -RNote: TheWSProbe -Rcommand resumes normal Encryption client functionality and is run after the computer is successfully upgraded. It can also be used to roll back to normal Encryption client functionality before an upgrade is performed.
- Restart the computer, if prompted.
To check progress of the preparation process, you can run. WSProbe –E
- If the following message does not display: Preparation complete. Please run Windows Upgrade now.
- Follow the prompts that are listed.
- Run
WSProbeagain and until the prompt to run the Windows Upgrade displays:WSProbe -E
- Run the Windows upgrade.
- Restart the computer, if prompted.
- Once the upgrade has finished, open a command prompt and enter:
WSProbe -R
This method may run into issues with files not decrypting. To avoid this, we should automatically create a registry key of:
HKLM\Software\Credant\DecryptAgent\
DWORD: MaxBytesReboot
Value: 0
To check progress of the preparation process, you can run: WSProbe –E
Note: The
WSProbe -R command resumes normal Encryption client functionality and is run after the computer is successfully upgraded. It can also be used to roll back to normal Encryption client functionality before an upgrade is performed.
To check progress of the preparation process, run WSProbe –E
As an administrator, open a command prompt in the same location as the WSProbe.exe file and enter the applicable command:
- This allows Windows 10 Upgrade mode to import, and authenticate against a pre-existing key bundle file (can be downloaded from the Dell Security Management Server [formally Dell Data Protection | Enterprise Edition]):
WSProbe -E -I "import_file_path" "password"
- This contacts the Dell Security Management Server or Dell Security Management Virtual Server (formally Dell Data Protection | Virtual Edition), which transfers the key bundle, which is used to validate the proper key material is present:
WSProbe -E -S "forensics_admin_name" "password"
- To check progress of the preparation process, you can run:
WSProbe -E
- The computer is ready for upgrade when the following message displays: Preparation complete. Please run Windows Upgrade now.
- Restart the computer, if prompted.
- Run the Windows upgrade.
- Restart the computer.
- Once the upgrade has finished, open a command prompt and enter:
WSProbe -R
- Restart the computer, if prompted.
If the Preparation complete. Please run Windows Upgrade now message does not display, follow these steps:
- Follow the prompts that are listed.
- Run
WSProbeagain and until the prompt to run the Windows Upgrade displays:WSProbe -E
- Run the Windows upgrade.
- Restart the computer, if prompted.
- Once the upgrade has finished, open a command prompt and enter:
WSProbe -R
This method may run into issues with files not decrypting. To avoid this, we should automatically create a registry key of:
HKLM\Software\Credant\DecryptAgent\
DWORD: MaxBytesReboot
Value: 0
To contact support, reference Dell Data Security International Support Phone Numbers.
Go to TechDirect to generate a technical support request online.
For additional insights and resources, join the Dell Security Community Forum.
Affected Products
Dell Encryption, Dell Endpoint Security Suite Pro, Dell Endpoint Security Suite EnterpriseArticle Properties
Article Number: 000125419
Article Type: How To
Last Modified: 19 Apr 2026
Version: 13
Find answers to your questions from other Dell users
Support Services
Check if your device is covered by Support Services.