Article Number: 000131640
Getting started with the Dell Venue 8 Pro (3845) tablet
Summary: This article provides information about how to take the Dell Venue 8 Pro out of the box and starting it up for the first time.
Article Content
Symptoms
Find information about how to take the Dell Venue 8 Pro out of the box and set it up for the first time.
Cause
No cause information available.
Resolution
- Locate the AC adapter and the USB-to-micro-USB cable that goes with it. Plug the AC adapter into a power outlet and plug the micro-USB connector into the port on the right edge of the Venue 8 Pro tablet (Figure 1). Because the battery may have discharged during shipping, it may be necessary to charge the battery for a few minutes before starting up the tablet.
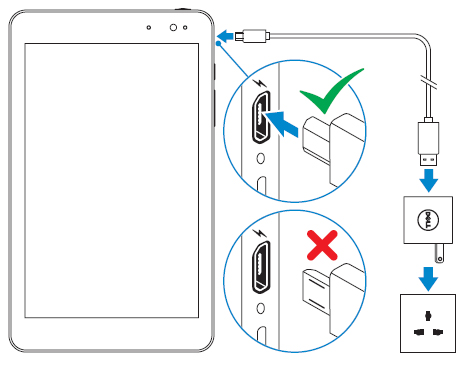
Figure 1: Charging Port LocationNOTE: The tablet orients vertically with the webcam at the top. The power button is on the top edge on the right-hand side and the Windows button is located on the right edge under the Micro-USB port (Figure 2) . To turn on the tablet, press the power button for three to five seconds. It will take a few seconds for Windows to launch.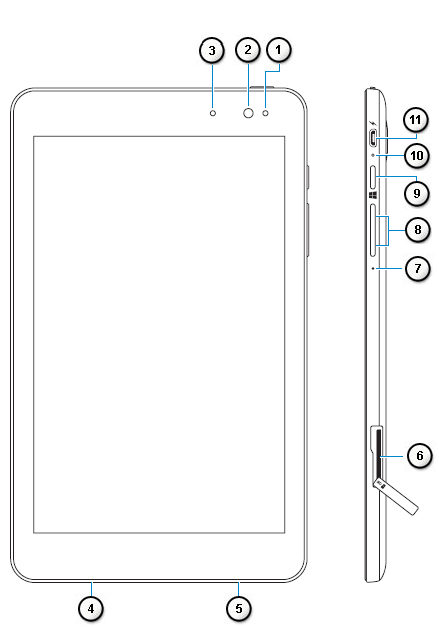
Figure 2: Venue 8 Pro (3845) Ports and Button Location Face and SideNumbers reference image above: 
Ambient-light sensor 
Front camera 
Camera-status light 
Service Tag label 
Speaker 
MicroSD-card slot 
Microphone 
Volume up-down rocker 
Windows button 
Battery-charging status light 
Micro-USB port 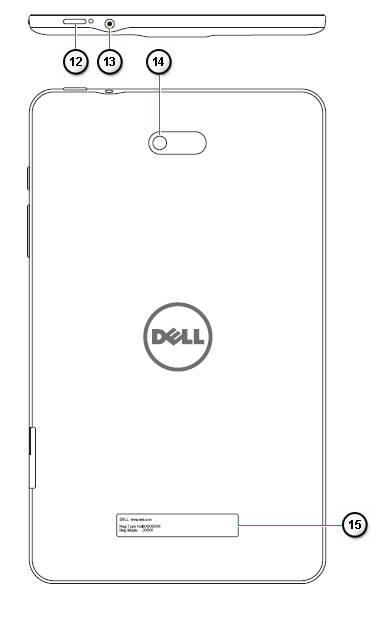
Figure 3: Venue 8 Pro (3845) Ports and Button Location Back and TopNumbers reference image above: 
Power button 
Headset port 
Rear camera 
Regulatory label
Click Here to learn more about using Windows 8.
If you require further assistance or wish to give us feedback, please engage our technical team on Twitter.
- The first screen you will see is the Region and Language setup screen. You will be able to use the pull-down menus for the following:
- Country or Region
- App Language
- Keyboard Layout
- Time Zone
When you have made all the choices, touch Next.
- The next screen will show the Microsoft Windows License Terms. You may read the full Windows license agreement here. When you are ready to proceed, touch I Accept.
- The next screen will let you set up Dell Updates. Enter your e-mail address (this does not have to be the same as your Microsoft log-in address). You may check the appropriate boxes and choose whether or not to receive automatic updates from Dell and whether to allow your tablet's service tag information to be sent to Dell Support.
- When you have finished your choices, touch Next or you may choose to Skip this step.
- The next screen allows you to personalize your tablet's name. The name you enter is how your device will be seen on networks This device name works exactly the same as any notebook or desktop PC running Windows 8.1. When you are finished entering the PC name, touch Next.
- The next screen will allow you to Get Online. Windows will display a list of locally available WiFi networks. If your device has a SIM card, this screen will also offer you options for connecting to a broadband network. When you have chosen a network, you will be prompted to enter the network password to sign on. If you have access to your router and it supports WiFi Protected Setup (WPS) follow the instructions to connect using WPS.
- On the next screen, you may choose whether to use the Express Settings which will simplify setup, or you can choose to Customize your Windows settings if you have experience using Windows 8 or 8.1.
- The next screen lets you set up your Windows account. If you already have a Windows account, enter your email address and password. You will be asked to enter a verification code sent to that email account. If you do not have a Windows account, you can set one up starting from this screen.
- The next screen will allow you to set up cloud settings on Microsoft's SkyDrive. You can store your information safely and securely on SkyDrive which will make it easy to backup and restore your data. You may choose to Skip this step if you choose.
- You should now be at the Windows 8.1 modern user interface. You may touch the Desktop tile to convert Windows to a traditional desktop style.
Article Properties
Affected Product
Venue 3845 Pro
Last Published Date
21 Jun 2021
Version
4
Article Type
Solution