How to Resolve Hard Drive or solid state drive Issues on your Dell Computer
Summary: This article provides information about how to troubleshoot and resolve common hard drive (HDD) or solid state drive (SSD) issues on a Dell computer.
This article applies to
This article does not apply to
This article is not tied to any specific product.
Not all product versions are identified in this article.
Instructions
Before You Begin
This article is the second stage of hard drive and SSD troubleshooting on Dell computers. It picks up where the Fix Hard Drive and SSD Issues library page ends.
Prerequisites:
Before proceeding with these advanced steps, ensure that you have:
- Disconnect unnecessary external devices.
- Perform a Hard Reset.
- Run a Hardware Diagnostic Test
- Check the BIOS Settings.
- Ensure BIOS and Drivers Are Up to Date.
Overview
This article addresses what to do when the steps on the Fix Hard Drive and SSD Issues library page pass or partially resolve the issue but the system still does not work correctly in Windows — covering:
- Checking for and removing viruses or malware
- Repairing missing or corrupted Windows system files
- Restoring the computer to a previous working state
- Factory resetting or reinstalling Windows as a last resort
Symptoms and Recommended Actions This Article Addresses
This article is relevant when one or more of the following conditions apply after completing all the prerequisite steps:
|
Symptom and Condition |
Likely Issue |
Recommended Action |
Guidance |
|
The computer takes an unusually long time to boot and diagnostics have passed; system performance is slow or unresponsive in Windows. |
File system degradation or malware |
Start at Step 1. If the issue persists, continue to Step 2. |
Malware and software-related issues can significantly impact startup time and performance. |
|
The computer runs slowly or becomes unresponsive during use, and diagnostics have passed. |
Software interference or disk-related errors |
Start at Step 1. If the issue persists, continue to Step 2. |
This behavior is commonly caused by software conflicts, malware, or file system issues. |
|
Hard drive-related error messages are displayed (for example, "Data error Reading Drive" or "Seek error") and symptoms indicate possible system file corruption. |
Software or file system corruption |
Start at Step 2 and Run SFC and DISM. If the issue persists, go to Step 4. |
These symptoms commonly result from corrupted operating system files that can be repaired using integrated tools. |
| Windows displays low disk space warnings, updates fail, or the computer runs slowly while diagnostics pass. | Insufficient free space on the operating system drive. | Start at Step 3. | Low available storage can cause symptoms that resemble hard drive or SSD failures. |
|
The issue began after installing software, a driver, or a Windows update. |
Software or driver conflict |
Start at Step 4. |
System Restore can revert recent changes without affecting personal files. |
|
SFC and DISM have been completed and the issue persists. |
Underlying operating system corruption |
Go to Step 4. |
If file repair tools do not resolve the issue, system restore is the next recovery step. |
|
The computer boots to a blank screen with a blinking cursor and Windows does not start. |
Boot sector or MBR corruption |
Start at Step 4. If no restore points are available; go to Step 5. |
This behavior indicates boot-level corruption that requires recovery or reinstallation. |
|
Error messages referencing the operating system are displayed during boot (for example, "Missing Operating System") and Windows does not start. |
Start-up file corruption |
Start at Step 4. If no restore points are available; go to Step 5. |
Missing or damaged start-up file prevents the system from loading Windows. |
|
The computer does not boot into the operating system and no restore points are available. |
Operating system corruption or missing start-up file |
Go to Step 5. |
When Windows cannot start and recovery options are unavailable, reinstallation is required. |
|
System Restore did not resolve the issue or no restore points are available. |
Severe operating system corruption |
Go to Step 5. |
A full reset or reinstallation is required when recovery options are not effective. |
| The computer does not recognize a newly installed replacement hard drive or SSD. | Drive installation, BIOS configuration, drive compatibility, or hardware detection issue. | Start with the Fix Hard Drive and SSD Issues library page. | The advanced Windows recovery steps in this article require the drive to be detected by the system first. |
|
Any of the above symptoms occur and the diagnostic test fails. |
Possible hardware failure |
Stop. Contact Dell Technical Support. |
Do not proceed with software troubleshooting when a hardware issue is detected. |
Advanced Troubleshooting Steps
Step 1: Check for Viruses or Malware
Identify and remove software threats that can mimic or cause drive errors.
Viruses and malware can interfere with how Windows reads and writes to the storage drive, causing symptoms that appear identical to hardware failures — including slow performance, system freezes, boot failures, and drive-access errors.
How to check:
- Open Windows Security: Select Start, type
Windows Security, and open the app. - Select Virus & threat protection.
- Under Current threats, select Quick scan. For a thorough check, select Scan options and choose Full scan.
- Follow any on-screen prompts to quarantine or remove detected threats.
- Restart the computer after the scan completes and check if the issue is resolved.
If the issue is resolved after removing a threat, the malware was the cause. Monitor the system for recurrence and ensure that real-time protection is enabled.
Step 2: Repair Missing or Corrupted Windows System Files
Use integrated Windows tools to scan and restore damaged operating system files.
Windows includes two command-line tools — System File Checker (SFC) and Deployment Image Servicing and Management (DISM) — that can detect and repair missing or corrupted operating system files. These tools address a common cause of drive-related errors that originate in the software layer rather than the hardware.
Run System File Checker (SFC)
SFC scans all protected Windows system files and replaces corrupted or missing files with a cached clean copy.
- Restart the computer and boot into Windows.
NOTE: If Windows will not start normally, perform the SFC scan in Safe Mode with Networking, for more information see the Run SFC in Safe Mode with Networking section.
- Select Start and search for Command Prompt.
- Right-click Command Prompt and select Run as administrator.
- If your computer is encrypted with BitLocker, enter the recovery key when asked. You can find the key by logging into your account at account.microsoft.com
and check the Devices section.
- Type
sfc /scannowin the command prompt, and then press Enter - The System File Checker scans all protected operating system files. Do not close the Command Prompt window until the scan shows 100% complete.
- Restart the computer. If the issue is resolved, no further action in this step is needed. If it is not resolved, go to the DISM section below.
Run DISM (Deployment Image Servicing and Management)
DISM connects to Windows Update online to download and replace corrupted system image files that SFC cannot repair on its own. An active Internet connection is required.
NOTE: DISM requires an active Internet connection. For best results, connect an Ethernet (RJ45) cable directly from your router to the computer. Safe Mode with Networking does not support Wi-Fi.
- Restart the computer and boot into Windows.
NOTE: If Windows will not start normally, perform the SFC scan in Safe Mode with Networking, for more information see the Run DISM in Safe Mode with Networking section.
- Select Start and search for Command Prompt.
- Right-click Command Prompt and select Run as administrator.
- If your computer is encrypted with BitLocker, enter the recovery key when asked. You can find the key by logging into your account at account.microsoft.com
- Type
DISM.exe /Online /Cleanup-image /Restorehealthin the command prompt, and then press Enter - Allow DISM to complete. This may take several minutes depending on your connection speed. Do not close the window or disconnect from the Internet during this process.
- Restart the computer after DISM completes and check if the issue is resolved.
NOTE: If neither SFC nor DISM resolves the issue, go to Step 4 or Step 5. Do not repeat these tools multiple times, as continuing to run them on a severely corrupted installation may reduce the effectiveness of subsequent recovery options.
Step 3: Check Why My C: Drive is Full?
Identify what is consuming storage space on the Windows operating system drive.
A full or nearly full C: drive can cause symptoms that resemble hard drive or SSD problems, including:
- Slow system performance
- Applications freezing or crashing
- Windows updates failing to install
- Low disk space warnings
- Temporary file errors
- Reduced system responsiveness
- Boot or login delays
Before assuming a hardware issue exists, verify that sufficient free space is available on the operating system drive.
Perform these steps if:
- The computer is running slowly, but hardware diagnostics pass.
- Windows displays a Low Disk Space warning.
- The C: drive has less than 10% free space remaining.
- Windows updates fail repeatedly.
- Applications report insufficient storage space.
Common Causes of a Full C: Drive
| Cause | Description |
|---|---|
| Temporary files | Windows and applications create temporary working files that can accumulate over time. |
| Windows Update files | Previous update packages may remain on the system after installation. |
| Downloads folder | Large installers, ISO files, and downloaded content are often stored here. |
| Recycle Bin | Deleted files continue to consume storage until permanently removed. |
| Large personal files | Videos, photos, virtual machines, and backups can consume significant space. |
| Application data | Some applications store large amounts of cached data. |
| System restore points | Multiple restore points may consume several gigabytes of storage. |
Check Available Drive Space
- Open File Explorer.
- Select This PC.
- Review the available space shown under Devices and drives.
- If the C: drive is nearly full, continue with the steps below.
Clean Up Temporary Files Using Storage Settings
- Select Start > Settings > System > Storage.
- Review the storage categories to identify what is using disk space.
- Select Temporary files.
- Choose the items you want to remove.
- Select Remove files.
Run Windows Disk Cleanup
Disk Cleanup can remove unnecessary files that are no longer needed.
- Select Start and search for Disk Cleanup.
- Open Disk Cleanup.
- Select the C: drive and click OK.
- Select Clean up system files.
- Review the available categories.
- Select the files that can be safely removed.
- Click OK and then Delete Files.
Remove Unneeded Files
Consider removing or moving:
- Large files from the Downloads folder
- Unused applications
- Old ISO images
- Duplicate media files
- Personal files that can be stored on external drives or cloud storage
Enable Storage Sense
Storage Sense automatically removes temporary files and helps manage disk usage.
- Open Settings > System > Storage.
- Turn on Storage Sense.
- Configure the cleanup schedule as desired.
If Storage Space Continues to Decrease
- Run a malware scan as described in Step 1.
- Review recently installed applications.
- Check whether backup software is creating large local backup files.
- Verify that synchronization applications such as OneDrive are not caching unnecessary files locally.
Expected Result
After freeing disk space, restart the computer and verify whether the original performance or drive-related symptoms are resolved.
NOTE: For best Windows performance, Dell recommends maintaining at least 10% to 15% free space on the operating system drive. Systems with critically low free space may experience update failures, performance degradation, and application stability issues.
For more information see Dell Knowledge Base article How to Free up Disk Space on Your Windows Personal Computer.
Step 4: Restore the Computer Using Windows System Restore
Revert Windows to a previous working state without affecting personal files.
Windows System Restore reverts the computer's software state — including installed applications, Windows Registry entries, and system settings — to a saved restore point. It does not affect personal files such as documents, photos, or music.
System Restore is effective when:
- The issue began after a recent Windows update, driver install, or software change
- SFC and DISM did not resolve the issue
- The computer can boot into Windows (or Safe Mode with Networking)
NOTE: System Restore requires that restore points exist on the system. Restore points are created automatically before Windows updates, driver installs, and certain software installations. If no restore points are available, go to Step 5.
How to run System Restore:
For step-by-step instructions with screenshots, see the Dell Knowledge Base article: How to Use System Restore in Microsoft Windows.
Step 5: Restore the Computer to Factory Default Settings
A factory reset or clean reinstall of Windows resolves issues that cannot be fixed by file repair or restore. This is appropriate when:
- All previous steps have been completed, and the issue persists
- Windows cannot boot, and System Restore is unavailable
- The drive is confirmed healthy by diagnostics, but Windows is severely corrupted
NOTE: This is a last-resort step. A factory reset removes all installed applications and Windows settings. Ensure to back up all personal files before proceeding. For more information, see the Dell Backup Media and Recovery Options for Windows library page.
Options for resetting or reinstalling Windows:
|
Method |
When to Use |
Keeps Personal Files? |
|
Reset This PC (Keep my files) |
Windows can boot; you want to reinstall Windows without losing personal files. |
Yes |
|
Reset This PC (Remove everything) |
Windows can boot; you want a completely clean installation. |
No |
|
Dell OS Recovery Tool |
Windows cannot boot; you must create a USB recovery drive from another computer. |
No |
|
Dell SupportAssist OS Recovery |
Available on select Dell systems; boots into a recovery environment independent of Windows |
No |
For complete step-by-step instructions, see Dell Knowledge Base article Factory Reset, Restore, or Reinstall Microsoft Windows on a Dell computer.
NOTE: If you see a 'Hard Drive not Detected' or 'No Boot Device Found' error during a Windows reinstall on a system with an Intel 11th, 12th, or 13th Gen processor, the Intel RST driver may be required. See Dell Knowledge Base article Intel 11th, 12th, 13th, and 14th Generation Processors, No Drives Can Be Found During Windows 10 and Windows 11 Installation
Run SFC in Safe Mode with Networking
- Starting with the computer off. Press the Power button on the computer and immediately start pressing the F12 key once a second to access the System Boot menu.
- Select SupportAssist OS Recovery to boot to SupportAssist OS Recovery.
- In SupportAssist OS Recovery, click the 3 dots
 at the upper right side of the OS Recovery Home screen and this provides a dropdown menu.
- Select Windows recovery.
- The computer reboots into the Windows Recovery Environment (WinRE).
- Select Troubleshoot > Advanced Options > Command Prompt (Figure 1)
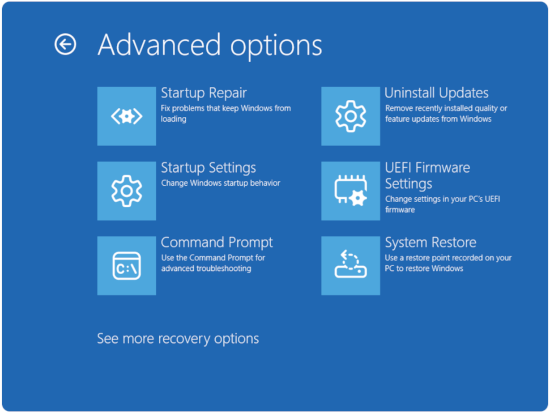
Figure 1: Advanced options - If your computer is encrypted with BitLocker, enter the recovery key when asked. You can find the key by logging into your account at account.microsoft.com
- Type
sfc /scannowin the command prompt, and then press Enter. - The System File Checker scans all protected operating system files. Do not close the Command Prompt window until the scan shows 100% complete.
- Restart the computer. If the issue is resolved, no further action in this step is needed. If it is not resolved, go to the DISM section below.
Run DISM in Safe Mode with Networking
- Starting with the computer off. Press the Power button on the computer and immediately start pressing the F12 key once a second to access the System Boot menu.
- Select SupportAssist OS Recovery to boot to SupportAssist OS Recovery.
- In SupportAssist OS Recovery, click the 3 dots
 at the upper right side of the OS Recovery Home screen and this provides a dropdown menu.
- Select Windows recovery.
- The computer reboots into the Windows Recovery Environment (WinRE).
- Select Troubleshoot > Advanced Options > Command Prompt (Figure 2)
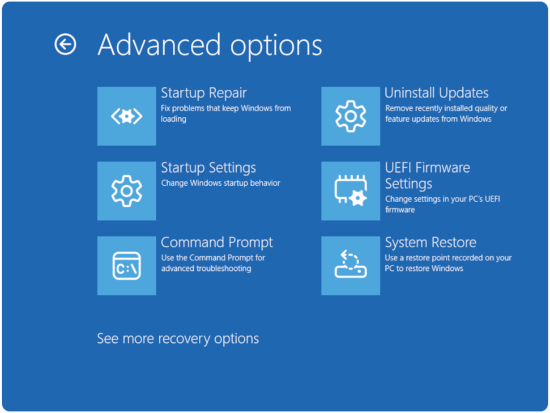
Figure 2: Advanced options - If your computer is encrypted with BitLocker, enter the recovery key when asked. You can find the key by logging into your account at account.microsoft.com
- Type
DISM.exe /Online /Cleanup-image /Restorehealthin the command prompt, and then press Enter. - Allow DISM to complete. This may take several minutes depending on your connection speed. Do not close the window or disconnect from the Internet during this process.
- Restart the computer after DISM completes and check if the issue is resolved.
Affected Products
Alienware, Dell All-in-One, Dell Pro All-in-One, Dell Pro Max Micro, Dell Pro Max Slim, Dell Pro Max Tower, Dell Pro Micro, Dell Pro Slim, Dell Pro Tower, Dell Slim, Dell Tower, Inspiron, Legacy Desktop Models, OptiPlex, Vostro, XPS, G Series
, G Series, Alienware, Dell Plus, Dell Pro, Dell Pro Max, Dell Pro Plus, Dell Pro Premium, Inspiron, Latitude, Dell Pro Rugged, Vostro, XPS, Legacy Laptop Models, Fixed Workstations, Mobile Workstations, Dell Pro Max Micro XE FCM2250, Dell Pro Max Slim XE FCS1250, Dell Pro Max Tower T2 XE FCT2250, Dell Pro Max 16 XE MC16250, Dell Pro Micro Plus XE QBM1250, Dell Pro Slim Plus XE5 QBS1250, Dell Pro Tower Plus XE5 QBT1250
...
Article Properties
Article Number: 000179526
Article Type: How To
Last Modified: 05 Nov 2026
Version: 32
Find answers to your questions from other Dell users
Support Services
Check if your device is covered by Support Services.