Article Number: 000186239
PowerStore: Using vVols across multiple vCenters: How to register the PowerStore VASA provider across multiple vCenters
Summary: How to register Powerstore VASA provider with multiple vCenters to ensure proper VVOL operations.
Article Content
Instructions
Introduction
VMware today offers no simple way of configure VASA Provider (VP) so that a single storage system can be used for vVols across multiple independent vCenters. This KB documents the current options available to use PowerStore’s VASA Provider across multiple vCenters.
These options are:
- Using Enhanced Linked Mode
- Sharing vCenter root certificates across vCenters
Option 1: Using Enhanced Linked Mode
In the environments where several vCenters are linked together using Enhanced Linked Mode, registering Powerstore VASA provider is a straightforward process. Enhanced Linked Mode replicates trusted Root certificates across all linked vCenter instances.
The steps are:
-
To share a single PowerStore across multiple vCenters for vVol services, connect the vCenters by using Enhanced Linked Mode follow these steps from VMware: https://docs.vmware.com/en/VMware-vSphere/6.7/com.vmware.vcenter.install.doc/GUID-4394EA1C-0800-4A6A-ADBF-D35C41868C53.html
-
Once the vCenters are linked, go to PowerStore Manager and register one of your vCenters with the VASA provider option selected. PowerStore Manager will have the visibility into storage objects as managed by this vCenter.
-
Register the PowerStore VASA provider manually with each other vCenter:
- Login to vCenter and navigate to Configure > Storage Providers under the vCenter inventory object.
- Open the dialog to add a storage provider.
- The Name can be any name that you choose.
- The URL must be in the format: https://<IP address>:8443/version.xml, where <IP address> is the management IP address of the PowerStore T model cluster.
- The User name is the PowerStore Manager user with the VM Administrator role, in the appropriate format:
- For local users, use local/<user name>
- For LDAP users, use <domain>/<user name>
- The Password is the password of the PowerStore Manager user with the VM Administrator role.
- Do not select Use storage provider certificate.
- Click OK.
- Verify the details that you entered in vCenter Server
Option 2: Manual sharing vCenter root certificates across vCenters
To make PowerStore work with multiple non-linked vCenter instances, trusted root certificate of the vCenter instance, where VASA provider was registered first, needs to be uploaded and registered across all other vCenter instances prior to registration of the VASA provider, to ensure they trust VASA provider certificate and don’t initiate re-signature.
Hereby, this procedure involves the VMCA root certificate of one vCenter being applied to all vCenters. SAN installation differs from HCI installation a bit because HCI presupposes the existence of vCenter where VASA Provider was initially registered. In case of SAN installation you may choose any vCenter instance to be the first one.
Steps using the GUI method:
1. Download trusted root CA from the “first” vCenter using GUI:Navigate to the login page of first vCenter and download “Trusted root CA certificates”

2. Extract the ZIP file. You will end up with one .CRT file for every Certificate Authority (CA) in this SSO Domain.

3. Upload certificate to other vCenters:
- Login into VC and navigate to Menu > Administration > Certificates > Certificate Management.
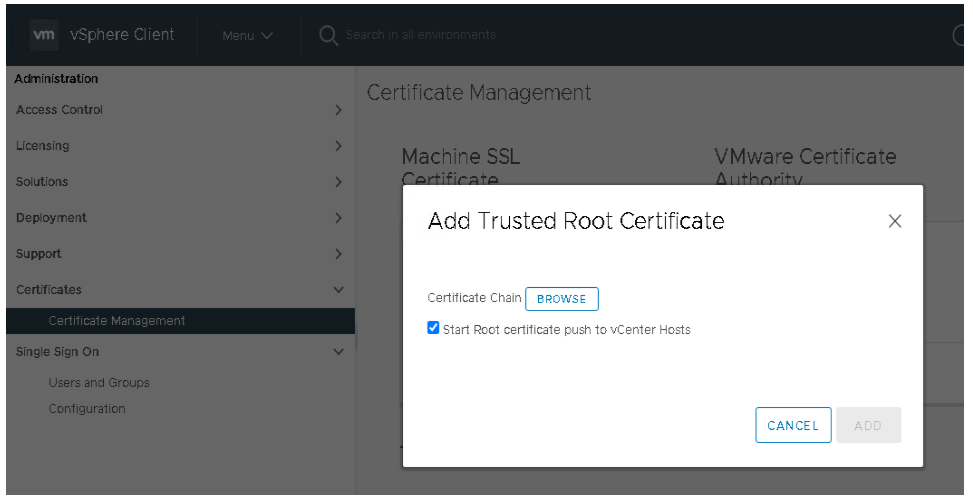
- On the right side, under “Trusted Root Certificates”, click ADD.
- Click on Browse and navigate to the folder where you extracted certificates in Step 2:

- Make sure the box “Start Root certificate push to vCenter Hosts” is checked – this will ensure that the certificate you’re adding is pushed to all ESXi hosts that are managed by corresponding vCenters .
4. Log into each of needful vCenter instances and register VASA provider there. You should end up with the VASA Provider registered with every vCenter.
- Login to vCenter and navigate to Configure > Storage Providers under the vCenter inventory object.
- Open the dialog to add a storage provider.
- The Name can be any name that you choose.
- The URL must be in the format: https://<IP address>:8443/version.xml, where <IP address> is the management IP address of the PowerStore T model cluster.
- The User name is the PowerStore Manager user with the VM Administrator role, in the appropriate format:
- For local users, use local/<user name>
- For LDAP users, use <domain>/<user name>
- The Password is the password of the PowerStore Manager user with the VM Administrator role.
- Do not select Use storage provider certificate.
- Click OK.
- Verify the details that you entered in vCenter Server
Note: only one vCenter can be registered in the PowerStore Manager, and using this method the PowerStore Manager will only display vVol related VMs for the single vCenter registered with the PowerStore and will therefore have no visibility into other vCenters sharing this same VASA provider via this shared root certificate method.
Alternatively, certificates can be manually managed using VC shell and PowerCLI.
Steps using the CLI method:
- Retrieve “first” VC’s root CA:
- Open shell session on VC
- $ /usr/lib/vmware-vmafd/bin/vecs-cli entry list --store TRUSTED_ROOTS
- Copy certificate content (full value of the field named “Certificate”, including “-----BEGIN CERTIFICATE-----” and “-----END CERTIFICATE-----“.
- Add this vCenter's trusted root CA certificate to Trusted Root Certificates of EACH needful vCenter:
- Open shell session on VC
- save certificate content copied earlier to a file on a filesystem
- $ sudo /usr/lib/vmware-vmafd/bin/dir-cli trustedcert publish –chain --cert <certificate file>
- Propagate CA certificate changes to all hosts on each VC using PowerCLI and PowerShell:
- Connect-VIServer -server [VC ip or FQDN]
- Get-Cluster -Name "Cluster" | Get-VMhost | % {(Get-View -Id (Get-View ServiceInstance).Content.CertificateManager).CertMgrRefreshCACertificatesAndCRLs($_.ExtensionData.MoRef)}
- Register VP on each VC as described above.
FAQ:
Q. Is it possible to manually propagate root certificates to ESXi hosts?
A. Propagating certificates to ESXi hosts connected to vCenter can be done manually using VC GUI.
Hosts and clusters -> {Pick a host} -> Configure -> System -> Certificate -> REFRESH CA CERTIFICATES):

Q. What if certificate of the “first” VC requires to be renewed?
A. Renewal of the certificate can be done using vSphere Certificate Manager, which is described in https://kb.vmware.com/s/article/2097936.
Please note that certificate manager does not generate VP certificate – if you need to sign it with renewed VC certificate, you must use Refresh Certificate on Storage provider menu of VC.
- Old root CA must be unpublished from each vCenter instance using CLI:
- $ sudo /usr/lib/vmware-vmafd/bin/dir-cli trustedcert unpublish --cert file.crt
- After VP certificate was signed by new root CA– this root CA must be distributed across all other vCenter instances as described above.
- Renew CA certificates on VC hosts using PowerCLI or VC GUI (described above).
Article Properties
Affected Product
PowerStore
Last Published Date
03 Nov 2021
Version
3
Article Type
How To