Article Number: 000194492
How To Stop Windows Updates from Downloading and Installing
Summary: This article describes the process of how to stop or pause Windows Updates from being downloaded and installed on a Dell computer.
Article Content
Instructions
Affected Operating Systems:
- Windows 10
- Windows 11
In Windows, the customer may decide when and how to get the latest updates to keep their device running smoothly and securely. When updated, Windows gets the latest fixes and security improvements, helping the device run efficiently and stay protected. Usually, restarting your device completes the update. The device should be plugged in when updates are installed. However, Windows Update may be automatically installing updates the customer may not be ready to take and would like to refrain from automatic updates to the computer.
It is best practice to keep automatic updates enabled and running to prevent problems with the computer and to ensure that the latest security updates are applied. Disabling automatic updates could lead to the computer being vulnerable.
Note: If the computer has no drivers or only inbox drivers, Windows Update automatically installs any needed drivers, even if the auto update setting is set to "paused" or "stopped." This exception to auto install drivers when there are none or only inbox drivers, is to ensure that that basic functionality is enabled and to protect the device from potential vulnerabilities.
Windows Home
Windows Home cannot stop updates entirely. They help keep your device safe and secure. Updates eventually must be downloaded and installed, regardless of the computers update settings. Here is how to temporarily pause updates from being downloaded and installed.
Note: That after the pause limit is reached, the latest updates must be installed before Windows can pause updates again.
Select Start > Settings > Windows Update. Next to Pause updates, in the dropdown list, select Pause for 1 week, then click Pause for 1 week.
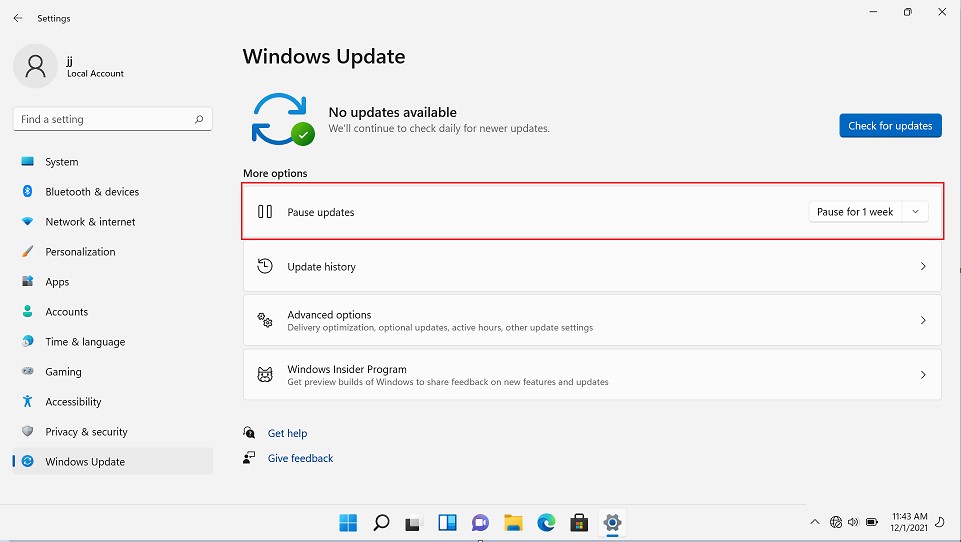
Figure 1: (English Only) Windows Update
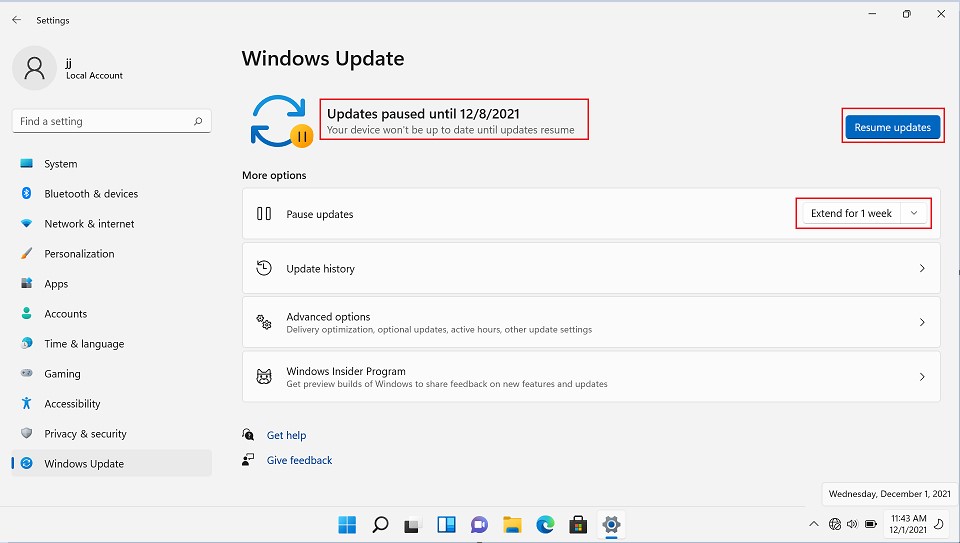
Figure 2: (English Only) Updates paused until 12/8/2021
In the Windows 10 November 2019 Update (version 1909) or later, or in Windows version 1809 for Pro or Enterprise, select Start > Settings > Update & Security > Windows Update. Select Pause updates for 7 days.
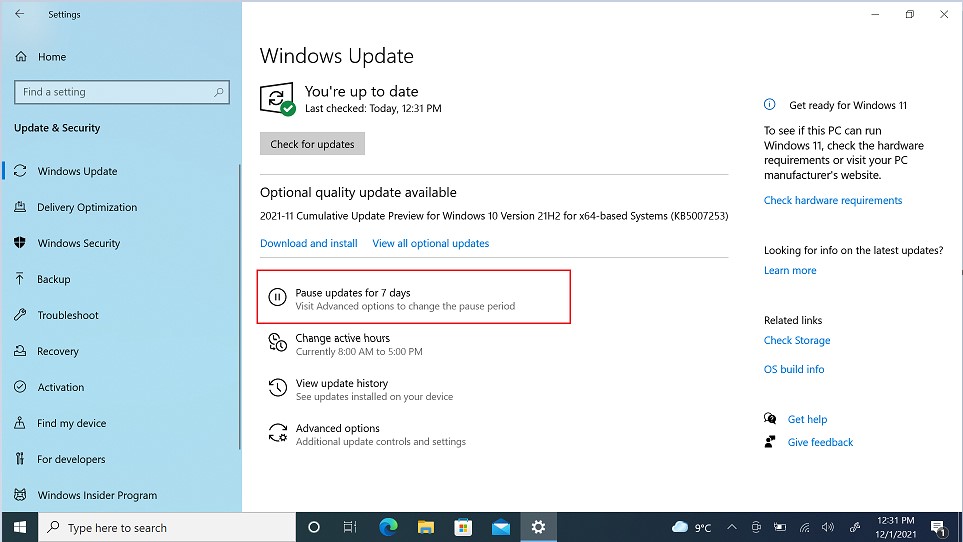
Figure 3: (English Only) Windows Update
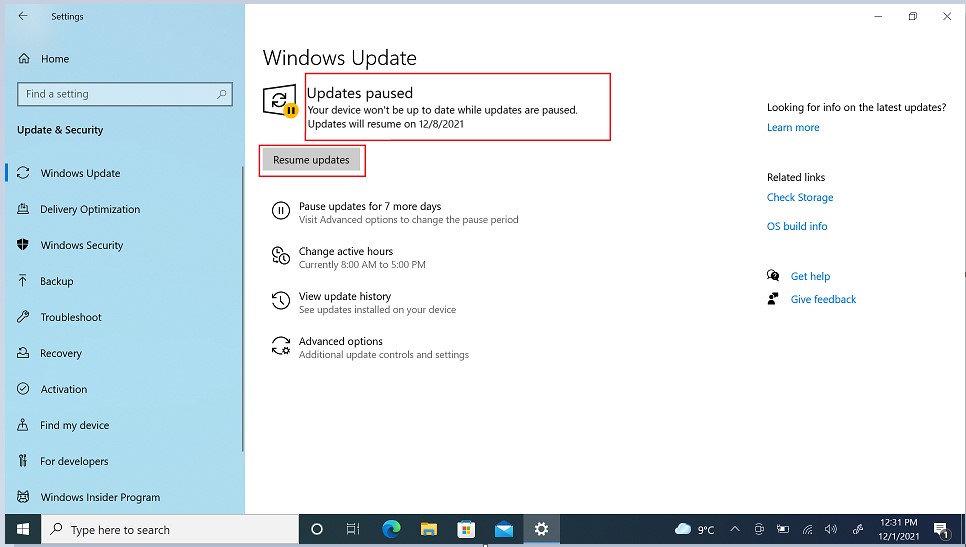
Figure 4: (English Only) Updates paused
Windows Pro
Windows Pro can control Windows Update behavior through group policies. The easiest way to stop getting driver and BIOS updates from Windows Update is using the Local Group Policy Editor with these steps:
- Use the Windows key + R keyboard shortcut to open the Run command.
- Type gpedit.msc and click OK to open the Local Group Policy Editor.
- Browse the following path:
- Computer Configuration > Administrative Templates > Windows Components > Windows Update > Manage updates offered from Windows Update
- On the right side, double-click the Do not include drivers with Windows Update policy.
- Select the Enabled option.
- Click Apply.
- Click OK.
Your computer will continue to receive security and other patches after completing these steps, but drivers will be excluded.

Figure 5: (English Only) Local Group Policy Editor

Figure 6: (English Only) Do not include drives with Windows Updates
- Use the Windows key + R keyboard shortcut to open the Run command.
- Type gpedit.msc and click OK to open the Local Group Policy Editor.
- Browse the following path:
- Computer Configuration > Administrative Templates > Windows Components > Windows Update
- On the right side, double-click the Do not include drivers with Windows Update policy.
- Select the Not Configured option.
- Click Apply.
- Click OK.
Your computer will receive security and other patches including drivers, after completing these steps.
- Use the Windows key + R keyboard shortcut to open the Run command.
- Type gpedit.msc and click OK to open the Local Group Policy Editor.
- Browse the following path:
- Computer Configuration > Administrative Templates > Windows Components > Windows Update
- On the right side, double-click the Do not include drivers with Windows Update policy.
- Select the Enabled option.
- Click Apply.
- Click OK.
Your computer will continue to receive security and other patches after completing these steps, but drivers will be excluded.
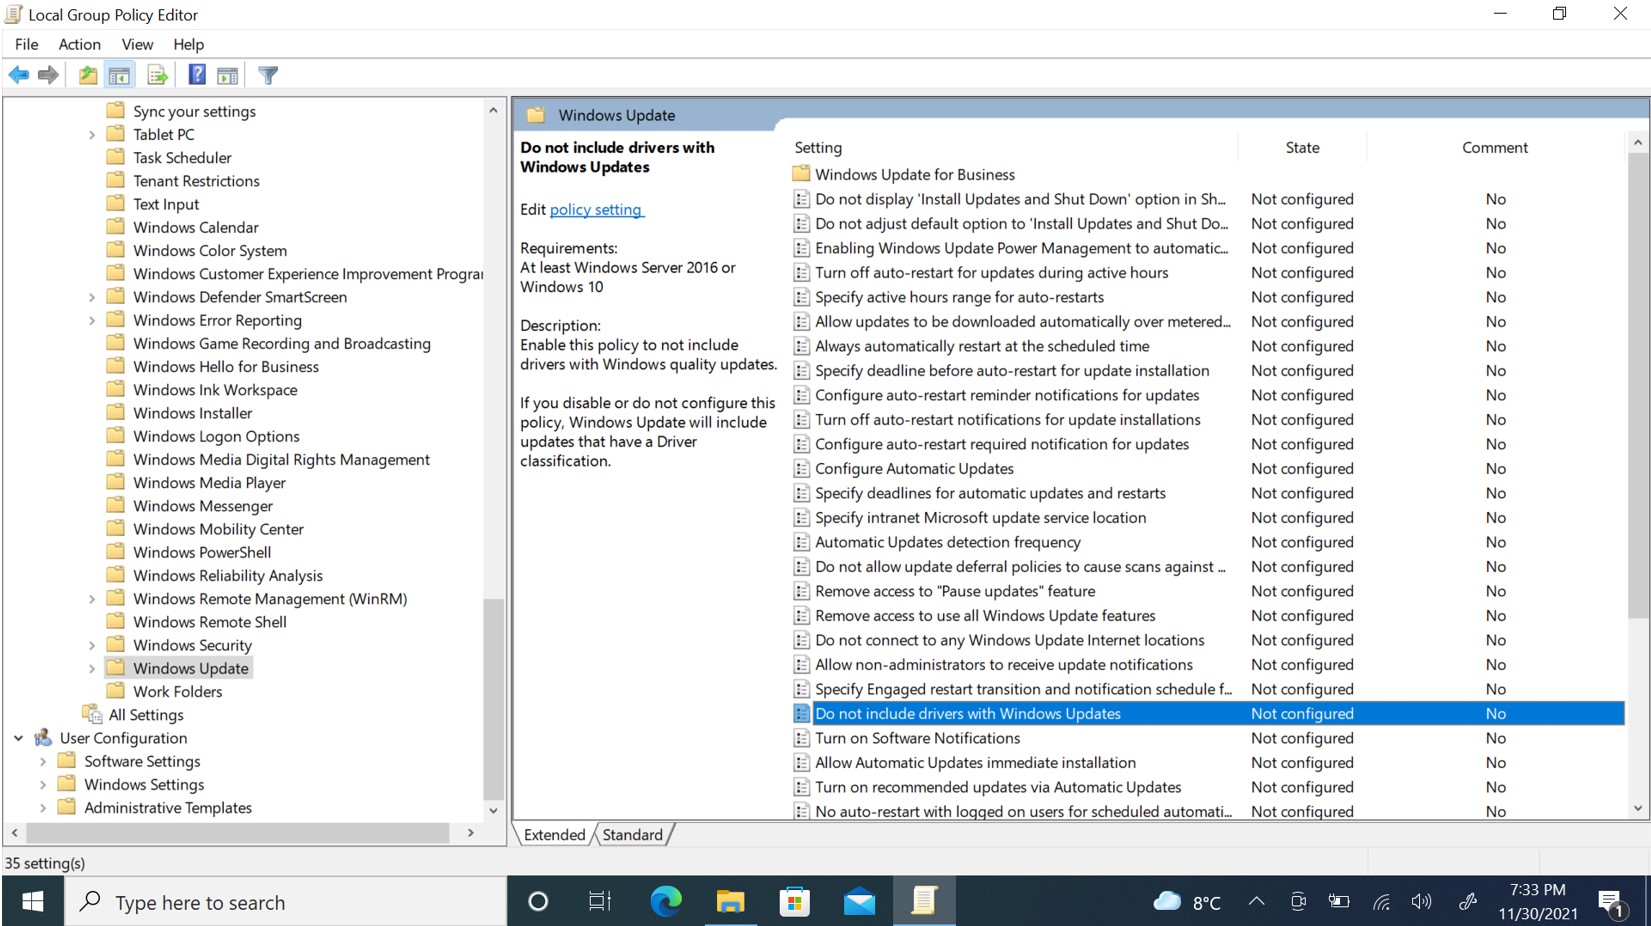
Figure 7: (English Only) Local Group Policy Editor
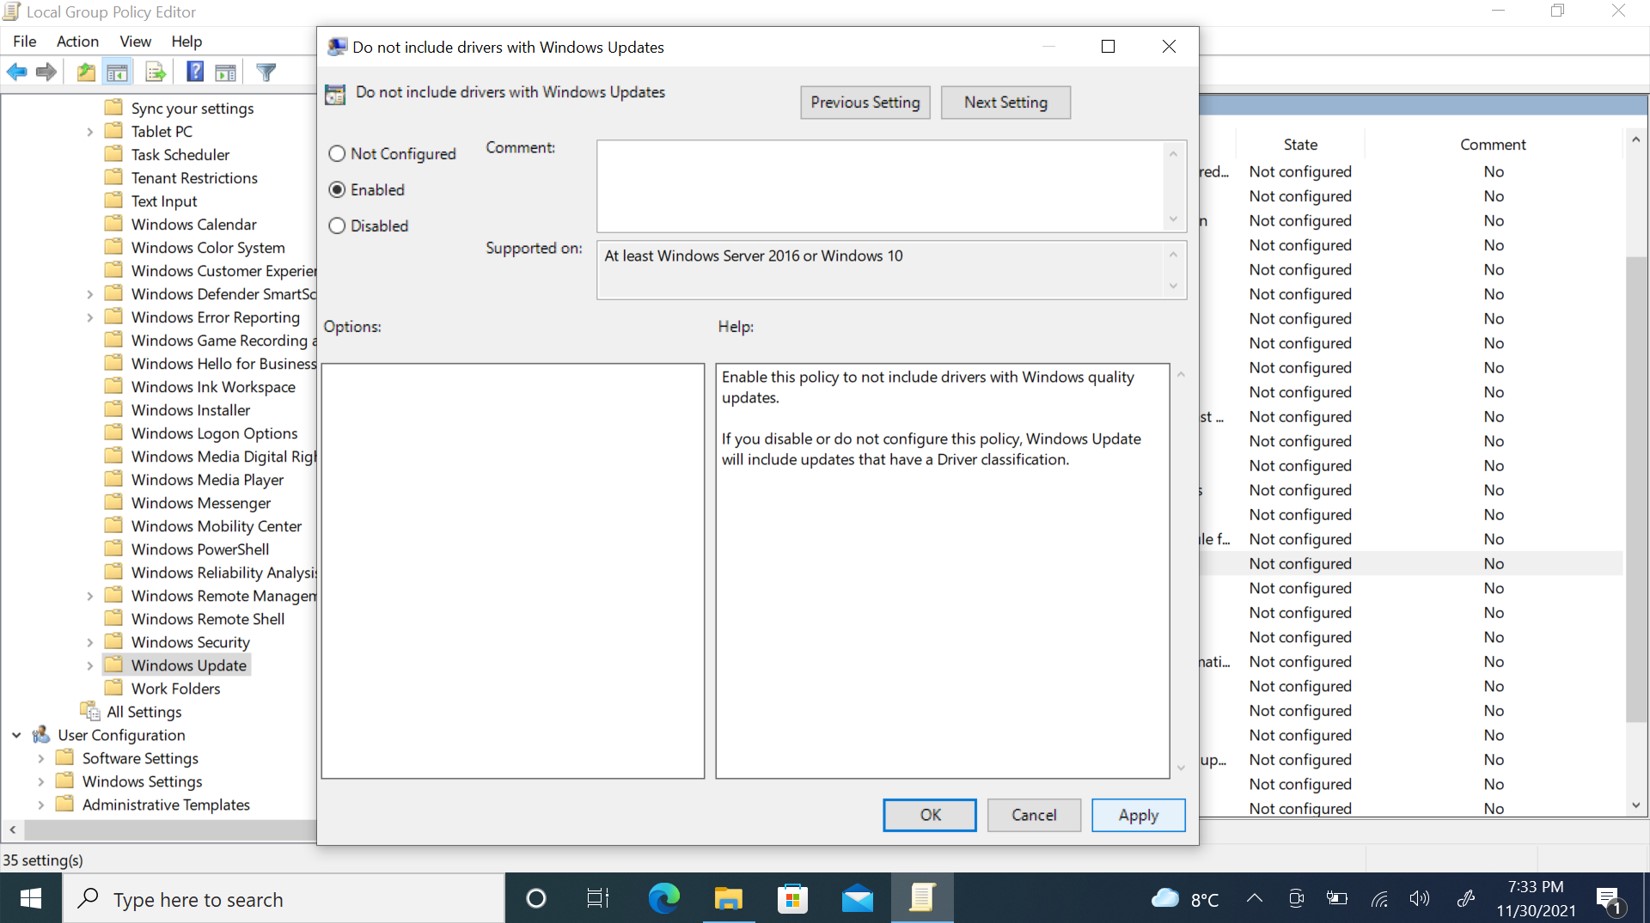
Figure 8: (English Only): Do not include drives with Windows Updates
- Use the Windows key + R keyboard shortcut to open the Run command.
- Type gpedit.msc and click OK to open the Local Group Policy Editor.
- Browse the following path:
- Computer Configuration > Administrative Templates > Windows Components > Windows Update
- On the right side, double-click the Do not include drivers with Windows Update policy.
- Select the Not Configured option.
- Click Apply.
- Click OK.
Your computer will receive security and other patches after completing these steps, including drivers.
- Type Device Manager on the Windows Search Bar and click on the Device Manager application.
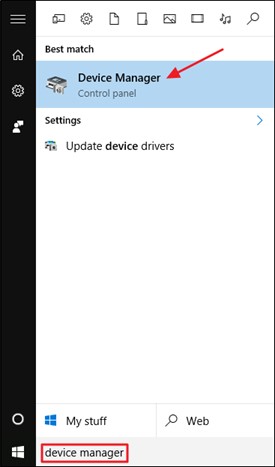
Figure 9: (English Only) Open Device Manager
- Locate the Driver you want to block from updating, right click it and select Properties.
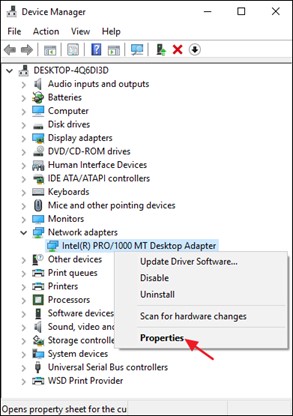
Figure 10: (English Only) Right Click and select properties
- On the Driver’s Properties window click the Details tab
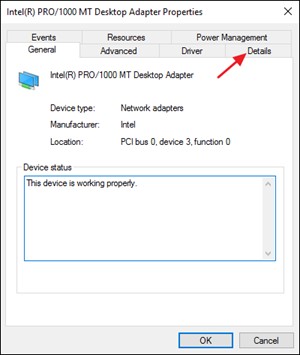
Figure 11: (English Only) Click on the Details tab
- From the Property drop-down menu, select Hardware IDs
- Copy the IDs that show up on the Value field.
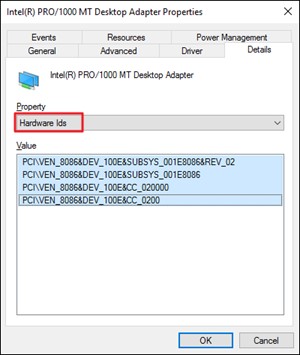
Figure 12: (English Only) Select Hardware IDs from Property drop-down
- Press Windows + R to open the Run command.
- Type gpedit.msc and click OK to open the Local Group Policy Editor
- Go to Computer Configuration > Administrative Templates > System > Device Installation > Device Installation Restrictions
- Click on Prevent Installation of devices that match any of these Device IDs
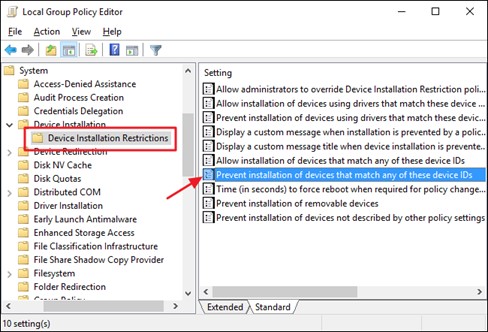
Figure 13: (English Only) Click on Prevent installation of devices that match any of these device IDs
- In the policy window, select the Enabled option and click the Show button.
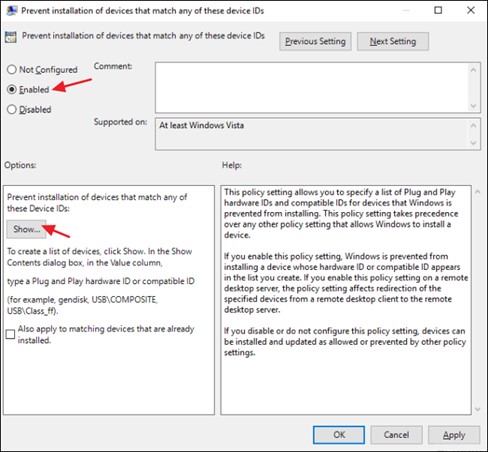
Figure 14: (English Only) Select the Enabled option and click the Show button
- In the Show Contents window, add the Hardware IDs for the device (as copied in step 5) in the Value column.
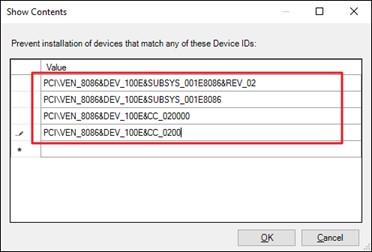
Figure 15: (English Only) Add the Hardware IDs for the device in the Value column
Additional Information
Article Properties
Last Published Date
27 Mar 2024
Version
9
Article Type
How To