NetWorker: How to Import or Replace Certificate Authority Signed Certificates for NMC
Summary: These instructions describe how to replace the default NetWorker self-signed certificate with a CA-signed certificate on a NetWorker Management Console (NMC) server.
Instructions
These instructions describe how to replace the default NetWorker self-signed certificate with a CA-signed certificate for the NetWorker Management Console (NMC). This KB provides instructions for both Windows and Linux NMC servers.
The process for replacing the NetWorker server authentication service (AUTHC) and NetWorker Web User Interface (NWUI) self-signed certificates with CA-signed ones are detailed in the following operating system-specific articles:
- NetWorker: How to Import or Replace Certificate Authority Signed Certificates for "AUTHC" and "NWUI" (Linux)
- NetWorker: How to Import or Replace Certificate Authority Signed Certificates for "AUTHC" and "NWUI" (Windows)
Certificates Involved:
-
<server>.csr: NetWorker Management Console Server certificate signing request -
<server>.key: NetWorker Management Console Server private key -
<server>.crt: NetWorker Management Console Server CA-signed certificate -
<CA>.crt: CA root certificate -
<ICA>.crt: CA intermediate certificate (optional if it is available)
Before you start:
This process uses the OpenSSL utility. This utility is provided by default on Linux operating systems; however, is not included on Windows systems. Consult with the system administrator regarding installing OpenSSL. The required version of OpenSSL differs depending on the NetWorker version installed.
- NetWorker 19.9 through 19.11 require openssl version 1.1.1n
- NetWorker 19.12.0.0 (Linux only) supports openssl version 3.0.14
- NetWorker 19.12.0.2 (Windows only) supports openssl version 3.0.14
The OpenSSL version can be identified following:
# openssl versionWindows:
- From Windows File Explorer, go to the openssl.exe location. This path can differ depending on how OpenSSL was installed.
- Open the openssl.exe file and go to the Details tab. The Product Version field details the OpenSSL version:
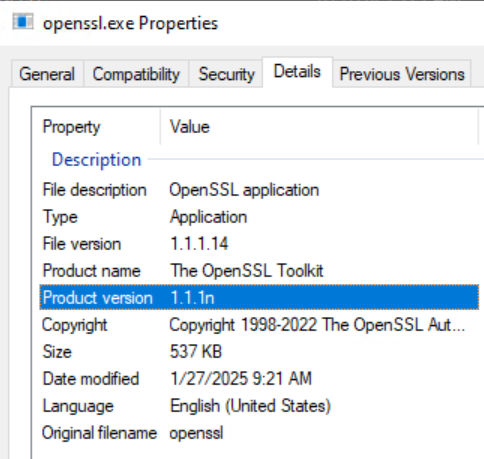
Alternatively if the openssl.exe file path is part of the system PATH variable you can run the `openssl version` command from and Administrative command prompt. If the directory containing openssl.exe is not part of the system PATH, change directory (cd) to the directory containing openssl.exe.
Generate a private key and certificate signing request (CSR) file to provide to your CA.
- On the NMC server, use the OpenSSL command-line utility to create the NetWorker server private key file (
<server>.key) and CSR file (<server>.csr).
Linux:
# openssl req -new -newkey rsa:4096 -nodes -out /tmp/<server>.csr -keyout /tmp/<server>.key
Windows:
set openssl="<Full system path to the openssl.exe file>"
%openssl% req -new -newkey rsa:4096 -nodes -out "C:\tmp\<server>.csr" -keyout "C:\tmp\<server>.key"
- Send the CSR file (
<server>.csr) to the CA to generate the CA-signed certificate file (<server>.crt). The CA should provide the CA-signed certificate file (<server>.crt), the root certificate (<CA>.crt), and any intermediate CA certificates (<ICA>.crt).
Linux NetWorker Management Console (NMC) Servers:
- Get the CA signed certificates in either individual key files or a single file in PFX format.
- If the CA signed certificates are in a single PFX file, the private key and CA signed certificate can be extracted as with OpenSSL tool (Windows may not have OpenSSL installed, it can be installed separately).
.crt and .key files with the full file path, including the file name of your certificate and key files accordingly.
# openssl pkcs12 -in <file>.pfx -out <server>.key -nodes -nocerts
# openssl pkcs12 -in <file>.pfx -out <server>.crt -nokeys
B. Verify the integrity of the server.key and server.crt.
# openssl pkey -in <server>.key -pubout -outform pem | sha256sum
# openssl x509 -in <server>.crt -pubkey -noout -outform pem | sha256sum
C. Convert Private Key, CA signed server certificate, root CA (and any intermediate certificates) to PEM format.
# openssl rsa -in <server>.key -outform pem -out server.key.pem
# openssl x509 -in <server>.crt -outform pem -out server.crt.pem
# openssl x509 -in CA.crt -outform pem -out CA.crt.pem
# openssl x509 -in ICA.crt -outform pem -out ICA.crt.pem
server.key.pem, root CA.crt, Intermediate cert (if applicable), and signed server certificate into the cakey.pem file for NMC:
# cat server.key.pem CA.crt.pem ICA.crt.pem server.crt.pem > cakey.pem
- Shut down the NMC server's
gstservice:
# systemctl stop gst
- Make a copy of the existing
cakey.pemfile, then replace the default file with the file created in step 2, D.
# cp /opt/lgtonmc/etc/cakey.pem /opt/lgtonmc/etc/cakey.pem_orig
# cp cakey.pem /opt/lgtonmc/etc/cakey.pem
- Make a copy of the NMC server's
server.crtandserver.keyfiles, then replace the original files with the signedserver.crtandserver.key:
# cp /opt/lgtonmc/apache/conf/server.crt /opt/lgtonmc/apache/conf/server.crt_orig
# cp <server>.crt  /opt/lgtonmc/apache/conf/server.crt
# cp /opt/lgtonmc/apache/conf/server.key /opt/lgtonmc/apache/conf/server.key_orig
# cp <server>.key /opt/lgtonmc/apache/conf/server.key
nsrnmc) with 600 permissions.
- Start the NMC server's
gstservice:
# systemctl start gst
- Monitor the NMC server's
/opt/lgtonmc/logs/gstd.rawfor any errors.
NetWorker: How to use nsr_render_log to render .raw log file
Verification:
When the NMC server's gst service is running, compare the fingerprint of the CA signed certificate with the certificate finger print of the NMC's gst service port (9000):
# openssl x509 -in <server>.crt -fingerprint -sha256 -noout
# openssl x509 -in <(openssl s_client -connect localhost:9000 -prexit 2>/dev/null </dev/null | sed -n -e '/BEGIN\ CERTIFICATE/,/END\ CERTIFICATE/ p') -fingerprint -sha256 -noout
The SHA256 fingerprint of these two commands should match.
Example:
[root@lnx-srvr01 ~]# openssl x509 -in lnx-srvr01.crt -fingerprint -sha256 -noout
sha256 Fingerprint=33:FF:25:13:A2:C7:59:1C:F0:D6:F3:F7:5D:10:6A:83:7A:2C:4E:20:4B:52:DD:3C:FA:D4:59:1B:6B:44:D6:A2

[root@lnx-srvr01 ~]# openssl x509 -in <(openssl s_client -connect localhost:9000 -prexit 2>/dev/null </dev/null | sed -n -e '/BEGIN\ CERTIFICATE/,/END\ CERTIFICATE/ p') -fingerprint -sha256 -noout
sha256 Fingerprint=33:FF:25:13:A2:C7:59:1C:F0:D6:F3:F7:5D:10:6A:83:7A:2C:4E:20:4B:52:DD:3C:FA:D4:59:1B:6B:44:D6:A2
Windows NetWorker Management Console (NMC) Servers:
- Get the CA signed certificates in either individual key files or a single file in PFX format.
- If the CA signed certificates are in a single PFX file, the private key and CA signed certificate can be extracted as with OpenSSL tool (Windows does not typically have OpenSSL installed, it can be installed separately).
.crt and .key files with the full file path, including the file name of your certificate and key files accordingly.
%openssl% pkcs12 -in <file>.pfx -out <server>.key -nodes -nocerts
%openssl% pkcs12 -in <file>.pfx -out <server>.crt -nokeys
B. Verify the integrity of the server.key and server.crt.
%openssl% pkey -in <server>.key -pubout -outform pem | %openssl% dgst -sha256
%openssl% x509 -in <server>.crt -pubkey -noout -outform pem | %openssl% dgst -sha256
C. Convert Private Key, CA signed server certificate, root CA (and any intermediate certificates) to PEM format.
%openssl% rsa -in <server>.key -outform pem -out C:\tmp\server.key.pem
%openssl% x509 -in <server>.crt -outform pem -out C:\tmp\server.crt.pem
server.key.pem and sever.crt.pem into the cakey.pem file for NMC. It is recommended to use the following PowerShell command for this:
PS C:\tmp> Get-Content server.key.pem,server.crt.pem | Out-File cakey.pem -Encoding ascii
-Encoding ascii is not set, the following issue may be observed: NetWorker: Windows NMC server fails to start GSTD service after replacing certificates
- Shut down the NMC server's
gstservice:
net stop gstd
- Make a copy of the original
cakey.pem, then place the combined CA signedcakey.pemin its place:
copy "C:\Program Files\EMC NetWorker\Management\GST\etc\cakey.pem" "C:\Program Files\EMC NetWorker\Management\GST\etc\cakey.pem_orig"
copy C:\tmp\cakey.pem "C:\Program Files\EMC NetWorker\Management\GST\etc\cakey.pem"
- Make a copy of the NMC server's
server.crtandserver.keyfiles, then replace the original files with the signedserver.crtandserver.key:
copy "C:\Program Files\EMC NetWorker\Management\GST\apache\conf\server.crt" "C:\Program Files\EMC NetWorker\Management\GST\apache\conf\server.crt_orig"
copy "C:\Program Files\EMC NetWorker\Management\GST\apache\conf\server.key" "C:\Program Files\EMC NetWorker\Management\GST\apache\conf\server.key_orig"
copy <server>.crt "C:\Program Files\EMC NetWorker\Management\GST\apache\conf\server.crt"
copy <server>.key "C:\Program Files\EMC NetWorker\Management\GST\apache\conf\server.key"
- Start the NMC server's
gstservice:
net start gstd
- Monitor the NMC server's
C:\Program Files\EMC NetWorker\Management\GST\logs\gstd.rawfor any errors.
NetWorker: How to use nsr_render_log to render .raw log file
Verification:
When the NMC server's gst service is running, compare the fingerprint of the CA signed certificate with the certificate finger print of the NMC's gst service port (9000):
%openssl% x509 -in <server>.crt -fingerprint -sha256 -noout
%openssl% s_client -connect localhost:9000 -showcerts 2>nul | %openssl% x509 -noout -fingerprint -sha256
The SHA256 fingerprint of these two commands should match.
Example:
C:\tmp>%openssl% x509 -in win-srvr02.crt -fingerprint -sha256 -noout
SHA256 Fingerprint=B9:4A:1E:64:AA:1A:38:88:7B:D3:72:70:A2:32:D5:9A:D1:33:50:93:00:35:D6:9B:8D:AE:59:92:B1:66:46:DE

C:\tmp>%openssl% s_client -connect localhost:9000 -showcerts 2>nul | %openssl% x509 -noout -fingerprint -sha256
SHA256 Fingerprint=B9:4A:1E:64:AA:1A:38:88:7B:D3:72:70:A2:32:D5:9A:D1:33:50:93:00:35:D6:9B:8D:AE:59:92:B1:66:46:DE
Additional Information
Even after the NMC's self-signed certificate has been replaced with a CA signed certificate, you may see the following warning during connection to an NMC server from the NMC launcher:
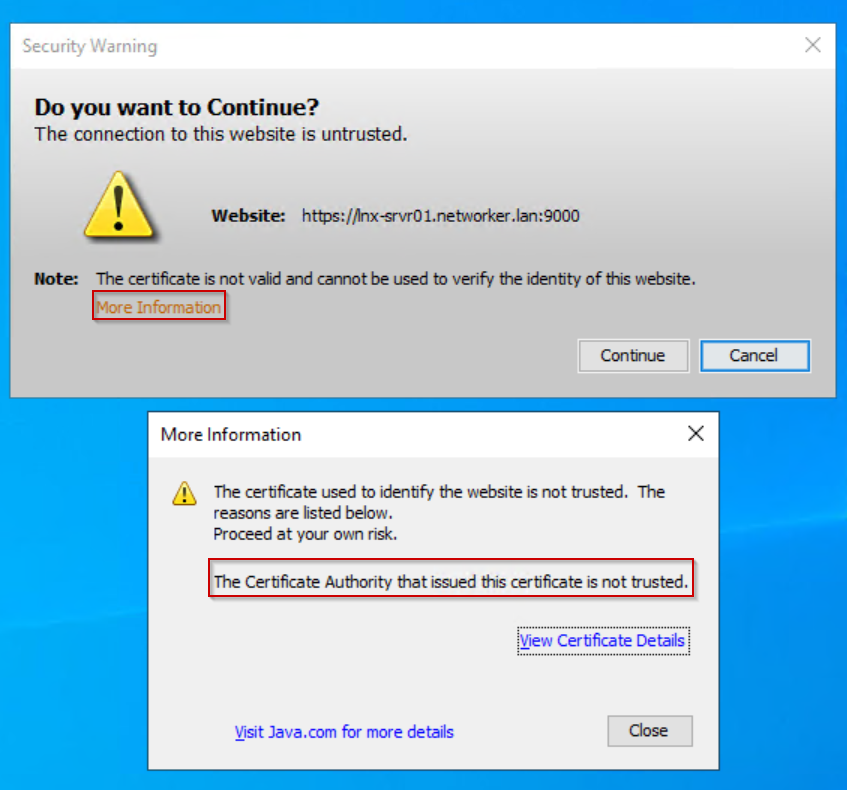
Click "View Certificate Details." The certificate details validate that the CA signed certificate is used.
The warning is appearing because the signed certificate is missing from the NMC client's Trusted Root Certificates.
This warning can be ignored; optionally, the NMC server's CA signed certificate can also import into the NMC client's Trusted Root Certificates:
- Put the NMC server's CA signed certificate (
<server>.crt) on the NMC client host in a folder of your choosing. - Open the CA signed certificate properties.
- Click Install Certificate.
- Select Local Machine.
- Select Place all certificates in the following store.
- Click Browse.
- Select Trusted Root Certification Authorities, then click OK.
- Click Next.
- Click Finish.
- A message appears stating if the import failed or was successful, click OK.
- On the CA signed certificate properties, click OK.
During the next NMC launch, the Security Warning does not appear.