Setting Up for Shared Printing on Windows Operating Systems
Summary: Setting up shared printing in Windows for your Dell printer.
This article applies to
This article does not apply to
This article is not tied to any specific product.
Not all product versions are identified in this article.
Symptoms
Table of Contents:
This article provides information on "Setting Up for Shared Printing on Windows Operating Systems"
1. Specifying the Shared Settings of the Printer
You can share your new printer on the network using the Software and Documentation disc that comes with your printer, or using Microsoft point-and-print or peer-to-peer method. However, if you use one of the Microsoft methods, some features, such as the status monitor and other printer utilities, installed with the Software and Documentation disc, may not be available.
If you want to use the printer on a network, share the printer and install its drivers on all the computers on the network.
Windows 7, Windows 7 64-bit Edition, or Windows Server 2008 R2:
- Click Start→ Devices and Printers.
- Right-click the printer icon and select Printer properties.
- On the Sharing tab, click Change Sharing Options if exists.
Select the Share this printer check box, and then type a name in the Share name text box.
- Click Additional Drivers and select the operating systems of all network clients that print to the printer.
- Click Apply, and then click OK.
Windows 8, Windows 8 64-bit Edition, or Windows Server 2012:
- Under Desktop mode, right-click the bottom left corner of the screen, and then click Control Panel → Hardware and Sound (Hardware for Windows Server 2012) → Devices and Printers.
- Right-click the printer icon and select Printer properties.
- On the Sharing tab, click Change Sharing Options if exists.
- Select the Share this printer check box, and then type a name in the Share name text box.
- Click Additional Drivers and select the operating systems of all network clients using this printer.
- Click Apply, and then click OK.
To confirm that the printer is properly shared:
- Ensure that the printer object in the Printers, Printers and Faxes, or Devices and Printers folder is shared. The shared icon is shown under the printer icon.
- Browse Network or My Network Places. Find the host name of the server and the shared name you assigned to the printer.
Now that the printer is shared, you can install the printer on network clients using the point and print method or the peer-to-peer method.
Note: If the OS bit editions (32/64 bit edition) differ between a print server and a client computer, you need to manually add the printer driver for the client computer edition on the server. Otherwise, the printer driver cannot be installed on the client computer using the point and print or peer-to-peer method. For example, if the print server runs on Windows XP 32-bit edition, while the client computer runs on Windows 7 64-bit edition, follow the procedures below to additionally install the printer driver for 64-bit client on the 32-bit server.
- Click Additional Drivers on the screen for sharing printers.
- Select the x64 check box, and then click OK.
- Click Browse to specify the folder that contains the 64-bit OS driver, and then click OK.
Installation starts.
Windows XP, Windows XP 64-bit Edition, Windows Server 2003, or Windows Server 2003 x64 Edition:
- Click start→ Printers and Faxes.
- Right-click the printer icon and select Properties.
- On the Sharing tab, select the Share this printer check box, and then type a name in the Share name text box.
- Click Additional Drivers and select the operating systems of all network clients that print to the printer.
- Click OK.
If you are missing files, you are prompted to insert the server operating system CD.
If these steps do not correct the problem, please contact Dell Technical Support.
Back to Top2. Point and Print
Windows 7, Windows 7 64-bit Edition, or Windows Server 2008 R2:
- On the Windows desktop of the client computer, click Start→ your user name→ Network (Start→ Network for Windows Server 2008 R2).
- Locate the host name of the server computer, and then double-click the host name.
- Right-click the shared printer name, and then click Connect.
- Click Install driver.
- Wait for the driver information to be copied from the server computer to the client computer, and for a new printer object to be added to the Devices and Printers folder. The time this takes varies, based on network traffic and other factors.
- Print a test page to verify installation.
- Click Start→ Devices and Printers.
- Right-click the printer you just created and select Printer properties.
- On the General tab, click Print Test Page.
When a test page prints successfully, installation is complete.
Windows 8, Windows 8 64-bit Edition, or Windows Server 2012:
- Point to the top or bottom right corner of the screen, and then click Search → Type Network in the search box, click Apps, and then click Network.
- Locate the host name of the server computer, and then double-click the host name.
- Right-click the shared printer name, and then click Connect.
- Click Install driver.
- Wait for the driver information to be copied from the server computer to the client computer, and for a new printer object to be added to the Devices and Printers folder. The time this takes varies, based on network traffic and other factors.
- Print a test page to verify installation.
- Under Desktop mode, right-click the bottom left corner of the screen, and then click Control Panel →Hardware and Sound (Hardware for Windows Server 2012) → Devices and Printers.
- Right-click the printer you just created and select Printer properties.
- On the General tab, click Print Test Page.
When a test page is printed successfully, installation is complete.
Windows XP, Windows XP 64-bit Edition, Windows Server 2003, or Windows Server 2003 x64 Edition:

Wait for the driver information to be copied from the server computer to the client computer, and for a new printer object to be added to the Printers and Faxes folder. The copy time varies, based on network traffic and other factors.
- Close My Network Places.
- Print a test page to verify installation.
- Click start→ Printers and Faxes.
- Select the printer you just created.
- Click File→ Properties.
- On the General tab, click Print Test Page.
When a test page prints successfully, installation is complete.
If these steps do not correct the problem, please contact Dell Technical Support.
Back to Top3. Peer-to-Peer
If you use the peer-to-peer method, the printer driver is fully installed on each client computer. Network clients retain control of driver modifications. The client computer handles the print job processing.
Windows 7, Windows 7 64-bit Edition, or Windows Server 2008 R2:
- Click Start → Devices and Printers.
- Click Add a Printer.
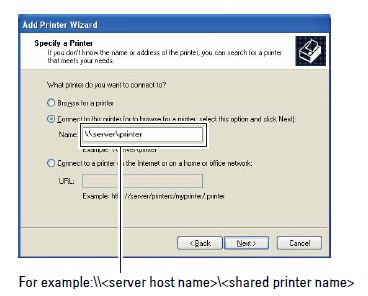
- Select Add a network, wireless or Bluetooth printer. If the printer is listed, select the printer and click Next, or select The printer that I want isn't listed. Click Select a shared printer by name and type in the path of the printer in the text box, and then click Next.
For example: \\<server host name>\<shared printer name>
The server host name is the name of the server computer that identifies it to the network. The shared printer name is the name assigned during the server installation process.
If this is a new printer, you may be prompted to install a printer driver. If no system driver is available, then you will need to provide the path to the available driver. - Confirm the printer name, and then click Next.
- Select Yes if you want this printer to be set as the default printer, and then click Next.
- Click Print a test page if you want to verify installation.
- Click Finish.
When a test page prints successfully, installation is complete.
Windows 8, Windows 8 64-bit Edition, or Windows Server 2012:
- Under Desktop mode, right-click the bottom left corner of the screen, and then click Control Panel → Hardware and Sound (Hardware for Windows Server 2012) → Devices and Printers.
- Click Add a Printer to launch the Add Printer wizard.
- If the printer is listed, select the printer and click Next, or select The printer that I want isn't listed. Click Select a shared printer by name and type in the path of the printer in the text box, and then click Next.
For example: \\<server host name>\<shared printer name>
The server host name is the name of the server computer that identifies it to the network. The shared printer name is the name assigned during the server installation process. If this is a new printer, you may be prompted to install a printer driver. If no system driver is available, then you will need to provide the path to the available driver. - Confirm the printer name, and then click Next.
- Select Yes if you want this printer to be set as the default printer, and then click Next.
- Click Print a test page if you want to verify installation.
- Click Finish.
When a test page is printed successfully, installation is complete.
Windows XP, Windows XP 64-bit Edition, Windows Server 2003, or Windows Server 2003 x64 Edition:
- Click start→ Printers and Faxes.
- Click Add a Printer.
- Click Next.
- Select A network printer, or a printer attached to another computer, and then click Next. If the printer is not listed, type the path to the printer in the text box.
The server host name is the name of the server computer that identifies it on the network. The shared printer name is the name assigned during the server installation process.
- Click Browse for a printer, and then click Next.
If this is a new printer, you may be prompted to install a printer driver. If no system driver is available, you need to specify the path to available drivers. - Select Yes if you want this printer to be set as the default printer, and then click Next.
If you want to verify installation, click Yes to print a test page. - Click Finish.
When a test page prints successfully, installation is complete.
If these steps do not correct the problem, please contact Dell Technical Support.
Back to TopCause
N/A
Resolution
N/A
Article Properties
Article Number: 000135671
Article Type: Solution
Last Modified: 07 Jun 2024
Version: 4
Find answers to your questions from other Dell users
Support Services
Check if your device is covered by Support Services.