VMware vSAN: How to replace a cache disk using vSphere Web Client
Summary: This article explains how to replace a cache disk in a vSAN configuration.
This article applies to
This article does not apply to
This article is not tied to any specific product.
Not all product versions are identified in this article.
Instructions
Note: This article applies to vSAN Original Storage Architecture (OSA) disk groups on vSphere/ESXi 8.x and vSphere/ESX 9.x. In a hybrid vSAN OSA environment where SSDs and hard disk drives are mixed, the SSD used as cache memory is called a cache disk, and the hard disk drive used as data space is called a capacity disk. In an all-flash OSA configuration, the cache tier SSD still serves as a write buffer and is managed the same way.
Caution: vSAN Express Storage Architecture (ESA), available in vSAN 8.0 and later, does not use the traditional cache and capacity disk group model. ESA uses a single-tier storage pool managed with
esxcli vsan storagepool commands. This article does not apply to vSAN ESA environments. Refer to Broadcom vSAN ESA documentation for ESA disk replacement procedures.
Caution: When Deduplication and Compression is enabled on the vSAN cluster, the entire disk group must be removed from vSAN before replacing the failed disk. Failure to remove the disk group first may result in data loss or unexpected behavior.
How to Replace a Cache Disk (vSAN 8.x and 9.x OSA)
If a problem occurs on a cache disk, it affects the entire disk group. The disk group must be removed and re-created with the replacement cache disk.
Note: Depending on the vSAN version, the disk group icon may not appear in the vSphere Client even if the problem occurred on a cache disk. In this case, see Additional Information: Unable to Remove Disk Group below for CLI-based removal.
Replacement Steps
-
In the vSphere Client, navigate to the affected host and place it in maintenance mode. Select the appropriate data evacuation mode for your environment:
- Full data migration — Migrates all data off the host. This is the safest option but requires sufficient cluster capacity and takes the longest time.
- Ensure data accessibility — Ensures at least one copy of the data remains accessible. Faster than full migration but may temporarily reduce redundancy.
- No data migration — Enters maintenance mode immediately without migrating data. Use only for brief maintenance windows when data redundancy is already sufficient across other hosts.
For detailed guidance on maintenance mode options, refer to the Broadcom vSAN documentation for your version: Configure > vSAN > Disk Management on the host object in vCenter.
-
Navigate to the affected host in the vSphere Client: Configure > vSAN > Disk Management. Select the disk group containing the failed cache disk and click Remove (the remove icon in the toolbar). Removing the cache disk removes the entire disk group.
-
Replace the failed cache disk physically.
-
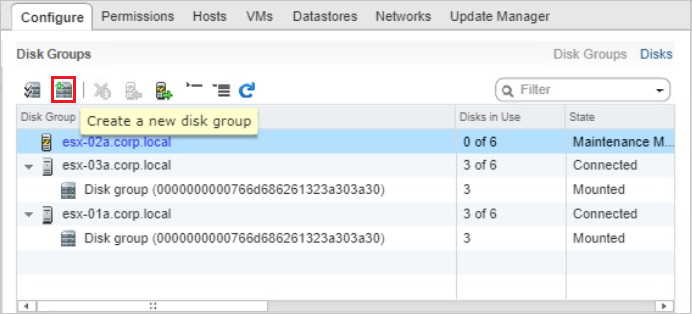
After the physical replacement, return to Configure > vSAN > Disk Management in the vSphere Client and click the Create a new disk group icon in the toolbar.
-
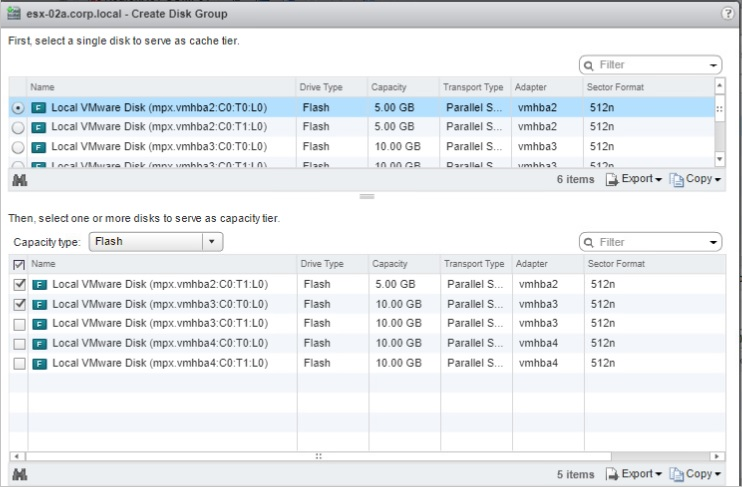
In the Create Disk Group dialog, select the replacement cache disk from the upper (cache tier) list, select the capacity disks from the lower (capacity tier) list, and click OK.
-
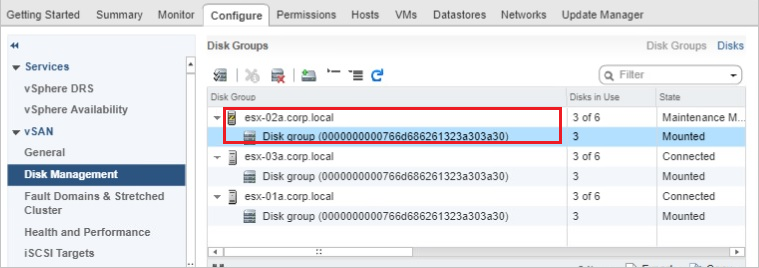
Once the newly created disk group is displayed in Disk Management, exit maintenance mode on the host.
-
Confirm that the capacity of the re-created disk group is added to the total capacity of the vSAN datastore.
-
Since health alerts may remain even after the problem is resolved, navigate to Monitor > vSAN > Health and click Acknowledge or Reset to Green to clear the alerts manually.

Additional Information: Unable to Remove Disk Group
The disk group icon may not appear in the vSphere Client, or removal of the disk group may fail through the GUI. In that case, use the CLI to remove the disk group or individual capacity disks before replacing the cache disk.
Method 1: Remove the Disk Group by UUID (Recommended)
This is the preferred method in vSAN 6.6 and later, including vSAN 8.x and 9.x.
-
Connect to the affected host using SSH.
-
Identify the disk group UUID by running:
esxcli vsan storage list
Locate the vSAN Disk Group UUID for the disk group that contains the failed cache disk.
-
Remove the entire disk group by UUID:
esxcli vsan storage remove -u <VSAN Disk Group UUID>
Example:
esxcli vsan storage remove -u 52a038e0-b564-e579-a498-4ceb5aa9e372
-
Replace the cache disk physically and create a new disk group using the vSphere Client as described in the replacement steps above.
Method 2: Remove Capacity Disks Individually
If the UUID-based method is unavailable or fails, remove each capacity disk individually.
-
Connect to the affected host using SSH.
-
Identify the capacity disk device names by running one of the following commands:
esxcli vsan storage list
or
vdq -q -H
Note the capacity disk identifiers in the format
mpx.vmhbax:Cx:Tx:Lx. -
Remove each capacity disk individually:
esxcli vsan storage remove --evacuation-mode=noAction --disk=mpx.vmhbax:Cx:Tx:Lx
Example:
esxcli vsan storage remove --evacuation-mode=noAction --disk=mpx.vmhba1:C0:T4:L0
-
Replace the cache disk physically and create a new disk group using the vSphere Client. The replaced cache disk and the existing capacity disks that were removed are now available for selection.
Additional Resources
-
How to Replace a vSAN Capacity Disk — For replacing a vSAN capacity disk instead of a cache disk.
-
VxRail: How to Manually Remove and Re-create a vSAN Disk Group Using esxcli — For VxRail-specific vSAN disk group procedures.
-
Requirements When Replacing Disks in a vSAN Cluster (VMware KB 67856)
— Covers Deduplication and Compression requirements for disk replacement.
-
Managing and Configuring a vSAN Disk Group Using esxcli Commands (Broadcom KB 315532)
-
Replace a Flash Caching Device in vSAN Cluster (Broadcom TechDocs, vSAN 8.0)
Affected Products
OEMR R230, OEMR R240, OEMR R250, OEMR XE R250, OEMR R260, OEMR XE R260, OEMR R330, OEMR R340, OEMR R350, OEMR XE R350, OEMR R360, OEMR XE R360, OEMR R430, OEMR R440, PowerEdge XR2, OEMR R450, OEMR R530, OEMR R540, OEMR R550, OEMR R5500, OEMR R630
, OEMR R640, OEMR XL R640, OEMR R6415, OEMR R650, OEMR R650xs, OEMR R6515, OEMR R6525, OEMR R660, OEMR XL R660, OEMR R660xs, OEMR R6615, OEMR R6625, OEMR R730, OEMR R730xd, OEMR R740, OEMR XL R740, OEMR R740xd, OEMR XL R740xd, OEMR R740xd2, OEMR R7415, OEMR R7425, OEMR R750, OEMR R750xa, OEMR R750xs, OEMR R7515, OEMR R7525, OEMR R760, OEMR R760xa, OEMR R760XD2, OEMR XL R760, OEMR R760xs, OEMR R7615, OEMR R7625, OEMR R830, OEMR R840, OEMR R860, OEMR R930, OEMR R940, OEMR R940xa, OEMR R960, OEMR T130, OEMR T140, OEMR T150, OEMR T330, OEMR T340, OEMR T350, OEMR T360, OEMR T430, OEMR T440, OEMR T550, OEMR T560, OEMR T630, OEMR T640, OEMR XL T640, OEMR XL R230, OEMR XL R240, OEMR XL R330, OEMR XL R340, OEMR XL R630, OEMR XL R660xs, OEMR XL R6615, OEMR XL R6625, OEMR XL R6715, OEMR XL R6725, OEMR XL R730, OEMR XL R730XD, OEMR XL R760xs, OEMR XL R7615, OEMR XL R7625, OEMR XL R7715, OEMR XL R7725, OEMR XR11, OEMR XR12, OEMR XR4510c, OEMR XR4520c, OEMR XR5610, OEMR XR7620, OEMR XR8610t, OEMR XR8620t, PowerEdge C4130, Poweredge C4140, PowerEdge c6320, PowerEdge c6320p, PowerEdge C6420, PowerEdge C6520, PowerEdge C6525, PowerEdge C6615, PowerEdge C6620, Poweredge FC430, Poweredge FC630, PowerEdge FC640, Poweredge FC830, PowerEdge HS5610, PowerEdge HS5620, PowerEdge M630, PowerEdge M630 (for PE VRTX), PowerEdge M640, PowerEdge M640 (for PE VRTX), PowerEdge M830, PowerEdge M830 (for PE VRTX), PowerEdge MX740C, PowerEdge MX750c, PowerEdge MX760c, PowerEdge MX840C, PowerEdge R230, PowerEdge R240, PowerEdge R250, PowerEdge R260, PowerEdge R330, PowerEdge R340, PowerEdge R350, PowerEdge R360, PowerEdge R430, PowerEdge R440, PowerEdge R450, PowerEdge R470, PowerEdge R530, PowerEdge R530xd, PowerEdge R540, PowerEdge R550, PowerEdge R630, PowerEdge R640, PowerEdge R6415, PowerEdge R650, PowerEdge R650xs, PowerEdge R6515, PowerEdge R6525, PowerEdge R660, PowerEdge R660xs, PowerEdge R6615, PowerEdge R6625, PowerEdge R670, PowerEdge R730, PowerEdge R730xd, PowerEdge R740, PowerEdge R740XD, PowerEdge R740XD2, PowerEdge R7415, PowerEdge R7425, PowerEdge R750, PowerEdge R750XA, PowerEdge R750xs, PowerEdge R7515, PowerEdge R7525, PowerEdge R760, PowerEdge R760XA, PowerEdge R760xd2, PowerEdge R760xs, PowerEdge R7615, PowerEdge R7625, PowerEdge R770, PowerEdge R7715, PowerEdge R7725, PowerEdge R830, PowerEdge R840, PowerEdge R860, PowerEdge R930, PowerEdge R940, PowerEdge R940xa, PowerEdge R960, PowerEdge T130, PowerEdge T140, PowerEdge T150, PowerEdge T160, PowerEdge T30, PowerEdge T330, PowerEdge T340, PowerEdge T350, PowerEdge T360, PowerEdge T40, PowerEdge T430, PowerEdge T440, PowerEdge T550, PowerEdge T560, PowerEdge T630, PowerEdge T640, POWEREDGE VRTX, PowerEdge XR11, PowerEdge XR12, PowerEdge XR4510c, PowerEdge XR4520c, PowerEdge XR5610, PowerEdge XR7620, PowerEdge XR8610t, PowerEdge XR8620t, VMware ESXi 7.x, VMware ESXi 8.x, VMware ESXi 9.x, VMware VSAN, Dell EMC vSAN C6420 Ready Node, Dell EMC vSAN MX740c Ready Node, Dell EMC vSAN MX750c Ready Node, Dell vSAN Ready Node MX760c, Dell EMC vSAN R440 Ready Node, Dell EMC vSAN R640 Ready Node, Dell EMC vSAN R6415 Ready Node, Dell EMC vSAN R650 Ready Node, Dell EMC vSAN R6515 Ready Node, vSAN Ready Node R660, Dell vSAN R6615 Ready Node, Dell vSAN R670 Ready Node, Dell vSAN R6715 Ready Node, Dell EMC vSAN R740 Ready Node, Dell EMC vSAN R740xd Ready Node, Dell EMC vSAN R750 Ready Node, Dell EMC vSAN R7515 Ready Node, Dell EMC vSAN R760 Ready Node, Dell vSAN R7615 Ready Node, Dell vSAN Ready Node R7625, Dell vSAN R770 Ready Node, Dell vSAN R7715 Ready Node, Dell vSAN R7725 Ready Node, Dell EMC vSAN R840 Ready Node, Dell EMC vSAN T350 Ready Node
...
Article Properties
Article Number: 000120252
Article Type: How To
Last Modified: 14 أغسطس 2026
Version: 11
Find answers to your questions from other Dell users
Support Services
Check if your device is covered by Support Services.