XtremIO X2: How to Suspend/Resume Native Replication sessions on an X2 array
Zusammenfassung: Instruction on how to Suspend and or Resume a Native Replication Session on an X2 array as noted in the XtremIO User guide under Managing Remote Protection Session.
Dieser Artikel gilt für
Dieser Artikel gilt nicht für
Dieser Artikel ist nicht an ein bestimmtes Produkt gebunden.
In diesem Artikel werden nicht alle Produktversionen aufgeführt.
Weisungen
To Suspend a Native Replication session:
1. From the Data Protection menu, select the Sessions option to open the Sessions window.
2. Click Remote to display the list of defined Remote Protections Sessions.
3. Click to select the session.
Note: Verify that the selected session’s status is Active
4. Click Manage > Suspend
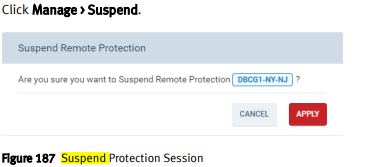
5. Click Apply
To Suspend a session from a selected Sessions Context:
1. From the Data Protection menu, select the Sessions option to open the Sessions window
2. Click Remote to display the list of defined Remote Protection Sessions.
3. Double-click a session to open the Session’s Details window.
Note: Verify that the displayed status is Active.
4. Click Manage > Suspend.
5. Click Apply
Resuming a Remote Protection Session:
Note: You can resume a suspended session.
You can resume a session from the Sessions window context or from a selected session context.
1. From the Data Protection menu, select the Sessions option to open the Sessions window
2. Click Remote to display the list of defined Remote Protection Sessions.
3. Click to select a session.
Note: Verify that the selected session’s status is Suspended.
4. Click Manage > Resume
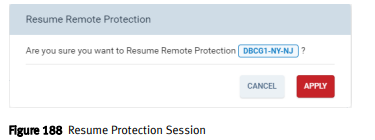
5. Click Apply
To resume a session from a selected Sessions context:
1. From the Data Protection menu, select the Sessions option to open the Sessions window
2. Click Remote to display the list of defined Remote Protection Sessions.
3. Double-click a session to open the Session’s Details window.
Note: Verify that the displayed status is Suspended.
4. Click Manage > Resume.
5. Click Apply.
1. From the Data Protection menu, select the Sessions option to open the Sessions window.
2. Click Remote to display the list of defined Remote Protections Sessions.
3. Click to select the session.
Note: Verify that the selected session’s status is Active
4. Click Manage > Suspend
5. Click Apply
To Suspend a session from a selected Sessions Context:
1. From the Data Protection menu, select the Sessions option to open the Sessions window
2. Click Remote to display the list of defined Remote Protection Sessions.
3. Double-click a session to open the Session’s Details window.
Note: Verify that the displayed status is Active.
4. Click Manage > Suspend.
5. Click Apply
Resuming a Remote Protection Session:
Note: You can resume a suspended session.
You can resume a session from the Sessions window context or from a selected session context.
1. From the Data Protection menu, select the Sessions option to open the Sessions window
2. Click Remote to display the list of defined Remote Protection Sessions.
3. Click to select a session.
Note: Verify that the selected session’s status is Suspended.
4. Click Manage > Resume
5. Click Apply
To resume a session from a selected Sessions context:
1. From the Data Protection menu, select the Sessions option to open the Sessions window
2. Click Remote to display the list of defined Remote Protection Sessions.
3. Double-click a session to open the Session’s Details window.
Note: Verify that the displayed status is Suspended.
4. Click Manage > Resume.
5. Click Apply.
Weitere Informationen
For these instructions and more related to Native Replication, please see the Dell EMC XtremIO Storage Array User Guide "Managing Local Data Protection"
Betroffene Produkte
XtremIO HW X2-R, XtremIO HW X2-S, XtremIO HW X2-T, XtremIO X2Artikeleigenschaften
Artikelnummer: 000204396
Artikeltyp: How To
Zuletzt geändert: 15 Mai 2026
Version: 5
Antworten auf Ihre Fragen erhalten Sie von anderen Dell NutzerInnen
Support Services
Prüfen Sie, ob Ihr Gerät durch Support Services abgedeckt ist.