Windows Server: Configuring Microsoft Cluster Sets on Dell PowerEdge
Summary: Guide on Configuring Cluster Sets on Windows Server 2019
This article applies to
This article does not apply to
This article is not tied to any specific product.
Not all product versions are identified in this article.
Instructions
Cluster Sets, introduced in Windows Server 2019 (WS19) improves SDDC (Software Defined Data Center) flexibility and resilience. Cluster Set is a technology that allows administrators to combine multiple Windows 2019 Clusters into a single umbrella of Clusters.
Existing failover clusters can accommodate a maximum of 64 nodes. Cluster Sets technology combines multiple WS19 clusters in a single domain, with each of these clusters supporting up to 64 WS19 nodes. Compared to a Failover-Cluster, Cluster Set has more resiliency. For example, a 4-node failover cluster can survive 2-node failure. With the same 4-node cluster if we divide into two 2-node clusters and form a cluster sets out of it, it can survive one cluster failure plus one node failure from the remaining cluster. So, it can survive 3 node failures altogether.
For an overview of Cluster-Sets feature in Server 2019 refer "Introduction-to-cluster-sets-in-windows-server-2019 " and "Cluster sets
". Cluster Sets gains its flexibility by the use of an underlying technology called Infrastructure Scale-Out File Server
; this also eases the cross-cluster migration of VMs within the Cluster Set.
Lab Setup for Deploying Cluster Set on PowerEdge
Servers Used: Two PowerEdge R730XD’s and Two PowerEdge R740XD’s
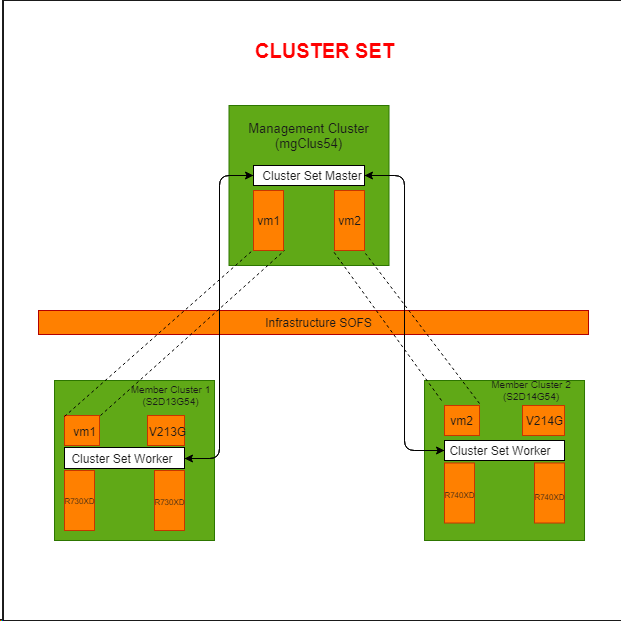
- Created the first cluster using the two R730XD’s and named
S2D13G54(called Member Cluster 1). - Created the second cluster using the two R740XD’s and named
S2D14G54(called Member Cluster 2). - Created two CSV volumes on each of the above created Clusters.
- Created a VM ‘
vm1’ onMember Cluster 1and a VM ‘vm2’ onMember Cluster 2.Then, I combined these two VMs to create a Management Cluster (namedmgClus54) for the Cluster Set. No shared storage is required while creating the Management Cluster.
Installed the File-Services role in each of the nodes in the Member Cluster 1, Member Cluster 2 and Management Cluster:
Install-WindowsFeature File-Services -IncludeAllSubFeature –IncludeManagementTools –Restart
Created an Infrastructure SOFS File Server on Member Cluster 1, Member Cluster 2 and the Management Cluster:
Add-ClusterScaleOutFileServerRole -Name -Infrastructure
Created a Cluster Set named CLUSSET54:
New-ClusterSet -Name CLUSSET54 -NamespaceRoot -CimSession
And then add the created S2D14G54 and S2D13G54 Cluster to the cluster to the ClusterSet:
Add-ClusterSetMember -ClusterName S2D14G54 -CimSession -InfraSOFSName


Then I deploy two VM’s V213G and V214G on Member Cluster 1 and Member Cluster 2 respectively and register the VMs on the Cluster Set:
Get-ClusterSetMember -ClusterName | Register-ClusterSetVM -VMName
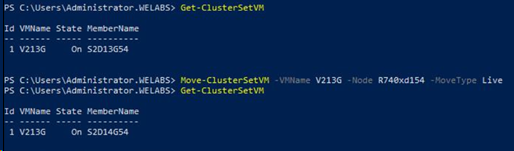
For Testing live migration across clusters, I tried to migrate VM "V213G" to Member Cluster 2. Before performing migration across clusters, we need to consider below points:
- VM settings, Processor Compatibility should be enabled.
- Configure Kerberos constrained delegation (KCD) between all pairs of cross-cluster nodes
- Constrained delegation guidance
from Microsoft Hyper-V product team will be useful in setting this up.
- Configure the cross-cluster virtual machine live migration authentication type to Kerberos on each node in the Cluster Set.
- Constrained delegation guidance
- foreach($h in $hosts){Set-VMHost -VirtualMachineMigrationAuthenticationType Kerberos -computerName $h }
-
-
- Add the management cluster to the local administrators group on each node in the cluster set.
-
- foreach($h in $hosts){ Invoke-Command -ComputerName $h -ScriptBlock {Net localgroup administrators /add $} }
For performing any maintenance activity of a cluster in Cluster Set, migrate all the VMs that are part of the cluster to other clusters in the Cluster Set and then remove Cluster from the Cluster Set:
Remove-ClusterSetMember -ClusterName -CimSession
After performing the maintenance activity, add back the cluster to the Cluster Set.
In case of unexpected failure of a Member Cluster, Cluster Set is not intelligent enough to handle the fail-over. Only manual movement of resources from one cluster to another cluster is supported in Windows Server 2019; even though automatic VM failover continue to function within a single member cluster scope.
Existing failover clusters can accommodate a maximum of 64 nodes. Cluster Sets technology combines multiple WS19 clusters in a single domain, with each of these clusters supporting up to 64 WS19 nodes. Compared to a Failover-Cluster, Cluster Set has more resiliency. For example, a 4-node failover cluster can survive 2-node failure. With the same 4-node cluster if we divide into two 2-node clusters and form a cluster sets out of it, it can survive one cluster failure plus one node failure from the remaining cluster. So, it can survive 3 node failures altogether.
After performing the maintenance activity, add back the cluster to the Cluster Set.
In case of unexpected failure of a Member Cluster, Cluster Set is not intelligent enough to handle the fail-over. Only manual movement of resources from one cluster to another cluster is supported in Windows Server 2019; even though automatic VM failover continue to function within a single member cluster scope.
This blog has been written by DELL Engineer AS Nithya Priya
Affected Products
Microsoft Windows Server 2019Products
PowerEdge FC640, PowerEdge M640, PowerEdge M640 (for PE VRTX), PowerEdge MX740C, PowerEdge MX750c, PowerEdge MX760c, PowerEdge MX840C, PowerEdge R240, PowerEdge R250, PowerEdge R260, PowerEdge R340, PowerEdge R350, PowerEdge R360, PowerEdge R440
, PowerEdge R450, PowerEdge R540, PowerEdge R550, PowerEdge R640, PowerEdge R6415, PowerEdge R650, PowerEdge R650xs, PowerEdge R6515, PowerEdge R6525, PowerEdge R660, PowerEdge R660xs, PowerEdge R6615, PowerEdge R6625, PowerEdge R740, PowerEdge R740XD, PowerEdge R740XD2, PowerEdge R7415, PowerEdge R7425, PowerEdge R750, PowerEdge R750XA, PowerEdge R750xs, PowerEdge R7515, PowerEdge R7525, PowerEdge R760, PowerEdge R760XA, PowerEdge R760xd2, PowerEdge R760xs, PowerEdge R7615, PowerEdge R7625, PowerEdge R840, PowerEdge R860, PowerEdge R940, PowerEdge R940xa, PowerEdge R960, PowerEdge T140, PowerEdge T150, PowerEdge T160, PowerEdge T340, PowerEdge T350, PowerEdge T360, PowerEdge T440, PowerEdge T550, PowerEdge T560, PowerEdge T640
...
Article Properties
Article Number: 000147500
Article Type: How To
Last Modified: 09 Dec 2024
Version: 6
Find answers to your questions from other Dell users
Support Services
Check if your device is covered by Support Services.