Dell Unity: Changing NAS Server SP Ownership
Summary: This article covers the steps to manually change the ownership of a NAS Server to the peer Storage Processor (SP).
This article applies to
This article does not apply to
This article is not tied to any specific product.
Not all product versions are identified in this article.
Instructions
Changing the Storage Processor (SP) owner of a NAS Server and its file systems can be performed multiple ways:
Unisphere:
Example: Changing the NAS Server "NAS_Unity_01" from SPA to SPB due to load balance issues:
- Within Unisphere, go to Storage > File > NAS Servers
- Double-click the NAS server that is to be modified.
- In the General tab, go to the SP Owner section and select the SP to move the NAS Server to.
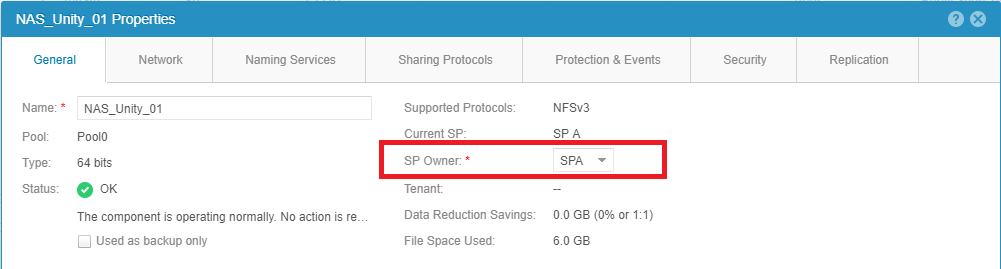
- Select the button to Apply the changes at the bottom of the screen.
Note: This operation may fail if replication is running. Pause replication and reattempt the move again.
- Close the General Properties of the NAS Server and refresh the list to ensure that the change was completed.
- Once all work is done, resume replication.
Ensure that the network configuration is correct to allow the IP of the NAS Interface to be used on the peer Storage Processor.
If the correct network configuration settings are not applied, moving the NAS Server to another Storage Processor may result in a Data Unavailability (DU) scenario.
UEMCLI:
Example: Changing NAS Server "NAS_Unity_01" from SPB to SPA.
- Collect the NAS Server ID Information:
The following command can be used:
uemcli /net/nas/server show
The following output is received while running the above command. The output lists all the NAS Servers present on the machine:
service@Unity spa:~/user # uemcli -u admin -p password /net/nas/server show
1:    ID                            = nas_73                   -> ID of the NAS Server
      Name                          = NAS_Unity_01             -> Name of the NAS Server
      NetBIOS name                  =
      SP                            = spb                      -> Current SP that is the owner of the NAS Server.
- To change the NAS Server SP Ownership, run the following command with the array credentials:
uemcli -u <Admin_User> -p <Password> /net/nas/server -id <NAS_ID> set -sp <Destination SP>
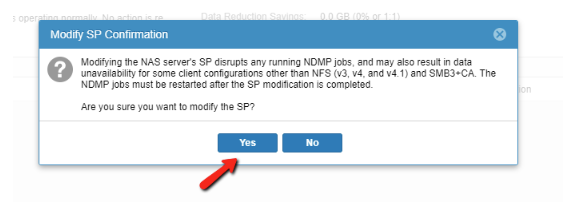
service@Unity spa:~/user # uemcli -u admin -p password /net/nas/server -id nas_73 set -sp spa
WARNING: modifying the NAS server's SP disrupts any running NDMP jobs, and may also result in data unavailability for some client configurations other than NFS (v3, v4, and v4.1) and SMB3+CA. The NDMP jobs must be restarted after the SP modification is completed.
Are you sure you want to modify the SP?
yes / no: yes
ID = nas_73
Operation completed successfully.
- Confirm that the SP ownership has been changed by using the command from step 1:
service@Unity spa:~/user # uemcli -u admin -p password /net/nas/server -id nas_73 show
1:    ID                            = nas_73
      Name                          = NAS_Unity_01
      NetBIOS name                  =
      SP                            = spa                      -> New SP that is the owner of the NAS Server.
Affected Products
Dell EMC Unity FamilyProducts
Dell Unity 300, Dell EMC Unity 300F, Dell EMC Unity 350F, Dell EMC Unity 400, Dell EMC Unity 400F, Dell EMC Unity 450F, Dell EMC Unity 500, Dell EMC Unity 500F, Dell EMC Unity 550F, Dell EMC Unity 600, Dell EMC Unity 600F, Dell EMC Unity 650F
, Dell EMC Unity Family |Dell EMC Unity All Flash, Dell EMC Unity Family, Dell EMC Unity Hybrid, Dell EMC UnityVSA Professional Edition/Unity Cloud Edition
...
Article Properties
Article Number: 000019599
Article Type: How To
Last Modified: 17 Apr 2026
Version: 6
Find answers to your questions from other Dell users
Support Services
Check if your device is covered by Support Services.