Unable to decrypt: BAD_DATA error message in NMC UI after a NetWorker server migration
Summary: The "Unable to decrypt: BAD_DATA" error can occur due to lockbox issues, such as corruption or when the NetWorker server is migrated, moved, or reinstalled without restoring the lockbox. The current lockbox does not have the passwords stored that match the user/passwords in the nsrdb, hence the BAD_DATA error. ...
This article applies to
This article does not apply to
This article is not tied to any specific product.
Not all product versions are identified in this article.
Symptoms
- The NetWorker server was migrated to a new hardware
nsrdrwas performed to bring back the NetWorker configuration- Password was assigned to fields of some NetWorker resources
- In the NetWorker Management Console (NMC), the following error appears when clicking some of the NetWorker resources.

Cause
The "BAD_DATA" error can occur due to lockbox issues, such as corruption or when the NetWorker server is migrated, moved, or reinstalled without restoring the lockbox. The current lockbox does not have the passwords stored that match the user/password in the nsrdb, hence the BAD_DATA error.
Resolution
To resolve the BAD_DATA error message, replace the current lockbox with the original lockbox from the NetWorker server prior to an nsrdr or migration. On a Linux NetWorker server, export the original lockbox using the nsr_prep_lb command. See the NetWorker Security Configuration Guide for instructions on how to export the lockbox. This is demonstrated in the Video section of this article.
If importing the original lockbox is not possible, reset all password fields in the NetWorker resource to blank.
How to reset the passwords in nsrdb.
1. Create an input file with the names of passwords that must be cleared in nsrdb. Create a file called "pass.txt" that contains the following lines:
update password: ;
y
update management password: ;
y
update NAS management password: ;
y
update NAS file access password: ;
y
update Authentication Key: ;
y
update VMWS user password: ;
y
update EBR Password: ;
y
update REST Services Password: ;
y
update vCenter Password: ;
y
update Privacy Key: ;
y
update datazone pass phrase: ;
y
2. Stop NetWorker services.
On Linux: systemctl stop networker or nsr_shutdown
On Windows: net stop nsrexecd /y
3. Make a copy of nsrdb. Call this nsrdb.beforepassclean.
4. Run nsradmin command with the input file pass.txt.
On Linux:
# nsradmin -i pass.txt -d /nsr/res/nsrdb
On Windows:
C:> nsradmin -i pass.txt -d "C:\Program Files\EMC Networker\nsr\res\nsrdb"
5. Make another copy of the modified nsrdb. Call this nsrdb_passwordblank. Rename the dbg folder under nsrdb if there is any.
CAUTION: For Windows servers, follow the procedure "Change the ownership of nsrdb" in the "Additional Info" section before proceeding to step 6. The steps outlined to change the ownership of nsrdb are necessary before starting NetWorker services. Starting NetWorker services with the incorrect file ownership can lead to nsrdb corruption. For Linux servers, no action is necessary, proceed to the next step.
6. Start the NetWorker service.
Linux: systemctl start networker
Windows: net start nsrd
Windows (if NMC is installed on the same host): net start gstd
7. Launch NMC and reenter the password that was assigned to the NetWorker resource.
Dell NetWorker Lockbox Migration using nsr_prep_lb Command
Duration: 00:03:16 (hh:mm:ss)
When available, closed caption (subtitles) language settings can be chosen using the CC icon on this video player.
You can also view this video on YouTube.
Additional Information
Change the ownership of nsrdb
On a Windows NetWorker server, the ownership of the modified nsrdb files is changed from Administrators (the group) to the user account that renamed the folder. This can corrupt NetWorker databases if services are started with incorrect file ownership. The result is that corrupted files are moved to the ..\nsr\res\nsrdb\dbg folder. Before starting NetWorker services on Windows, set all file permissions under nsrdb to be owned by the Administrators group, not the user.
Open "C:\Program Files\EMC Networker\nsr\res\nsrdb" from the File Explorer and set the ownership for all files and child objects to Administrators.
1. From Windows File Explorer, right click the C:\Program Files\EMC NetWorker\nsr\res\nsrdb folder
2. Select Properties.
3. Click the "Security" tab.
4. Click "Advanced"
5. In Owner, click "Change"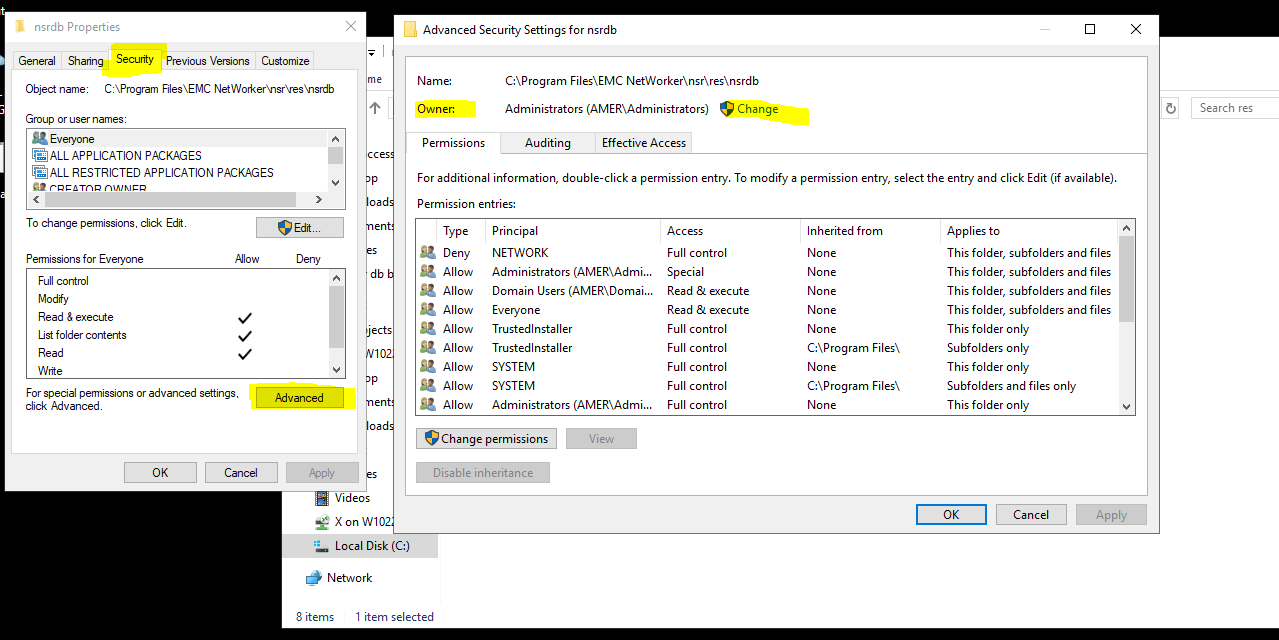
6. In the "Enter the object name to select" box, type: Administrators, then click "Check Names." (Sometimes you must use the computer name, like AMER\Administrators.)
7. Click OK
8. Put a check mark in the "Replace all child object permission entries…" and "Replace owner on subcontainers and objects" box.
9. Click "Apply," then click "Yes" for "Do you wish to continue?" box.
10. Click "OK"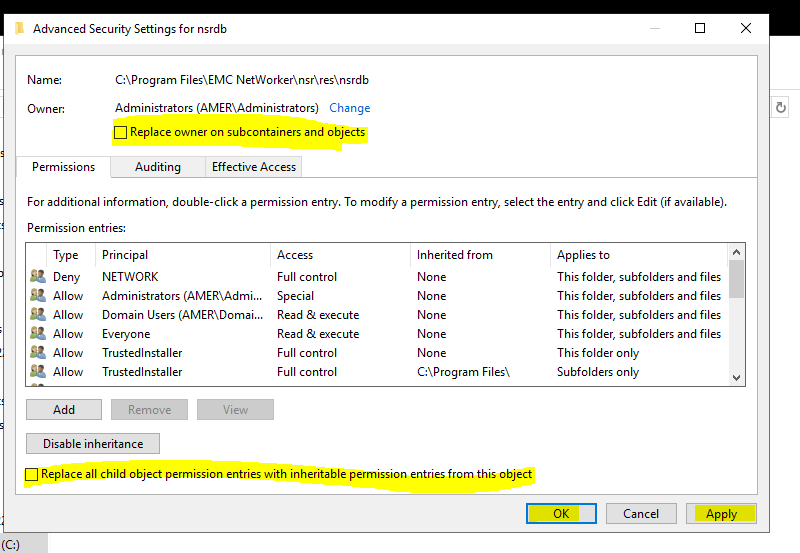
11. Return to step 6 in the Resolution field.
Affected Products
NetWorkerArticle Properties
Article Number: 000214570
Article Type: Solution
Last Modified: 29 Apr 2025
Version: 6
Find answers to your questions from other Dell users
Support Services
Check if your device is covered by Support Services.