Expert Insights into Unified Write Filter Servicing Mode
Summary: Unlock the power of Unified Write Filter Servicing Mode for Windows! Get your complete overview and tips for optimal computer protection.
This article applies to
This article does not apply to
This article is not tied to any specific product.
Not all product versions are identified in this article.
Instructions
- Windows 10 IoT
Table of Contents:
- Unified Write Filter (UWF) Servicing Mode Overview
- Prerequisites for using UWF Servicing Mode
- Running UWF Servicing Mode manually from Wyse Management Suite (WMS)
- Scheduling a UWF Servicing Mode job from WMS
- Running UWF Servicing Mode manually from client
- Using a Scheduled Task to run UWF Servicing Mode
- Using a Windows Service Update Server (WSUS) server
Unified Write Filter (UWF) Servicing Mode Overview
During normal operations, the UWF is enabled, and computer updates are disabled since they would be discarded on reboot when the UWF overlay is cleared. To update devices, use UWF Servicing Mode which allows Windows Updates and antimalware signature files to be updated.
When UWF Servicing Mode is triggered, Windows does the following:
- Clears the UWF overlay by rebooting the device
- Disables the UWF filter
- Triggers a maintenance window
- Scans for and applies any needed Windows Updates
- After updates are installed, the UWF is re-enabled and the device reboots.
Prerequisites for using UWF Servicing Mode
The 2022-KB5015807 QFE must be installed to leverage the UWF Servicing Mode. This update is in Windows 10 IoT operating system images released in 2023 and later. In addition to this QFE, the device must be able to reach the Microsoft Windows Update servers or an internal WSUS server.
Running UWF Servicing Mode manually from Wyse Management Suite (WMS)
The UWF Servicing Mode can be triggered manually from the WMS server for a single device or multiple devices at one time.
To manually trigger UWF Servicing Mode for multiple devices:
- Go to the Devices tab in the WMS Admin UI
- Select the devices that you want to target.
- Filters can be used if necessary to help narrow the list of devices.
- Once the devices are selected, click the down arrow on the More Actions menu
- Select the Initiate UWF Servicing Mode option.
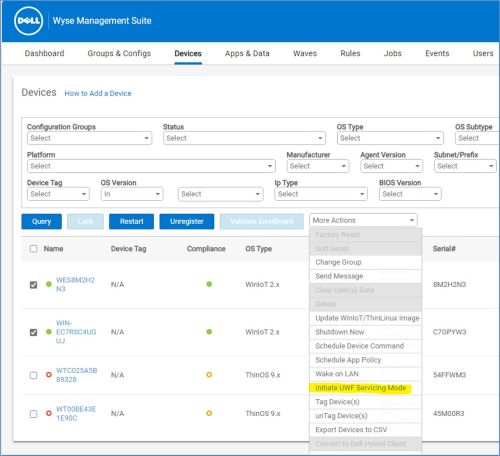
Figure 1: (English Only) Wyse Management Suite Devices tab
Note: Also, the UWF Servicing Mode can be triggered in the same manner from the Device Details page. This is done by selecting the Initiate UWF Servicing Mode option, from the More Actions drop-down menu.
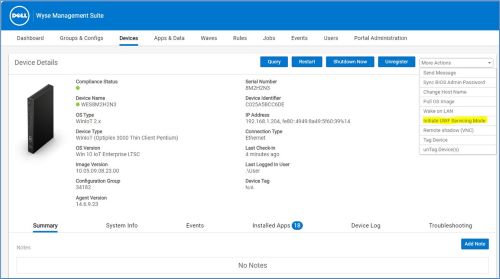
Figure 2: (English Only) Wyse Management Suite Device Details page
Scheduling a UWF Servicing Mode job from WMS
In addition to running UWF Servicing Mode manually from WMS, a recurring device command can be set up to run UWF Servicing Mode regularly.
To setup a scheduled device command, in the WMS Admin UI:
- Click on the Jobs tab
- Click on the Schedule Device Commands button (this initiates the Device Command Job wizard).
- Select the Initiate UWF Servicing Mode option in the Command drop-down list.
- Complete the rest of the wizard by selecting:
- The target group
- Days to run the job
- Times to start the job
- Click the Preview button and review the information for accuracy.
- Click the Schedule button to complete setting up the recurring command.
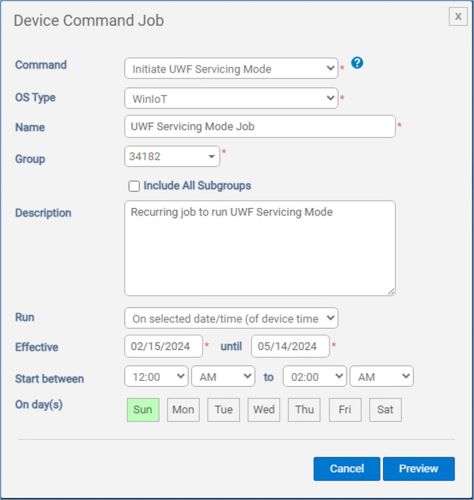
Figure 3: (English Only) Device Command Job
Running UWF Servicing Mode manually from client
The UWF Servicing Mode can be triggered manually from the thin client. This could be useful in Proof-of-Concept testing or when preparing an image to deploy to other devices.
To trigger UWF Servicing Mode, login as the local administrator:
- Go to the C:\Windows\System32\oem folder
- Run the SystemServicing.bat file.
Using a Scheduled Task to run UWF Servicing Mode
There is an existing scheduled task on Win10 IoT images that support the UWF Servicing Mode, but it is disabled by default. The local admin can enable this task and update when and how frequently it runs.
To update this scheduled task:
- Disable UWF
- Make the required changes.
- Re-enable UWF.
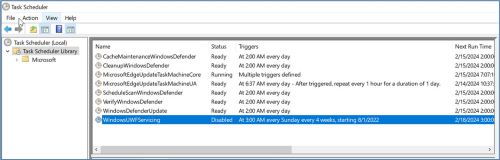
Figure 4: (English Only) Task Scheduler
Also, this scheduled task can be modified from WMS using PowerShell or batch scripts to enable and modify its settings.
The following PowerShell command enables the existing WindowsUWFServicing task:
Enable-ScheduledTask -TaskName “WindowsUWFServicing”
Reference Microsoft Powershell documentation for further commands to modify scheduled tasks if needed:
https://learn.microsoft.com/powershell/module/scheduledtasks/?view=windowsserver2022-ps
Using a Windows Service Update Server (WSUS) server
UWF Servicing Mode requires the thin client to have access to a Windows Update server. By default, the thin client is pointed to the Microsoft Windows Update server and requires internet access. If the client devices are on a restricted network, with no internet access, an onsite WSUS server is required, and the client must be configured to use it.
One way to configure the client to use a WSUS server is through Group Policy.
Make the necessary configurations under: Computer Configuration > Administrative Templates > Windows Components > Windows Update > Specify intranet Microsoft update service location to point the client to the WSUS server.
Warning: The next step is a Windows Registry edit:
- Back up the Registry before proceeding, reference How to Back Up and Restore the Registry in Windows
.
- Editing the Registry can cause the computer to become unresponsive on the next reboot.
- Contact Dell Technical Support for assistance if you have concerns about performing this step.
Also, WSUS configuration settings can be applied to all the devices using WMS using a PowerShell or batch script to modify the following registry entries:
[HKEY_LOCAL_MACHINE\SOFTWARE\Policies\Microsoft\Windows\WindowsUpdate]
"WUServer"="https://wsusserver.example.com"
"WUStatusServer"="https://wsusserver.example.com"
"TargetGroup"="TargetGroupName"
"TargetGroupEnabled"=dword:00000001
This sample PowerShell script modifies the above registry values in current Win10 IoT images:
$Path = "HKLM:\SOFTWARE\Policies\Microsoft\Windows\WindowsUpdate"
Set-ItemProperty -Path $Path -Name "WUServer" -Value "https://wsusserver.test.com"
Set-ItemProperty -Path $Path -Name "WUStatusServer" -Value "https://wsusserver.test.com"
Set-ItemProperty -Path $Path -Name "TargetGroup" -Value "GroupName"
Set-ItemProperty -Path $Path -Name "TargetGroupEnabled" -Value 1
Article Properties
Article Number: 000222266
Article Type: How To
Last Modified: 20 Feb 2024
Version: 2
Find answers to your questions from other Dell users
Support Services
Check if your device is covered by Support Services.