融合备份一体机:如何在已部署的 IDPA 中更改 DNS 条目
Summary: 本知识库文章提供了在已部署的融合备份一体机 (IDPA) 中更改 DNS 服务器的过程。
This article applies to
This article does not apply to
This article is not tied to any specific product.
Not all product versions are identified in this article.
Instructions
在已部署的融合备份一体机 (IDPA) 中为版本 2.6.1 及更低版本更新 DNS 服务器的过程: (有关 2.7.0 及更高版本,请参阅文章末尾)
Old entry:
Nameserver 10.2XX。XX.23
新条目:
Nameserver 10.2XX。二十.24

更新 IDPA 2.7.0 及更高版本中的 DNS 设置:
从 2.7.0 开始,ACM 现在包含一个自动化流程,用于更新所有 IDPA 组件上的 DNS 设置。

监视进度,如果成功,您就完成了。没有别的事可做。
- 确保新 DNS 具有与以前的 DNS 相同的主机名到 IP 映射。验证 Active Directory (AD) 中的主机名。
- 验证反向和正向查找是否适用于新 DNS。
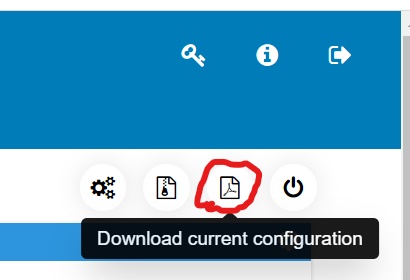
- 按照以下屏幕截图从 ACM UI 下载 DataProtectionConfig.pdf,以获取所有需要的虚拟机 IP 地址。
- 在除 Data Domain、ESXi 和 vCenter 以外的所有虚拟机上执行以下步骤:
- 使用 PuTTY 通过 SSH 连接到每个虚拟机
- 编辑 resolv.conf 文件以反映 DNS 的新 IP。
cd /etc/
vi resolv.conf
例如:
Old entry:
Nameserver 10.2XX。XX.23
新条目:
Nameserver 10.2XX。二十.24
- 有关更改 Cloud Disaster Recovery Add-On (CDRA) VM、DNS 服务器的信息,请参阅知识库文章 542912:Cloud DR — 如何在本地更改 DNS 服务器 Cloud Disaster Recovery Add-On (CDRA)
- 对于 Data Domain,请按照以下步骤更新 DNS 条目:
- 使用 sysadmin 凭据通过 SSH 连接到 Data Domain。
- 运行命令:
net show dns
示例输出:
sysadmin@datadomain]# net show dns
#   Server
-   ------------
1   10.2XX.XX.23
2   10.2XX.XX.24
-   ------------
显示手动配置的 DNS 服务器。
- 运行命令:
net reset dns
示例输出:
sysadmin@datadomain]# net reset dns
The Name (DNS) server list is empty.
- 运行命令:
net set dns <dns_ip1> <dns_ip2>
示例输出:
sysadmin@datadomain]# net set dns 10.2XX.XX.23 10.2XX.XX.24
The Name (DNS) server list is:
        10.2XX.XX.23, 10.2XX.XX.24
- 对于所有 ESXi 主机,按照以下步骤更新 DNS 条目:
- 使用 root 凭据通过 SSH 连接到 ESXi
- 运行以下命令以列出已注册的 DNS 条目:
esxcli network ip dns server list
示例输出:
[root@lXXXedmh085:~] esxcli network ip dns server list
DNSServers: 10.2XX.XX.23
- 运行以下命令以删除旧的 DNS IP:
esxcli network ip dns server remove --server=<old_dns_ip>
示例输出:
[root@lXXXh085:~] esxcli network ip dns server remove --server=10.2XX.XX.23
- 运行以下命令以删除旧的 DNS IP:
esxcli network ip dns server add --server=<new_dns_ip>
示例输出:
[root@lXXXh085:~] esxcli network ip dns server add --server=10.2XX.XX.24
提醒:如果 7.b 中的 list 命令显示辅助 DNS,也必须对其他名称服务器执行 7.c 和 7.d。
- 对于 vCenter,请按照以下步骤更新 DNS 条目:
- 使用以下命令打开 vCenter 的 Web UI: https://< vcenter_ip>:5480
- 转至网络管理 > 选项卡。
- 找到Hostname、Name Server和Gateways的条目。
- 单击上面屏幕截图中突出显示的“编辑”按钮,然后更改DNS服务器的条目。
- 通过 SSH 连接到 ACM,编辑commonconfig.xml以反映新的 DNS 条目。
cd /usr/local/dataprotection/var/configmgr/server_data/config/
vi commonconfig.xml
使用新的 DNS IP 编辑以下条目
<primaryDns>10.2XX.XX.23</primaryDns>
<secondaryDns>10.2XX.XX.24</secondaryDns>
- 设备已准备好使用。不需要在任何虚拟机上重新启动任何服务。
更新 IDPA 2.7.0 及更高版本中的 DNS 设置:
从 2.7.0 开始,ACM 现在包含一个自动化流程,用于更新所有 IDPA 组件上的 DNS 设置。
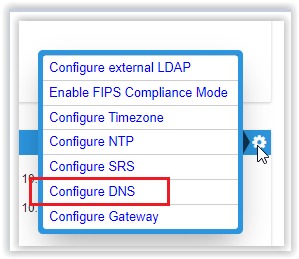
- 打开 ACM UI。
- 在“General Setting”部分中,单击“齿轮”图标:
- 选择“Configure DNS”
- 输入新的 DNS 信息,然后单击保存。
监视进度,如果成功,您就完成了。没有别的事可做。
Affected Products
Integrated Data Protection Appliance FamilyProducts
Integrated Data Protection Appliance FamilyArticle Properties
Article Number: 000021476
Article Type: How To
Last Modified: 25 Mar 2022
Version: 3
Find answers to your questions from other Dell users
Support Services
Check if your device is covered by Support Services.