Dell EMC Unity: come configurare NIS/netgroup per l'esportazione NFS in Unity (correggibile dall'utente)
Summary: Come configurare NIS/file locale netgroup/netgroup per l'esportazione NFS in Unity
This article applies to
This article does not apply to
This article is not tied to any specific product.
Not all product versions are identified in this article.
Instructions
Prerequisiti:
NIS/Netroup in Unity.
Unity funziona con il server NIS per la risoluzione del nome netgroup->host. Il meccanismo di funzionamento è il seguente (fare riferimento al file tcpdump NIS.cap allegato per ulteriori dettagli).
Local/Netgroup in Unity:
Procedura (definizione del netgroup nel server NIS):
Passaggio 1 - Configurazione in Unity

Nota


Passaggio 2 - Configurazione sul server NIS (uso CentOS6.2 e il relativo software NIS nativo come server NIS)
Testare il
mounting della condivisione NFS da un host che non appartiene al netgroup mfgnasroot, accesso negato.
- Configurare il netgroup per le condivisioni NFS in Unity.
- Utilizzare il server NIS per la risoluzione del nome netgroup->host. Questo articolo della Knowledge Base utilizza il server NIS nativo di CentOS 6.2 per il test. Un server NIS diverso dovrebbe avere il suo proprio metodo di configurazione, ma la teoria è la stessa.
- La porta di rete per NIS/NFS/RPC è consentita.
NIS/Netroup in Unity.
Unity funziona con il server NIS per la risoluzione del nome netgroup->host. Il meccanismo di funzionamento è il seguente (fare riferimento al file tcpdump NIS.cap allegato per ulteriori dettagli).
- Quando il client NFS tenta di il mounting delle condivisioni NFS in Unity, Unity ottiene l'indirizzo IP del client NFS.
- Unity invia una "YP match call" al server NIS con l'indirizzo IP del client NFS per il server NIS e il server NIS risponde con una "YO match replay" con il nome host.
- Se il server NIS non dispone di una voce di nome host corretta (al passaggio 2), Unity invia una query DNS PTR al server DNS ricercando il record PTR del nome host.
- Unity invia una "YP match call" al server NIS con il nome host del client NFS per il server NIS e il server NIS risponde con una "YP match call" con il nome netgroup.
Local/Netgroup in Unity:
- Quando il client NFS tenta di il mounting delle condivisioni NFS in Unity, Unity ottiene l'indirizzo IP del client NFS.
- Unity tenta di trovare la corrispondenza dell'indirizzo IP con il nome host negli host locali all'interno del server NAS.
- Se il file degli host locali non dispone di una voce di nome host corretta (al passaggio 2), Unity invia una query DNS PTR al server DNS, ricercando il record PTR del nome host.
- Unity tenta di trovare la corrispondenza del nome host con il nome host nel netgroup locale all'interno del server NAS.
Note:
Unity supporta la definizione del netgroup nel file dei netgroup locali a partire da Unity OE 4.1.x
Unity NON supporta il file dei netgroup locali prima di Unity OE 4.1.x.
Unity supporta la definizione del netgroup nel file dei netgroup locali a partire da Unity OE 4.1.x
Unity NON supporta il file dei netgroup locali prima di Unity OE 4.1.x.
Procedura (definizione del netgroup nel server NIS):
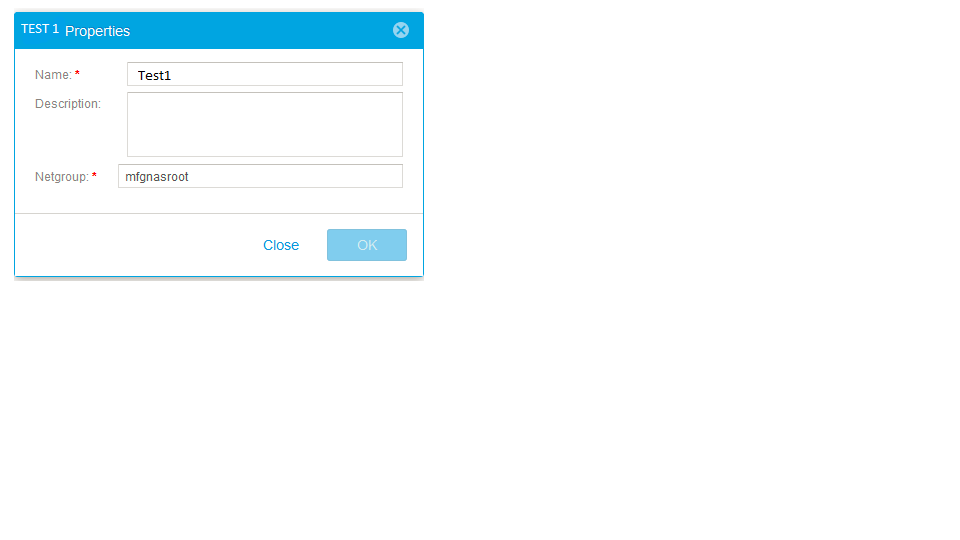
Passaggio 1 - Configurazione in Unity
- Nel menu Hosts, aggiungere un netgroup Test1 con netgroup mfgnasroot
Nota
- La definizione del nome "Netgroup" mfgnasroot deve corrispondere al nome del netgroup nel server NIS.
- NON utilizzare _ nel nome netgroup. La presenza di _ nel nome netgroup può causare problemi.
- Selezionare "File -> NAS Servers -> NAS server Properties -> Naming Services-LDAP/NIS" e aggiungere un server NIS con "celerra" come "NIS Domain", come mostrato nello screenshot seguente.
- In "File -> NFS Shares -> Share Properties -> Host Access", aggiungere il netgroup test con privilegio root,
Passaggio 2 - Configurazione sul server NIS (uso CentOS6.2 e il relativo software NIS nativo come server NIS)
- Verificare che siano installati i pacchetti seguenti.
# rpm -qa|egrep -i "^yp|^rpc"
ypserv-2.19-22.el6.x86_64
ypbind-1.20.4-29.el6.x86_64
yp-tools-2.9-12.el6.x86_64
rpcbind-0.2.0-8.el6.x86_64
ypserv-2.19-22.el6.x86_64
ypbind-1.20.4-29.el6.x86_64
yp-tools-2.9-12.el6.x86_64
rpcbind-0.2.0-8.el6.x86_64
- Definire il nome di dominio NIS.
# cat /etc/sysconfig/network
NETWORKING=yes
HOSTNAME=nis.example.com
GATEWAY=xxx.xxx.xxx.xxx
NISDOMAIN=celerra
NETWORKING=yes
HOSTNAME=nis.example.com
GATEWAY=xxx.xxx.xxx.xxx
NISDOMAIN=celerra
- Aggiungere il nome host e il relativo indirizzo IP in "/etc/hosts" (di colore blu), ypinit utilizza il file "/etc/hosts" per creare il database YP.
# cat /etc/hosts
127.0.0.1localhost localhost.localdomain localhost4 localhost4.localdomain4
::1localhost localhost.localdomain localhost6 localhost6.localdomain6
xxx.xxx.xxx.xxx 5700CS139.example.com
xxx.xxx.xxx.xxx VNX5400_107.example.com
xxx.xxx.xxx.xxx nis.example.com nis
127.0.0.1localhost localhost.localdomain localhost4 localhost4.localdomain4
::1localhost localhost.localdomain localhost6 localhost6.localdomain6
xxx.xxx.xxx.xxx 5700CS139.example.com
xxx.xxx.xxx.xxx VNX5400_107.example.com
xxx.xxx.xxx.xxx nis.example.com nis
- Aggiungere il nome host nel file "/etc/netgroup" e quindi aggiungere il nome di dominio NIS come mostrato di seguito (il mounting NFS non riesce se il campo del dominio NIS viene lasciato vuoto).
# cat /etc/netgroup
mfgnasroot (5700CS139.example.com,,celerra) (VNX5400_107.example.com,,celerra)
mfgnasroot (5700CS139.example.com,,celerra) (VNX5400_107.example.com,,celerra)
- Verificare che i servizi ypbind, ypserver e rpcbind siano in esecuzione.
# service ypbind status
ypbind (pid16711) is running...
# service ypserv status
ypserv (pid16758) is running...
# service rpcbind status
rpcbind (pid1274) is running...
ypbind (pid16711) is running...
# service ypserv status
ypserv (pid16758) is running...
# service rpcbind status
rpcbind (pid1274) is running...
- Inizializzare il database YP.
# /usr/lib64/yp/ypinit -m
A questo punto, è necessario creare un elenco degli host che eseguiranno i server NIS. nis.example.com si trova nell'elenco degli host del server NIS. Continuare ad aggiungere il nome host per gli altri host, una voce di nome host per riga e, al termine dell'elenco, digitare un <controllo D>.>.
next host to add:nis.example.com
next host to add:
L'elenco corrente dei server NIS è simile al seguente:
nis.example.com
Is this correct?[y/n: y]y
We need a few minutes to build the databases...
Building /var/yp/celerra/ypservers...
Running /var/yp/Makefile...
gmake[1]: Entering directory `/var/yp/celerra'
Updating passwd.byname...
Updating passwd.byuid...
Updating group.byname...
Updating group.bygid...
Updating hosts.byname...
Updating hosts.byaddr...
Updating rpc.byname...
Updating rpc.bynumber...
Updating services.byname...
Updating services.byservicename...
Updating netid.byname...
Updating protocols.bynumber...
Updating protocols.byname...
Updating mail.aliases...
Updating netgroup...
Updating netgroup.byhost...
Updating netgroup.byuser...
gmake[1]: Leaving directory `/var/yp/celerra'
nis.example.com è stato configurato come server master NIS.
Ora è possibile eseguire ypinit -s nis.example.com su tutti i server slave.
Testare il
mounting della condivisione NFS da un host che non appartiene al netgroup mfgnasroot, accesso negato.
[root@nis ~]# mount xxx.xxx.xxx.xxx:/Test /mnt
mount.nfs: access denied by server while mounting xxx.xxx.xxx.xxx:/Test
mount.nfs: access denied by server while mounting xxx.xxx.xxx.xxx:/Test
Eseguire il mounting della condivisione NFS da un host appartenente al netgroup mfgnasroot, accesso riuscito.
[root@5700CS139 nasadmin]# mount xxx.xxx.xxx.xxx:/Test /mnt
[root@5700CS139 nasadmin]# cd /mnt
[root@5700CS139 mnt]# touch 139
[root@VNX5400_107 nasadmin]# mount xxx.xxx.xxx.xxx:/Test /mnt
[root@VNX5400_107 nasadmin]# cd /mnt
[root@VNX5400_107 mnt]# touch 107
[root@5700CS139 nasadmin]# cd /mnt
[root@5700CS139 mnt]# touch 139
[root@VNX5400_107 nasadmin]# mount xxx.xxx.xxx.xxx:/Test /mnt
[root@VNX5400_107 nasadmin]# cd /mnt
[root@VNX5400_107 mnt]# touch 107
Procedura (definizione del netgroup nel file locale):
Passaggio 1 - Configurazione in Unity
Nota

Esempio di file degli host:
# The hosts file contains a list of IP addresses with their corresponding hostnames.
#
# Each line of the hosts file defines a host and has the format:
# IP_address hostname aliases
# where:
# - IP_address is the host's IP address.
# - hostname is the official name of the host.
# - aliases provides for name changes, alternate spellings, shorter hostnames, or generic hostnames (for example, localhost).
#
# Fields are separated by any number of blanks or tab characters or both.
#
xxx.xxx.xxx.xxx opennms.example.com opennms
xxx.xxx.xxx.xxx vnx5400-1cs0.example.com vnx5400-1cs0
xxx.xxx.xxx.xxx vnx5400-1cs1.example.com vnx5400-1cs1
Esempio di file dei netgroup:
# The netgroup file contains a list of network group names with the list of hostnames for hosts belonging to the group.
# In addition to mapping hosts to network groups, it also maps users to network groups.
#
# Each line of the netgroup file defines a group and has the format:
# groupname member1 member2 ...
#
# Each member is either the name of another group or indicates specific hosts, users, and domains, referred to as a triple, as follows:
# (hostname,username,domainname)
#
# Any of the triple's three fields can be blank, meaning all the values in that field are included.
# A dash (-) in any of the fieldsmeans there are no valid values.
# For example, the following line defines a group called ouruniverse that consists of all hosts and users in the NIS domain ourdomain.
# ouruniverse (,,ourdomain)
#
# The following lines define a group called ourhosts that includes all of the hosts but none of the users in the domain,
# and a group called ourusers that includes all users but no hosts.
# ourhosts (,-,ourdomain)
# ourusers (-,,ourdomain)
#
# The following line defines a group called ouruniverse that consists of two hosts hostatlanta and hostboston.
# ouruniverse (hostatlanta,,),(hostboston,,)
#
# Note: IP addresses are not allowed.
#
# A netgroup file can include as many lines as required; however, each line must be less than 1 KB in length.
# If necessary, a line can be continued on another line by using the backslash (\) as a continuation character.
# A triple, however, cannot be split across two lines.
#
# Nota: If you use a backslash (\) as a continuation character, it must be the last character on the line. It cannot be followed by spaces.
mfgnasroot (opennms,,example.com),(vnx5400-1cs1,,example.com),(vnx5400-1cs0,,example.com)

Testare il
mounting della condivisione NFS da un host che non appartiene al netgroup mfgnasroot, accesso negato.
Passaggio 1 - Configurazione in Unity
- Nel menu Hosts, aggiungere un netgroup Eric1 con netgroup mfgnasroot
Nota
- La definizione del nome "Netgroup" mfgnasroot deve corrispondere al nome netgroup nel netgroup dei file locali.
- NON utilizzare _ nel nome netgroup. La presenza di _ nel nome netgroup può causare problemi.
- Selezionare "File -> NAS Servers -> NAS server Properties -> Naming Services-Local Files". Recuperare il file degli host e il file dei netgroup correnti, aggiornarli con Notepad++, salvarli in formato Unix; infine caricarli.
Esempio di file degli host:
# The hosts file contains a list of IP addresses with their corresponding hostnames.
#
# Each line of the hosts file defines a host and has the format:
# IP_address hostname aliases
# where:
# - IP_address is the host's IP address.
# - hostname is the official name of the host.
# - aliases provides for name changes, alternate spellings, shorter hostnames, or generic hostnames (for example, localhost).
#
# Fields are separated by any number of blanks or tab characters or both.
#
xxx.xxx.xxx.xxx opennms.example.com opennms
xxx.xxx.xxx.xxx vnx5400-1cs0.example.com vnx5400-1cs0
xxx.xxx.xxx.xxx vnx5400-1cs1.example.com vnx5400-1cs1
Esempio di file dei netgroup:
# The netgroup file contains a list of network group names with the list of hostnames for hosts belonging to the group.
# In addition to mapping hosts to network groups, it also maps users to network groups.
#
# Each line of the netgroup file defines a group and has the format:
# groupname member1 member2 ...
#
# Each member is either the name of another group or indicates specific hosts, users, and domains, referred to as a triple, as follows:
# (hostname,username,domainname)
#
# Any of the triple's three fields can be blank, meaning all the values in that field are included.
# A dash (-) in any of the fieldsmeans there are no valid values.
# For example, the following line defines a group called ouruniverse that consists of all hosts and users in the NIS domain ourdomain.
# ouruniverse (,,ourdomain)
#
# The following lines define a group called ourhosts that includes all of the hosts but none of the users in the domain,
# and a group called ourusers that includes all users but no hosts.
# ourhosts (,-,ourdomain)
# ourusers (-,,ourdomain)
#
# The following line defines a group called ouruniverse that consists of two hosts hostatlanta and hostboston.
# ouruniverse (hostatlanta,,),(hostboston,,)
#
# Note: IP addresses are not allowed.
#
# A netgroup file can include as many lines as required; however, each line must be less than 1 KB in length.
# If necessary, a line can be continued on another line by using the backslash (\) as a continuation character.
# A triple, however, cannot be split across two lines.
#
# Nota: If you use a backslash (\) as a continuation character, it must be the last character on the line. It cannot be followed by spaces.
mfgnasroot (opennms,,example.com),(vnx5400-1cs1,,example.com),(vnx5400-1cs0,,example.com)
- In "File -> NFS Shares -> Share Properties -> Host Access", aggiungere un netgroup Eric1 con privilegio root.
Testare il
mounting della condivisione NFS da un host che non appartiene al netgroup mfgnasroot, accesso negato.
[root@VNX5400-1CS0 ~]# mount xxx.xxx.xxx.xxx:/unity_nfs /mnt
mount: xxx.xxx.xxx.xxx: /unity_nfs failed, reason given by server: Permission denied
mount: xxx.xxx.xxx.xxx: /unity_nfs failed, reason given by server: Permission denied
Eseguire il mounting della condivisione NFS da un host appartenente al netgroup mfgnasroot, accesso riuscito.
[root@opennms ~]# mount xxx.xxx.xxx.xxx:/unity_nfs /mnt
[root@opennms ~]# umount /mnt
[root@opennms ~]# mount xxx.xxx.xxx.xxx:/unity_nfs /mnt
[root@opennms ~]# cd /mnt
[root@opennms mnt]# touch opennms
[root@opennms mnt]# ll
total 102528
-rw-r--r-- 1 root root 104857600 Jun 12 23:51 emctest
drwxr-xr-x 6 root root 8192 Jun 13 02:42 eric
drwxr-xr-x 2 root root 8192 Jun 5 06:11 lost+found
-rw-r--r-- 1 root root 0 Jul 13 2017 opennms
Additional Information
- Non utilizzare "_" nel nome netgroup quando si aggiunge un netgroup nella GUI di Unity. In caso contrario, viene restituito il messaggio di errore "failed invalid DNS name...".
- Per più indirizzi IP nel netgroup, creare voci host/subnet nel menu Host se è necessario definire indirizzi Ip/intervallo di indirizzi IP per la condivisione NFS.
Affected Products
Dell EMC Unity FamilyProducts
Dell EMC Unity Family, Dell EMC Unity HybridArticle Properties
Article Number: 000022455
Article Type: How To
Last Modified: 16 Jun 2025
Version: 3
Find answers to your questions from other Dell users
Support Services
Check if your device is covered by Support Services.