Managing security and technical advisories within MyService360
Summary: MyService360 provides a centralized management view of all Dell Security Advisories (DSAs) and Dell Technical Advisories (DTAs). It enables you to assess the risks for your environment in real time and efficiently manage remediation across products and sites that you manage. You can also identify and manage all the products that are affected by a single advisory from one view. ...
This article applies to
This article does not apply to
This article is not tied to any specific product.
Not all product versions are identified in this article.
Instructions
Introduction
NOTE: MyService360 displays advisories that were issued only during the last three years.
A DSA is a document that is issued by Dell Technologies to address security vulnerabilities in its products. A DSA contains information about the affected products, important security information, and recommendations to address the issue. For more information, see https://www.dell.com/en-us/shop/security-center/cp/security-and-trust-center.
A DTA is a proactive notification by Dell Technologies for issues that may affect your IT operations such as data loss, data unavailability, loss of system functionality, or anything that could result in a significant safety risk. A DTA provides the steps to eliminate or minimize the impact of such issues.
For information about setting up email notification for DSAs and DTA, see Set up email notifications for security and technical advisories article.
Common features and functionality for advisories management
The heads-up display for the HEALTH & RISK tab displays the number of critical, high, medium, and low DSAs and DTAs using interactive dials. You can hover over the sections of the dial to view the number of advisories in each category or click the center of the dial to go to the corresponding tab.
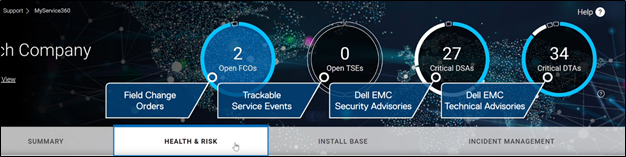
Figure 1: Heads-up display
You can view the information available for the advisories using the Table or Visualizations view. The default filters applied for the Dell Security Advisories and Dell Technical Advisories tabs are as follows:
- Advisories Date
- Install Base Status
- Install
- Install – T&M
- Shipped
- None
- Remediation Status
- New
- Reviewed
- Work in Progress

Figure 2: Table view
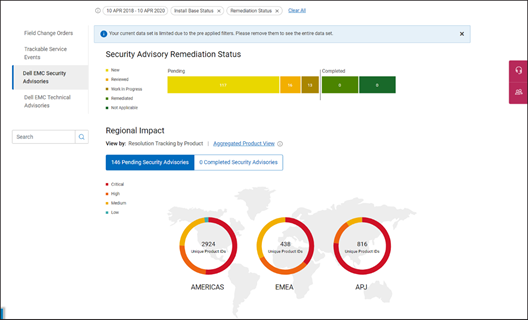
Figure 3: Visualizations view
NOTE: In the Visualizations view, it is recommended that you remove the Remediation Status filter to view the number of advisories that were already remediated or marked as Not Applicable.
Remediate an advisory
To review and update the remediation status for an advisory, perform the following:
NOTE: The steps required to review and remediate a security and technical advisory are similar.
- Click the required advisory link in the ADVISORY ID column.
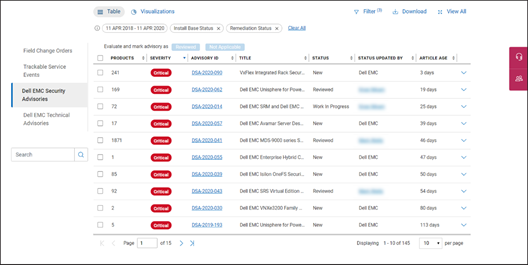
Figure 4: Advisory ID column
- Review the details displayed for the advisory.
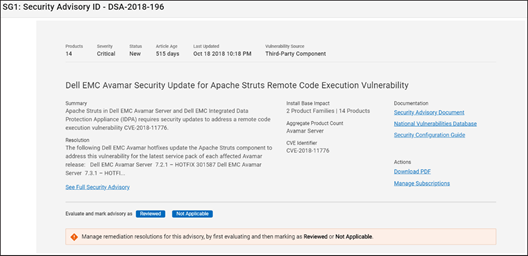
Figure 5: Review advisory details
- Perform one of the following:
- If the advisory is not applicable for your products, click Not Applicable.
NOTE: Click Not Applicable only if the advisory does not affect any product that is installed in your environment.
- If the advisory is applicable for your products, click Reviewed.
NOTE: The Reviewed status is applied to all products potentially affected by an advisory, including the products IDs managed by your colleagues.
- If you click Reviewed, in the Manage Affected Products section, select the product for which you want to update the remediation status.
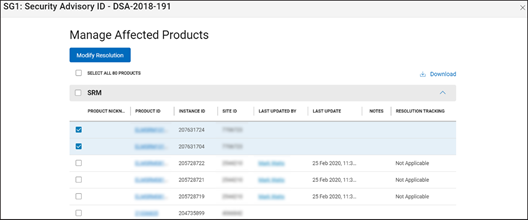
Figure 6: Manage Affected Products section
- Click Modify Resolution.
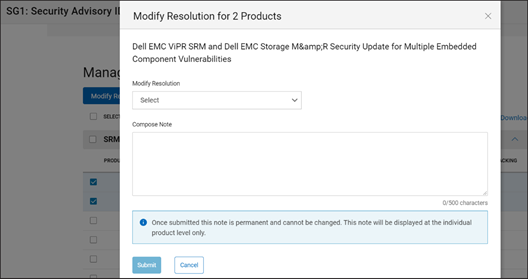
Figure 7: Modify Resolution window
- From the Modify Resolution list, perform one of the following:
- If the advisory is applicable and you have not scheduled the upgrade, click Not Scheduled.
- If the upgrade based on the recommendation in the advisory has not been completed successfully, click Scheduled for Action.
- If you have successfully completed the upgrade, click Resolution Completed.
- If the advisory does not affect any product that is installed in your environment, click Not Applicable.
- Enter any required notes in the Composite Notes box and click Submit.
NOTE: After you submit, you cannot edit or delete the information that is entered in the Composite Notes box. The information also provides an audit history of the remediation efforts for the product.
The RESOLUTION TRACKING column is updated for the selected products. The advisory status that is displayed in the STATUS column in the Table view is also updated.
Recommended strategies for advisory management
By default, MyService360 displays advisories that are issued during the last two years. But you can view advisories that are issued during the last three years. So, you can view advisories that were already reviewed and remediated. It is recommended that you identify and update the status of historical advisories that you may have already addressed or remediated.
If you have already implemented the resolution that is recommended in an advisory, you can update the status of the advisory as Resolution Completed. While updating the status of an advisory, enter notes to record key details for tracking and auditing purposes.
NOTE: You cannot edit or delete a note that is already submitted in MyService360.
The following table describes the strategies that you can use to review and remediate advisories:
Table 1 Recommended strategies
| Strategy | Description |
|---|---|
|
Product Issues |
If an issue is observed in a specific product family, review the advisories that are issued for that product family. This enables you to verify if the issues are resolved through the remediation that is provided in the advisories. |
|
Highest Risk |
Review and remediate advisories in the following order of impact:
|
|
Product family |
Prioritize the advisories based on the product families that you want to remediate first. |
|
Low complexity validation |
Document advisories that are only dependent on being at a certain code level to resolve |
|
Advisory Age |
Prioritize advisories based on the number of days since the advisory was issued. |
For a quick video demonstrating the advisory management features, go to the MyService360 Knowledge Center.
Affected Products
Product Security InformationArticle Properties
Article Number: 000112462
Article Type: How To
Last Modified: 18 Apr 2026
Version: 8
Find answers to your questions from other Dell users
Support Services
Check if your device is covered by Support Services.