Windows Server: Install and Manage Update Services with PowerShell
Summary: This article discusses managing the Windows Server Update Services (WSUS) role using PowerShell. PowerShell commands for adding the WSUS role and performing various administrative tasks are detailed. ...
This article applies to
This article does not apply to
This article is not tied to any specific product.
Not all product versions are identified in this article.
Instructions
Installation
To install the WSUS role, run the following command from an elevated PowerShell prompt:
Install-WindowsFeature -Name UpdateServices
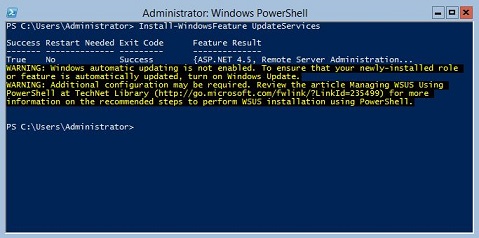
Figure 1: The expected output of Install-WindowsFeature UpdateServices
Additional Information:
The following WSUS role services can be installed using Windows PowerShell.
- Windows Internal Database (WID)
- WSUS Services
- Database
The WID Database and WSUS Services role services are installed after running command Install-WindowsFeature UpdateSevices.
Administration
The following Windows PowerShell cmdlets are available for managing the WSUS role on a server running Windows Server Core.
- Add a specified client computer to a specified target group:
Add-WsusComputer -Computer <computername> -TargetGroupName <groupname>
- Approve an update to be made available to clients:
Approve-WsusUpdate -Update <update> -Action <approvalaction> -TargetGroupName <groupname>
In this command, the -Update switch accepts an update object retrieved using the Get-WsusUpdate command (see below). The value of -Action can be Install, Uninstall, or NotApproved. The latter does not decline the update but removes a preexisting approval action.
- Decline an update:
Deny-WsusUpdate
As before, the -Update switch accepts an update object retrieved using the Get-WsusUpdate command (see below).
- List all update classifications (for example, security updates or critical updates) available in the system:
Get-WsusClassification
- List one or more WSUS client computers:
Get-WsusComputer
This command has many switches for filtering the list of client computers that it returns. See Get-WsusComputer (External Link) for the full list.
- List all products for which WSUS is providing updates:
Get-WsusProduct
- Display a list of updates in WSUS that meet certain criteria:
Get-WsusUpdate
For a list of the switches that can be used to filter the output, see Get-WsusUpdate (External Link).
- Begin the WSUS cleanup process:
Invoke-WsusServerCleanup
This command can start multiple cleanup tasks. See Invoke-WsusServerCleanup (External Link) for the relevant switches.
- Enable or disable specified types of updates (for example, security updates or driver updates):
Set-WsusClassification
Use filtered output from Get-WsusClassification to run this command.
- Enable or disable updates for specified products:
Set-WsusProduct
Use filtered output from Get-WsusProduct to run this command.
- Specify whether WSUS synchronizes with an upstream WSUS server or Microsoft's update servers:
Set-WsusServerSynchronization
Several switches can be used to specify settings for communicating with an upstream server. See Set-WsusServerSynchronization (External Link) for details.
Affected Products
Microsoft Windows Server 2016, Microsoft Windows Server 2019, Microsoft Windows Server 2022, Microsoft Windows Server 2025, Microsoft Windows 2012 Server, Microsoft Windows 2012 Server R2Products
C Series, HS Series, Modular Infrastructure, Rack Servers, Tower Servers, XE Servers, XR Servers, OEM Server SolutionsArticle Properties
Article Number: 000121387
Article Type: How To
Last Modified: 01 May 2026
Version: 11
Find answers to your questions from other Dell users
Support Services
Check if your device is covered by Support Services.