How to set the Dell Security Management Server to Block or Ignore a Configured Domain
Summary: If on a Dell Security Management Server with multiple domains defined, a child domain or a parent domain is inadvertently added, they are not able to be removed. How to block or ignore a configured domain in Dell Security Management Server. ...
This article applies to
This article does not apply to
This article is not tied to any specific product.
Not all product versions are identified in this article.
Instructions
Affected Products:
- Dell Security Management Server
Affected Versions:
- v9.8.2 and Later
To cope with domains that are not needed, Dell has introduced a feature that allows an administrator to block a domain from the user reconciliation process. When the domain that is not needed is added to this block list, and the domain’s alias list is empty, then it is no longer used to reconcile user accounts or to validate user accounts during device activations.
Warning:
- Modifying the database and configuration files for a Dell Security Management Server may lead to access issues to data or the Remote Management Console and WebUI.
- If you have any concerns on performing the below steps, contact Dell Data Security ProSupport. For how to contact support, reference ProSupport’s International Contact Numbers.
This process differs depending on the version of Dell Security Management Server. Click the appropriate version for more information.
v11.1.2 and Later
To block a domain:
- Locate the domain’s Credant Identifier (CID) by running the following query against the Dell Data Security Management Server database.
select cid,displayname from entity where EntitysubType = '2'
The results of the query look like the image below: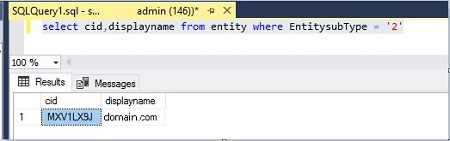
- Locate the result for the domain that is to be removed. The value in the CID column is the CID that is needed in subsequent steps. In the sample results above, the domain that is being removed is domain.com with CID, MXV1LX9J. This CID is used throughout the remaining examples.
- Open the Spring.config file for the Core Server service. By default, the Spring.config file is installed to the C:\Program Files\Dell\Enterprise Edition\Core Server folder.
- Locate the MigrationBlocklist property within the Spring.config file. By default the property is commented out, prepended with
<!--"and appended with"-->as shown in the following example and image.<object id="DomainCache" singleton="true" type="Credant.Authorization.DomainCache.DomainCache, Credant.Authorization.DomainCache"> <property name="Logger" ref="DataAccessLogger" /> <property name="DomainDataAccess" ref="DomainDataAccess" /> <property name="RefreshFrequency" value="300" /> <property name="TryAllAuthTypes" value="false" /> <!--<property name="MigrationBlocklist" ref="mbl" />--> </object> - Uncomment the MigrationBlocklist property by removing the comment marks
<!--"and"-->from the beginning and end of the line respectively. The following example and image show that the property is uncommented.<object id="DomainCache" singleton="true" type="Credant.Authorization.DomainCache.DomainCache, Credant.Authorization.DomainCache"> <property name="Logger" ref="DataAccessLogger" /> <property name="DomainDataAccess" ref="DomainDataAccess" /> <property name="RefreshFrequency" value="300" /> <property name="TryAllAuthTypes" value="false" /> <property name="MigrationBlocklist" ref="mbl" /> </object>
- Locate the object section with the id attribute mbl. By default the section is commented out, prepended with
<!--"and appended with"-->, as shown in the following example.<!-- <object id="mbl" type="System.Collections.Generic.List<String>"> <constructor-arg name="collection"> <list element-type="string"> <value>VALUEHERE</value> </list> </constructor-arg> </object> -->
- Remove the comment flags
<!--"and"-->from the beginning and end of the object section respectively.<object id="mbl" type="System.Collections.Generic.List<String>"> <constructor-arg name="collection"> <list element-type="string"> <value>VALUEHERE</value> </list> </constructor-arg> </object>
- Add the CID identified earlier to the value tag. Using the CID value from the example, MXV1LX9J, the object section is as follows once it is uncommented and the value is updated.
<object id="mbl" type="System.Collections.Generic.List<String>"> <constructor-arg name="collection"> <list element-type="string"> <value>MXV2LX9J</value> </list> </constructor-arg> </object>Note: If multiple domains are required to be blocked or ignored, additional<value>tags can be created. Example:<object id="mbl" type="System.Collections.Generic.List<String>" > <constructor-arg name="collection"> <list element-type="string"> <value>MXV1LX9J</value> <value>CID2HERE</value> </list> </constructor-arg> </object>
- Save the file and then restart the Dell Core Server service. The domain denoted by the CID in the value tag, MXV1LX9J from the example, is no longer used when reconciling users.
v9.8.2 to 11.1.1
To block a domain:
- Locate the domain’s Credant Identifier (CID) by running the following query against the Dell Data Security Management Server database.
select cid,displayname from entity where EntitysubType = '2'
The results of the query look like the image below:
- Locate the result for the domain that is to be removed. The value in the CID column is the CID that is needed in subsequent steps. In the sample results above, the domain that is being removed is domain.com with CID, MXV1LX9J. This CID is used throughout the remaining examples.
- Open the Spring.config file for the Core Server service. By default, the Spring.config file is installed to the C:\Program Files\Dell\Enterprise Edition\Core Server folder.
- Locate the MigrationBlacklist property within the Spring.config file. By default the property is commented out, prepended with
<!--" and appended with "-->,as shown in the following example and image.<object id="DomainCache" singleton="true" type="Credant.Authorization.DomainCache.DomainCache, Credant.Authorization.DomainCache"> <property name="Logger" ref="DataAccessLogger" /> <property name="DomainDataAccess" ref="DomainDataAccess" /> <property name="RefreshFrequency" value="300" /> <property name="TryAllAuthTypes" value="false" /> <!--<property name="MigrationBlacklist" ref="mbl" />--> </object> - Uncomment the MigrationBlacklist property by removing the comment marks
<!--"and"-->from the beginning and end of the line respectively. The following example and image show that the property is uncommented.<object id="DomainCache" singleton="true" type="Credant.Authorization.DomainCache.DomainCache, Credant.Authorization.DomainCache"> <property name="Logger" ref="DataAccessLogger" /> <property name="DomainDataAccess" ref="DomainDataAccess" /> <property name="RefreshFrequency" value="300" /> <property name="TryAllAuthTypes" value="false" /> <property name="MigrationBlacklist" ref="mbl" /> </object> - Locate the object section with the id attribute mbl. By default the section is commented out, prepended with
<!--"and appended with"-->, as shown in the following example.<!-- <object id="mbl" type="System.Collections.Generic.List<String>"> <constructor-arg name="collection"> <list element-type="string"> <value>VALUEHERE</value> </list> </constructor-arg> </object> -->
- Remove the comment marks
<!--"and"-->from the beginning and end of the object section respectively. - Add the CID identified earlier to the value tag. Using the CID value from the example, MXV1LX9J, the object section is as follows once it is uncommented and the value is updated.
<!-- <object id="mbl" type="System.Collections.Generic.List<String>"> <constructor-arg name="collection"> <list element-type="string"> <value>MXV1LX9J</value> </list> </constructor-arg> </object>
Note: If multiple domains are required to be blocked or ignored, additional<value>tags can be created. Example:<object id="mbl" type="System.Collections.Generic.List<String>" > <constructor-arg name="collection"> <list element-type="string"> <value>MXV1LX9J</value> <value>CID2HERE</value> </list> </constructor-arg> </object>
- Save the file and then restart the Dell Core Server service. The domain denoted by the CID in the value tag, MXV1LX9J from the example, is no longer used when reconciling users.
In addition to blocking the domain, all aliases must be removed from the domain in the Dell Security Management Server Console.
To remove aliases from the domain:
- Log in to the Dell Data Security Server Administration Console. For information about how to log in reference How to Access the Dell Data Security Server Administration Console
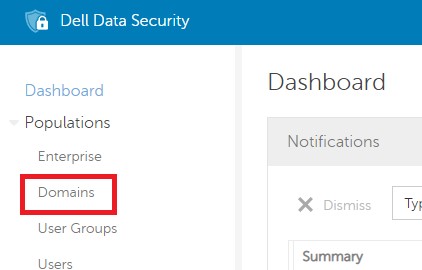
- Expand the Populations link on the left and click Domains.
- Click the Domain Name of the domain that is to be removed from use during activation to go to the Domain Detail page.
- Select the Settings tab at the top of the Domain Detail page.

- Locate the aliases that are assigned to the domain at the bottom of the settings tab.

- Select each alias and click the Remove Selected button.
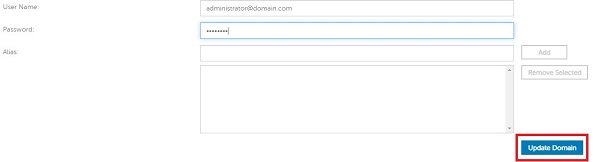
- Once all aliases have been removed, enter the password for the domain user that is configured and click the Update Domain button.
- This domain is no longer matched to any user accounts that attempt an activation and is no longer used.
To contact support, reference Dell Data Security International Support Phone Numbers.
Go to TechDirect to generate a technical support request online.
For additional insights and resources, join the Dell Security Community Forum.
Affected Products
Dell EncryptionArticle Properties
Article Number: 000124103
Article Type: How To
Last Modified: 20 May 2025
Version: 21
Find answers to your questions from other Dell users
Support Services
Check if your device is covered by Support Services.