Cambio delle modalità SATA: Da AHCI a RAID su computer Windows Dell Data Security
Summary: Informazioni su come passare dalla modalità SATA AHCI a RAID sui computer Windows Dell Data Security. Segui le istruzioni passo passo per una transizione fluida.
This article applies to
This article does not apply to
This article is not tied to any specific product.
Not all product versions are identified in this article.
Instructions
Prodotti interessati:
- Dell Encryption Enterprise
- Dell Encryption Personal
- Dell Data Protection | Enterprise Edition
- Dell Data Protection | Personal Edition
Nota: Dell Encryption non supporta
Intel VMD with Xeon class processors.
Per modificare la modalità di funzionamento SATA da AHCI a RAID:
Avvertenza: la procedura che segue prevede una modifica del Registro di sistema di Windows:
- Eseguire il backup del Registro di sistema prima di procedere, consultare Come eseguire il backup e il ripristino del Registro di sistema in Windows
.
- Quando si modifica il Registro di sistema, il computer potrebbe smettere di rispondere al riavvio successivo.
- Contattare i numeri di telefono internazionali del supporto di Dell Data Security per assistenza in caso di dubbi sull'esecuzione di questa procedura.
- A seconda che sia richiesta la modalità AHCI o RAID SATA, è necessario abilitare o disabilitare le seguenti impostazioni di registro:
HKEY_LOCAL_MACHINE\SYSTEM\CurrentControlSet\Services\

iastor = 0 (these correlates to the Intel RAID, 3 means off, 0 means on)
iastorv start = 0 (these correlates to Windows RAID, 3 means off, 0 means on)
iaVROC start = 0 (these correlate to the Intel VMD / Intel VROC drivers, 3 means off, 0 means on)
StorAHCI start = 0 (these correlate to the Microsoft AHCI drivers, 3 means off, 0 means on)
- Dopo aver modificato l'impostazione di registro, aprire un prompt dei comandi con privilegi elevati ed eseguire il comando
bcdedit /set {current} safeboot minimal.
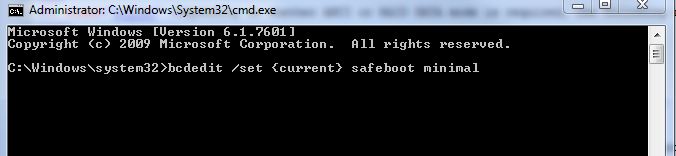
Figura 1. (solo in inglese) Eseguire un comando bcdedit /set {current} safeboot minimal
- Riavviare il computer.
- Al riavvio, accedere al BIOS premendo F2.
Nota: Il fornitore dell hardware può modificare i comandi di accesso al BIOS. Consultare il fornitore dell'hardware per il comando della funzione corretto.
- Nel BIOS, modificare SATA Operation in AHCI o RAID (a seconda dei requisiti).
- Per disabilitare Intel VMD, individuare il flag della tecnologia appropriato all'interno del BIOS. Può chiamarsiVMD Intel, Intel VROC o avere un altro nome simile. Fare riferimento alla documentazione del produttore per eventuali chiarimenti che potrebbero essere necessari.
Nota: SATA Operation può essere nidificato all'interno dei sottomenu del BIOS. Per ulteriori informazioni, consultare il manuale hardware del modello in uso.
- Uscire dal BIOS e riavviare il computer. Windows si avvia automaticamente in modalità provvisoria e aggiorna il driver richiesto.
- Ancora in modalità provvisoria, apri un altro prompt dei comandi ed esegui il comando
Bcdedit /deletevalue {current} safeboot.
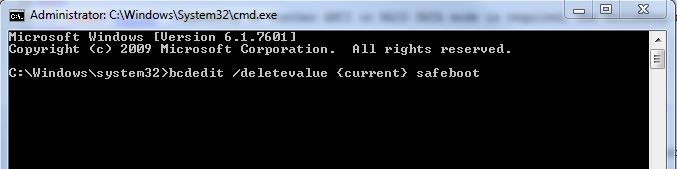
Figura 2. (solo in inglese) Eseguire un comando Bcdedit /deletevalue {current} safeboot
- Riavviare e attendere l'avvio di Windows.
Nota: Se System Data Encryption (SDE) è abilitato, potrebbe essere necessario un ripristino SDE dopo il passaggio da una modalità all'altra, in base alla procedura descritta in dettaglio nella Guida al ripristino in https://www.dell.com/support/home oppure consultare Come eseguire il pacchetto di ripristino Dell Encryption Enterprise/Dell Encryption Personal.
Per contattare il supporto, consultare l'articolo Numeri di telefono internazionali del supporto di Dell Data Security.
Accedere a TechDirect per generare una richiesta di supporto tecnico online.
Per ulteriori approfondimenti e risorse accedere al forum della community Dell Security.
Additional Information
Videos
Affected Products
Dell EncryptionArticle Properties
Article Number: 000124714
Article Type: How To
Last Modified: 06 May 2024
Version: 12
Find answers to your questions from other Dell users
Support Services
Check if your device is covered by Support Services.